By: Team Alfred Since: Sept 2019 Licence: MIT
- 1. Introduction
- 2. Setting up
- 3. Design
- 4. Implementation
- 5. Documentation
- 6. Testing
- 7. Dev Ops
- Appendix A: Product Scope
- Appendix B: User Stories
- Appendix C: Use Cases
- C.1. Use case: Delete an Entity Type (Participant, Mentor, Team)
- C.2. Use case: Find an Entity of a specific Entity Type (Participant, Mentor, Team)
- C.3. Use case: Create an Entity of a specific Entity Type(Participant, Mentor, Team)
- C.4. Use case: Update an Entity of a specific Entity Type (Participant, Mentor, Team)
- C.5. Use case: Import external data through a CSV file
- C.6. Use case: Export data to an external CSV file.
- C.7. Use case: View the Leaderboard
- C.8. Use case: View the Leaderboard with Tiebreaks
- C.9. Use case: Find the top scoring K Teams
- C.10. Use case: Find the top scoring K Teams with TieBreaks
- C.11. Use case: Find the ranking of all Teams
- Appendix D: Non Functional Requirements
- Appendix E: Glossary
- Appendix F: Product Survey
- Appendix G: Instructions for Manual Testing
1. Introduction
Alfred is a desktop application to help Hackathons' Human Resource Managers organise a Hackathon event more efficiently and in an organized fashion. Currently, organising a Hackathon is no mean feat, as it requires coordinating across different stakeholders and managing different sources of data (such as participant and mentor information). Instead of managing this process across different media such as Excel spreadsheets and emails, Alfred allows you to coordinate everything in a single, convenient-to-use platform.
In particular, Alfred is a Command Line Interface (CLI) application packaged with a Graphical User Interface (GUI). This means that users are expected to interact with Alfred mainly through the Command Line, but each command executed will invoke a visual response in Alfred.
Any help on the development of Alfred would be greatly appreciated, and there are a couple of ways for you to do so - Contribute to Alfred’s codebase by expanding its features - Improve test coverage - Propose and implement improvements to current features.
This guide seeks to not only kick-start your journey as a contributor to Alfred by quickly getting you up to speed with how Alfred’s codebase and inner workings function, but also hopes to serve as a useful reference to current contributors in times or confusion or when faced with difficulties.
2. Setting up
Refer to the guide here.
3. Design
Alfred was designed with Object-Oriented Programming (OOP) principles in mind, with a focus on respecting the SOLID principles. This section serves to give a description of the major components in the architecture of Alfred. Subsequent sections will provide a lot more information on the inner workings of individual components and how different components interact with each other for Alfred’s various features.

3.1. Architecture

The Architecture Diagram given above explains the high-level design of the App. Given below is a quick overview of each component.
-
At app launch: Initializes the components in the correct sequence, and connects them up with each other.
-
At shut down: Shuts down the components and invokes cleanup method where necessary.
Commons represents a collection of classes used by multiple other components.
The following class plays an important role at the architecture level:
LogsCenter : Used by many classes to write log messages to the App’s log file.
The rest of the App consists of four components.
Each of the four components
-
Defines its API in an
interfacewith the same name as the Component. -
Exposes its functionality using a
{Component Name}Managerclass.
For example, the Logic component (see the class diagram given below) defines it’s API in the Logic.java interface and exposes its functionality using the LogicManager.java class.
The Sequence Diagram below shows how the components interact with each other for the scenario where the user issues the command delete 1.
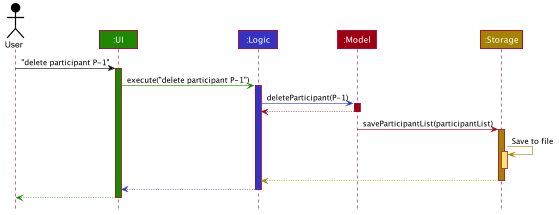
delete 1 commandThe sections below give more details of each component.
3.2. UI component
|
Structure of the UI Component
UI image and description to be updated with the later milestones.
|
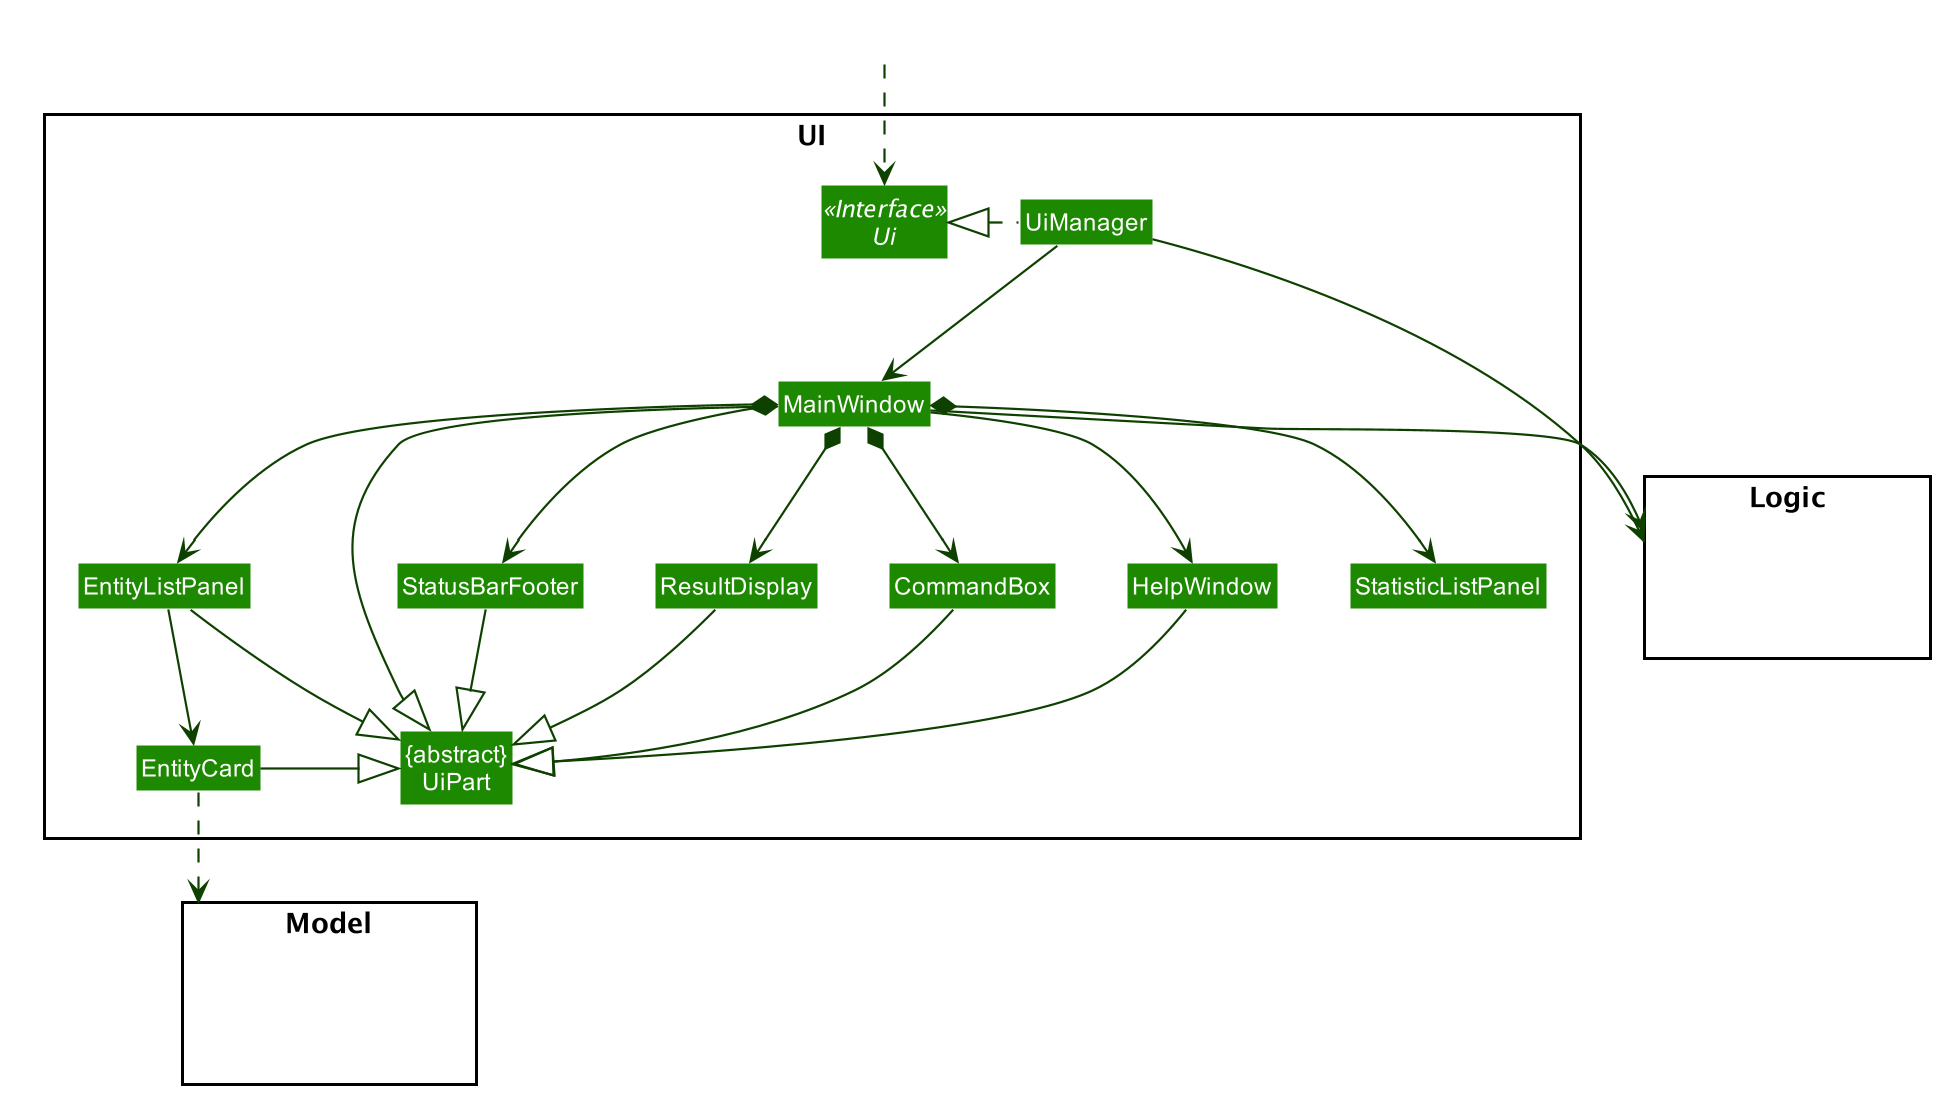
API : Ui.java
The UI consist of a MainWindow that is made up of different parts like StatusBarFooter. , ResultDisplay and more. All these including MainWindo , inherit from the abstract UiPart class.
The EntityListPanel consist of any number EntityCard (which also inherits from the abstract UiPart class). The EntityCard will dynamically generate cards of different entity type according to the data provided by Model, hence it will have a soft dependency on Model.
The UI component uses JavaFX UI framework, with the support of third party libraries JFeonix and FontAwesomeFX. The layout of these UI parts are defined in matching .fxml files that are in the src/main/resources/view folder. For example, the layout of the MainWindow is specified in MainWindow.fxml.
The UI component,
• Executes user commands using the Logic component.
• Listens for changes to Model data so that the UI can be updated with the modified data.
The UI component uses JavaFx UI framework. The layout of these UI parts are defined in matching .fxml files that are in the src/main/resources/view folder. For example, the layout of the MainWindow is specified in MainWindow.fxml
The UI component,
-
Executes user commands using the
Logiccomponent. -
Looks at the prefix commandType given in the CommandResult(returned after every Command is executed), as displays the specific
EntityListPanelrespectively.
3.2.1. Design Considerations
These are some design considerations for the UI component.
Aspect: Ways to update different entity list
-
Alternative 1: The system collects information form Model after each command, to display the entity list as the command result.
-
Pros: Easy to implement with existing Model interface
-
Cons: High degree of dependency between UI components and Model components(high coupling).
-
Cons: Updating of the data is not automatic.
-
-
Alternative 2: The system uses and Observable interface that observes for changes in the three types of list, namely ParticipantList, TeamList and MentorList.
-
Pros: Low degree of dependency between UI and Model components(low coupling).
-
Pros: The data in GUI is automatically updated.
-
Cons: Harder to implement
-
Decision: We have decided to go with alternative 2 because low dependency will ensure testability and maintainability of the system.
Aspect: How to generate EntityCard and ListPanel to display different entities
-
Alternative 1: Implement different classes that inherits EntityCard, like TeamCard, ParticipantCard and MentorCard respectively. Additionaly, implement different classes that extents ListPanel, like TeamListPanel and more.
-
Pros: Easy to implement and style respective cards and list panels.
-
Cons: Logic is duplicated many times, one for each type of entity. For example, ParticipantCard and Mentorcard are similar for most fields, except the extra field of Organisation and Specialisation.
-
Cons: Clutters the system with extra classes.
-
-
Alternative 2: Implement a EntityCard class with a barebone structure. Then dynamically add and morph the fields in Entity card according to the entity type.
-
Pros: No duplication of the same logic and implementation, as abstraction was used.
-
Pros: Lesser class files required.
-
Cons: Harder to implement.
-
Decision: We have decided to proceed with alternative 2 because this alternative employs that theory of abstraction in programming, and it there is less redundant code in this implementation.
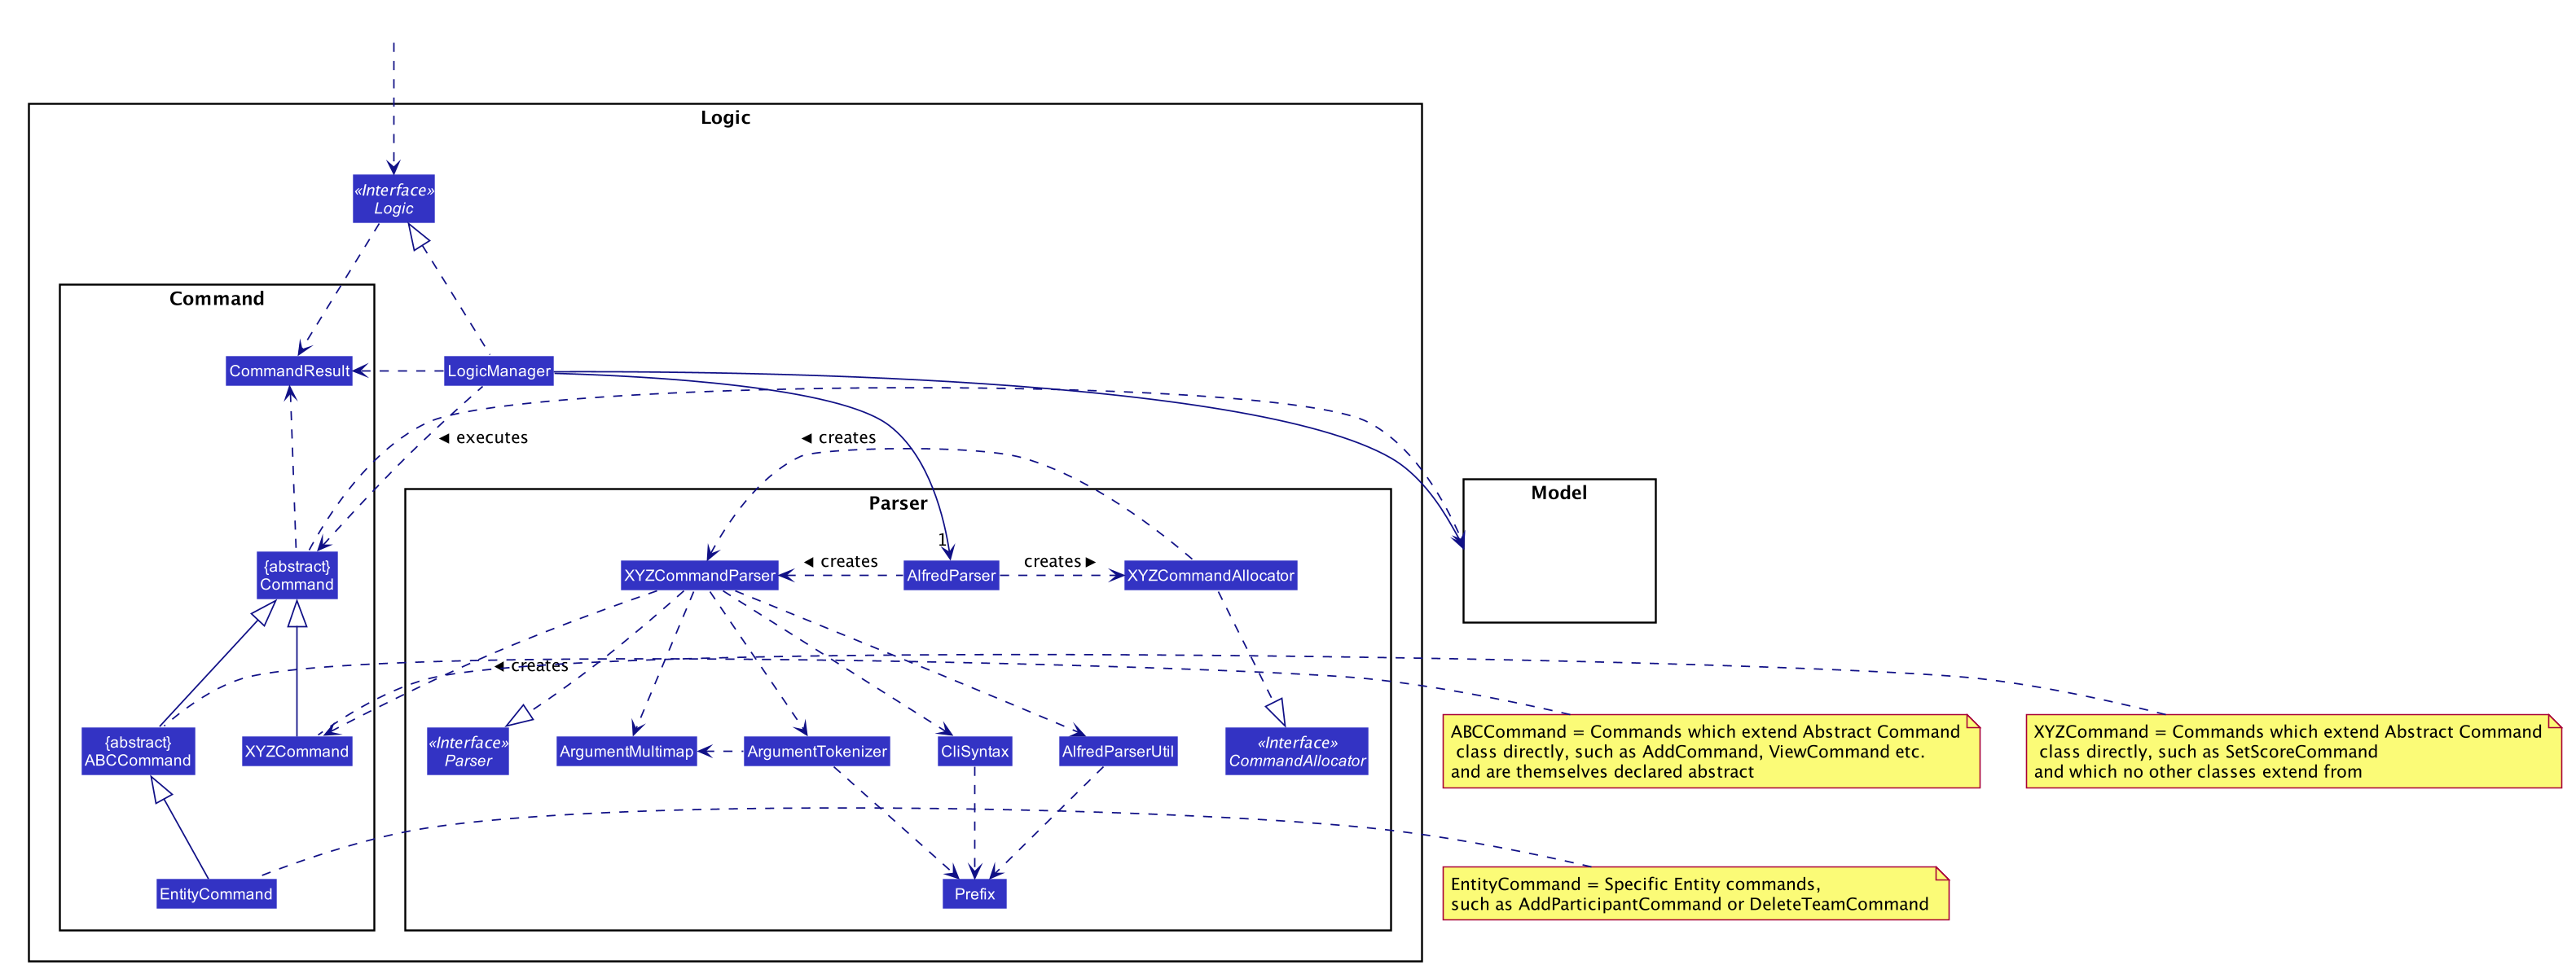
3.3. Logic component
The Logic component of Alfred handles the various commands within Alfred and
the parsing of the user input to convert them into such commands.
It’s primary purpose is to execute these commands which leads to an update in Model
(depending on the command) and return an appropriate feedback message to the UI component to
display to the user. It does this through a set of allocators, parsers and commands.
Allocators are relevant for commands which involve a specific entity, such as find participant. The
allocator will allocate the appropriate FindParticipantCommandParser to parse the input. If the input
is valid, parsers will then generate a command object to be returned. This command object is then
executed in LogicManager. However, Logic does not concern itself with the details of the execution.
That is abstracted away via polymorphism and delegated to Model. Executing a command then returns
a CommandResult object, which will then be processed to conclude the command execution flow.
If any errors are encountered along the way, an error is thrown and the flow terminates.
The Logic component’s primary structure is unchanged from the AB3 codebase,
though it has been heavily modified to accommodate the new commands implemented with regards to
Alfred, as can be seen from the class diagram below which highlights the high level structure
of the logic component.
API :
Logic.java
-
Logicuses theAlfredParserclass to parse the user command. -
This can result in one of two possibilities:
-
a new
CommandAllocatorobject is created to allocate the user input to appropriate entity-specificParser. TheCommandAllocator'sallocatemethod then returns a new Command object which is executed by the LogicManager, or -
the appropriate
Parseris directly called if no specifying is required and returns a newCommandobject which is executed by theLogicManager.
-
-
The command execution can affect the
Model(e.g. adding a participant or deleting a team). -
The result of the command execution is encapsulated as a
CommandResultobject which is passed back to theUi. -
In addition, the
CommandResultobject can also instruct theUito perform certain actions, such as displaying help to the user.
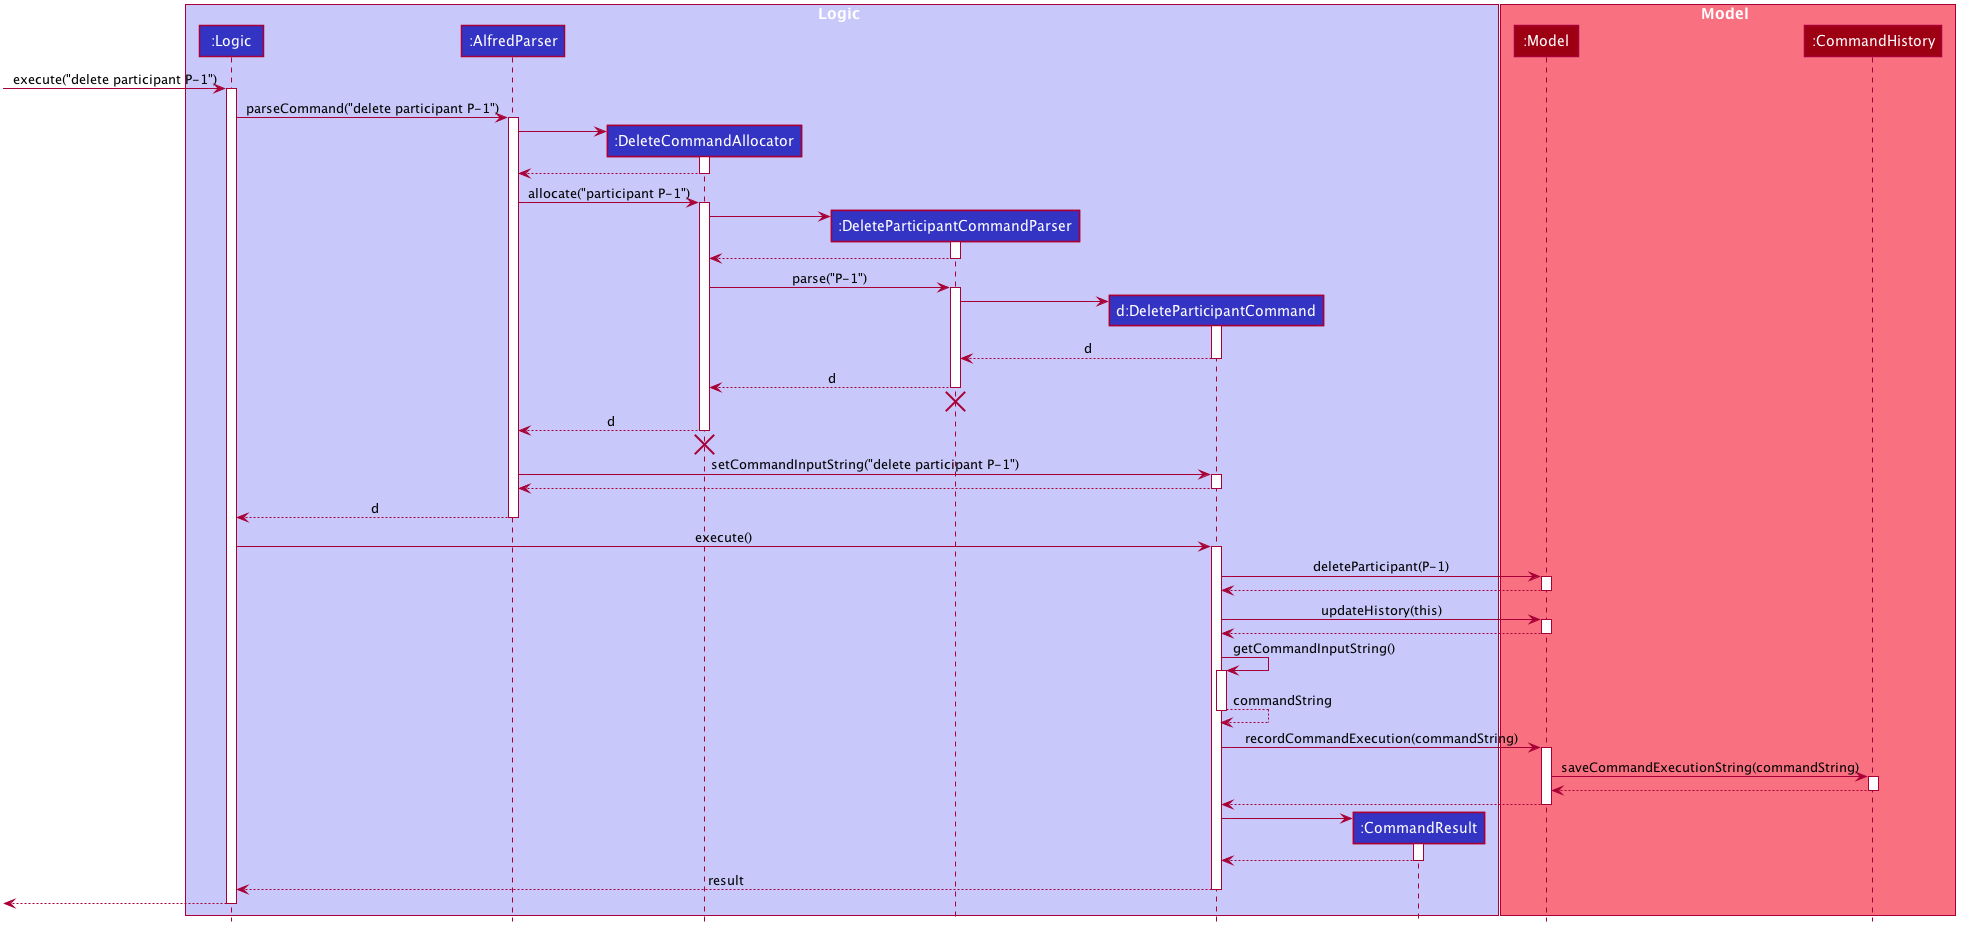
Given below is the Sequence Diagram for interactions within the Logic component for the execute("delete participant P-1") API call.

delete 1 Command
The lifeline for DeleteParticipantCommandParser and DeleteCommandAllocator should end at the destroy marker (X) but due to a limitation of PlantUML, the lifeline reaches the end of diagram.
|
3.4. Model component
3.4.1. High Level Design Overview
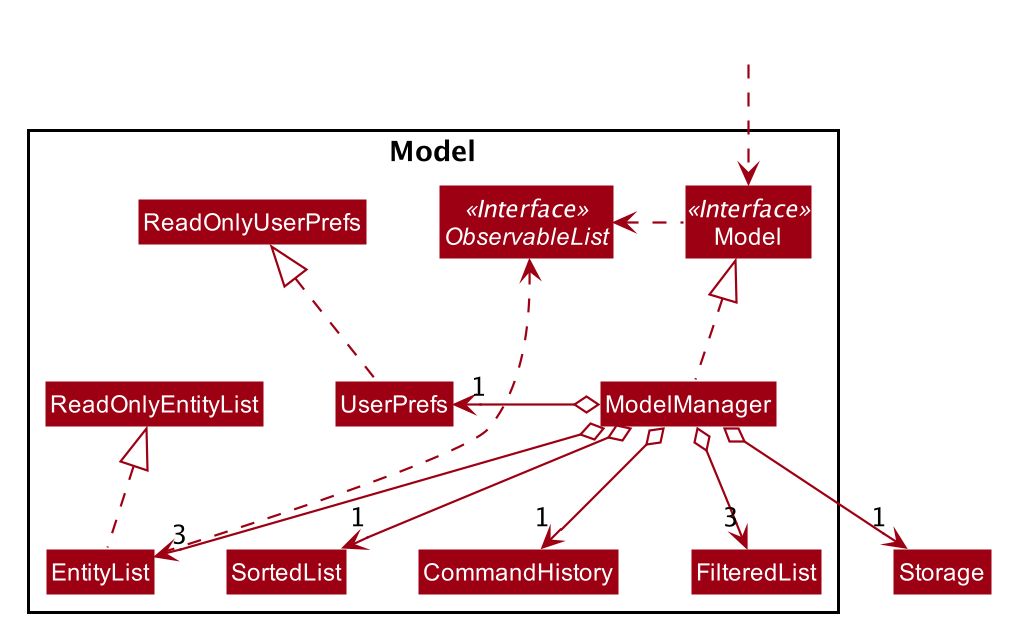
API : Model.java
The Model,
-
stores a
UserPrefobject that represents the user’s preferences. -
stores other things like
Storage,CommandHistorythat also depend onModel -
stores the lists of our various entities.
-
Modelis the bridge betweenLogicandStorageand provides an abstraction of how the data is stored in memory. -
It exposes multiple
ReadableEntityListwhich only has the list method to remindLogicthat the data given should not be modified. -
The UI can be bound to these lists so that it automatically updates when the contents of the list change.
-
At the heart of the
Modelare observable lists which allow for the dynamic updating of the UI. -
The
Modelinterface also serves as an API through which controller can edit the data stored in memory.
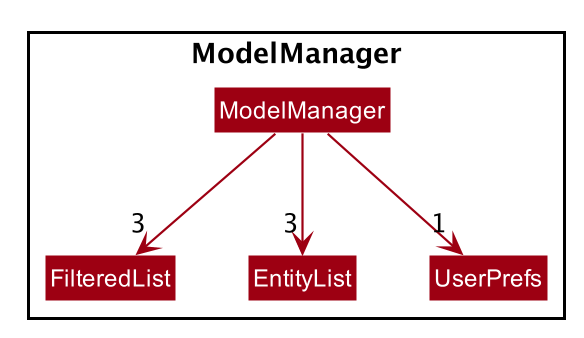
ModelManager
-
ModelManagerimplements all the methods exposed by theModelinterface. The 3 most important aspects for its in-memory storage and UI are theFilteredList,EntityListandUserPrefsobjects. As mentioned above,ModelManageralso consists of other components, but these are not reflected in the diagrams for brevity and clarity.
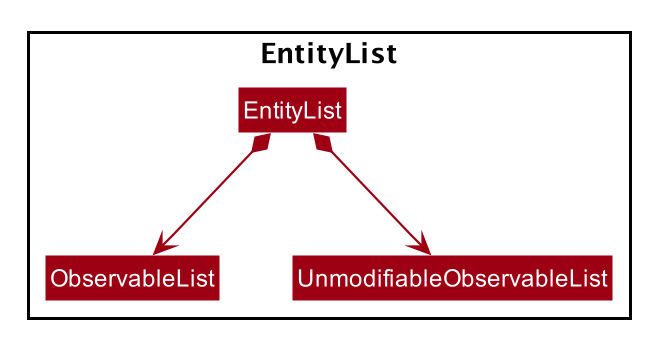
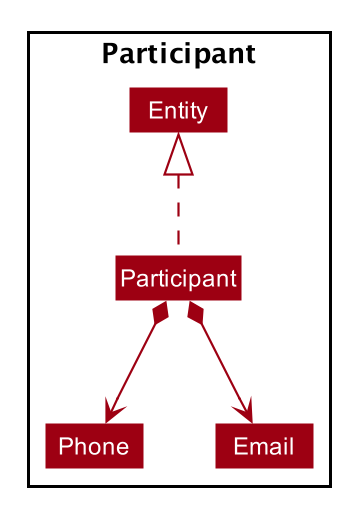
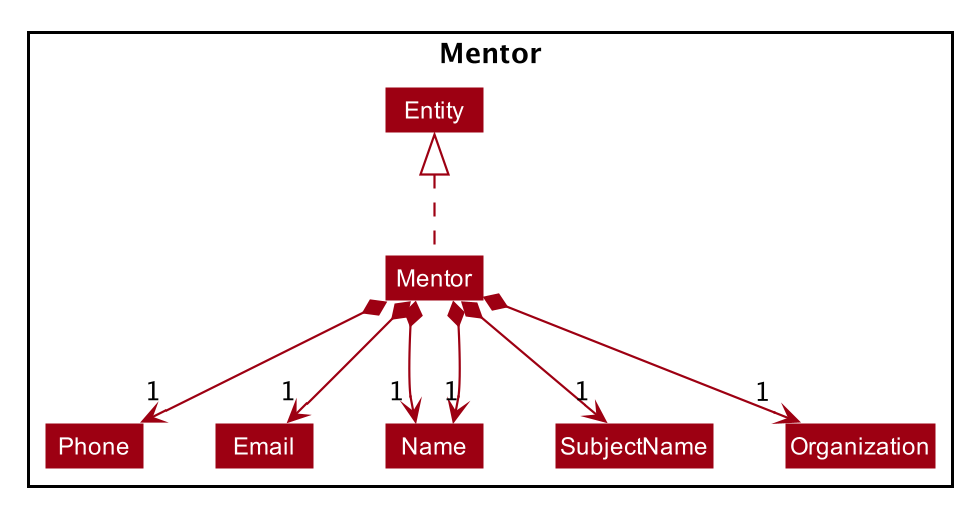
Each EntityList is also further subclassed into ParticipantList, MentorList, TeamList. Each of
these lists can be seen as an individual address book from the original AB3 project. The following diagrams show
the structure of these Entity objects within each list. These Entity objects are the building blocks of Alfred.

3.4.2. Usage
When the ModelManager object is first created upon starting the application, the existing data is loaded from
the disc via methods on the Storage object. However, if there are any bugs in the process, perhaps due
to corrupted data, a new EntityList is instantiated rather than run the risk of working with outdated data.
Due to its role as the API of the application, all calls which require access to the Entity objects will be done
through Model and not via the lists directly. These operations are listed as public methods on the Model interface.
For operations which would entail mutating the data within the
EntityList objects in any form, Model automatically communicates with the Storage object to save the data.
The saving logic can be found within the Storage object and thus Model only needs to pass it EntityList objects
on its end. The same applies for the other attributes in Model, such as CommandHistory; ModelManager will
automatically communicate with it for you.
If there are any errors along the way, it will be logged but the error would be handled within Model itself.
Moreover, if there is an error during a Model operation, the data will not be saved to disc.
3.4.3. Design Considerations
These are some design considerations for Model.
Aspect: Synchronization of data
-
The role of
ModelManageris to ensure that the data is in sync with each other across all 3EntityListobjects. The reason behind this is because for example, theParticipantobject inParticipantListis a separate object from the one insideTeam. It was not possible due to make theParticipantobject hold a reference toTeamdue to serialization issues onStorage. -
As such, for each CRUD operation,
ModelManagerhas to perform validation to ensure that the data modified/added is sync across all 3EntityListobjects. -
This was also the reason why
Storagewas moved into theModelobject, as in the current implementation of Alfred, onlyModelManagerneeds to communicate withStorage. This would hence help to better ensure data integrity.
Aspect: Single Responsibility Principle and Inheritance
-
Each class in
Modelis only responsible for a single task. For example,TeamListis only concerned with managing theTeamentities stored in it. This would help to improve testability and code quality, especially since the size of theModelcodebase is substantial. -
Inheritance was used to show links between related objects. For
Model, the two objects whose subclasses are related areEntityListandEntity. Inheritance was used to show this relationship and to reduce the need for code duplication.
Aspect: Open Closed Principle
-
Modelexposes many functions. However, in line with the Open Closed Principle, modifications toModelcome in the form of exposing new methods on it and creating new attributes on theModelManagerobject. The methods onModelManagerwere also implemented as simply as possible so that future methods can build on them. This way, future modifications do not need to edit existing code, reducing the likelihood of regression bugs.
Aspect: Design of the Entity objects
-
Alternative 1: Make the
Teamobject the single source of truth (onlyTeamhas references toParticipantandMentor)-
Pros: This would facilitate the serialization on
Storage -
Cons: As
ParticipantandMentorobjects no longer hold a reference to theTeamobject, it is now possible for their fields to be different from their counterparts stored inTeam, requiring Alfred to do significant validation
-
-
Alternative 2: Make
Participant,MentorandTeamobjects store a bidirectional reference to each other-
Pros: The
Participantobjects in theTeam's participants field are exactly the same objects stored in theParticipantList, reducing the need for validation code as they will never be out of sync -
Cons:
Storageserialization cannot handle bidirectional associations
-
We decided to opt for Alternative 1 as there was no easy solution to solve the issues Storage had with
bidirectional associations. Also, the validation code for Alternative 1 was implemented early and employed
many defensive programming practices, reducing the likelihood of bugs affecting data integrity.
3.4.4. Future Extensions
-
As the single source of truth for the application in runtime, there are many small functions on
ModelManagernow. These functions are implemented directly in the file itself. In the future, it may be better to abstract these functions out into smaller modules as per the Dependency Inversion Principle. It was not done for v1 of Alfred as refactoring these methods would block developers and slow down feature development velocity. However, as Alfred scales, it is recommended that this refactoring be done.
3.5. Storage component
The Storage component handles the complexities of storing to and reading from disc the Alfred’s data. The Storage component transforms the AB3 implementation to support the storage of Alfred’s 3 main EntityLists (ParticipantList, MentorList and TeamList) as well as User Preferences. The 3 EntityLists are the main data objects in Alfred, and Storage’s purpose is to transform each of the EntityLists into a format that is JSON-Serializable and store the data for each EntityList in separate JSON files. Storage also saves the User Preferences in a JSON file.
| The Food- and Swag-related features scheduled for release in v2.0, will require some changes in Storage to be made. To be more specific, Storage would need to be updated to support the storage of these other essential data, above and beyond the current support for the storage of the EntityLists. |
3.5.1. Purpose and Usage of Storage Component

API : AlfredStorage.java
The Storage component saves and reads 4 different data types:
-
UserPrefs: User Preferences for Alfred (such as the last used Window Size of the application) -
ParticipantList: Information of all the Participants in Alfred -
MentorList: Information of all the Mentors in Alfred -
TeamList: Information of all the Teams in Alfred
All 4 data types are stored to disc in JSON files. The data is read from the JSON files when Alfred is first start up. It is also important to note that saving is automatic in Alfred. This means that after the execution of each command, the data in Alfred will automatically be saved to disk. This frees the user from the hassle of constantly calling some form of saving functionality, and ensures that the information in storage is as up-to-date as possible.
| When reading the JSON files from memory at application start-up, any kind of data corruption in the JSON files will cause Alfred to completely discard the file and re-initialise the data type. If there are missing fields in the JSON file, invalid values in the individual fields or any kind of error while reading the data from the JSON file, Alfred will re-initialise the data type with an empty data type, persisting this newly initialised data type object to disc. |
3.5.2. Interacting with the Storage Component
The Storage Component uses the Facade Design Pattern, and exposes the functionality of all the Storage classes to the Model Component solely through the AlfredStorage interface. The exposed functionality was deliberately kept simple, allowing the following methods for each of the 4 data types:
-
getFilePath(): Retrieves the location of the JSON file -
save(): saves the data to the JSON file -
read(): reads the data from the JSON file
The Storage component handles the complexities of actually storing to and reading from disc the 4 different data types. As can be seen in the figure at the start of this section, underlying AlfredStorage’s simple interface are several classes that ensure the accurate storing and retrieval of Alfred’s data from disc. The following are some details of the Storage Component:
-
Each EntityList has a designated Storage class (i.e. for Participant, you have
ParticipantListStorage,JsonParticipantListStorageetc.). Hence, for the rest of this explanation, Entity will be used as a generic term for Participants/Mentors/Teams. -
The class implementing the
EntityListStorageinterface isJsonEntityListStorage. This class is responsible for providing the read/save functionality for the entire EntityList toAlfredStorageManager. -
In order to save the entire
EntityListin JSON, the classJsonSerializableEntityListimplements the logic for serialization for the collection of Entities (i.e. EntityList). This is achieved by converting theEntityListto aList<JsonAdaptedEntity>. -
In order to save each individual Entity, the Entity is in turn converted to a
JsonAdaptedEntityobject. TheJsonAdaptedEntityclass contains the fields of each Entity that are relevant for saving to disc. Hence, this class is directly serialized into JSON, and also has methods for converting the serialized object back into an Entity object forAlfredStorageto return toModelManager. -
The conversion of the
JsonAdaptedEntityobject to fields in a JSON file is done by Java’s Jackson library.
The following is a concrete example of the storage of a ParticipantList in JSON:
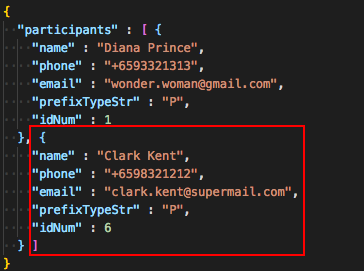
The figure above shows the contents of the JSON file storing a ParticipantList containing 2 participants. The data in the red box
corresponds to the fields in a single Participant object. These fields are generated by the Jackson library from the serializable JsonAdaptedParticipant
object, and the entire list of participants in the JSON file is in turn generated because the JsonSerializableParticipantList class converts
the ParticipantList to a List of JsonAdaptedParticipant.
3.5.3. Design Considerations
The following are some design considerations for the Storage component.
Aspect: Data Integrity
-
The individual
JsonAdaptedEntityclasses perform validation on every field in the JSON file for each Entity as it attempts to convert the JSON data into an Entity in Alfred. Should the data prove to be invalid, an error is thrown upwards to ModelManager and a new EntityList is initialised in memory, effectively discarding the old EntityList. -
This design was to ensure that any form of tampering of the code, malicious or inadvertent, will not result in data inconsistencies in Alfred.
-
In future implementations, it would be best to ensure that the JSON file is encrypted and secured to minimise opportunities for tampering with the data.
Aspect: Single Responsibility Principle
-
Each class exists for a very specific purpose. A class is provided for each Entity.
-
Purpose (From Top-Down):
-
Exposing read/save functionality for EntityList:
JsonEntityListStorage -
Serializing EntityList:
JsonSerializableEntityList -
Serializing one Entity:
JsonAdaptedEntity
-
Aspect: Interface Segregation
-
Each interface is kept as minimal as possible and targets a specific Entity type.
-
AlfredStorage is an interface that extends multiple interfaces to expose the read/save functionality required by Model.
Aspect: Dependency Inversion
-
Alfred’s Model is dependent on the interface AlfredStorage, and the implementation is provided through AlfredStorageManager. Hence, all functionality provided are first stipulated in the AlfredStorage interface.
3.6. Common classes
Classes used by multiple components are in the seedu.address.commons package.
4. Implementation
To best address the numerous and varying needs of Hackathon organizers, we have packed Alfred with a multitude of different features, each of which seeks to provide the user with the optimal means of tending to their hackathon organising needs. However, with a host of features comes a sizable codebase which can make it daunting for new programmers, and often even veteran Alfred programmers, to understand how certain features have been implemented. This section aims to empower you by introducing you to some of the noteworthy features currently present within Alfred, along with few that hope to add in the future, so that you may better grasp the implementation of these features in a bid to contribute new features and improvements to existing features within Alfred. Despite our best efforts to make the explanations of Alfred’s features' as comprehensive as possible, we do advice not to solely rely on this guide for understanding and encourage you to experiment with each feature’s code in order to truly grasp it.
4.1. Bulk Registration
The Bulk Registration feature, referred as the import command, allows you to add multiple entities into Alfred at once through a CSV file. The file must be stored locally as Alfred will attempt to retrieve it through the file path provided by the user. In order for the import command to successfully execute, it is required that the CSV file is formatted according to Alfred’s requirements, which you can read more about in our user guide.
This feature will be explained further in the following subsections.
4.1.1. Implementation Overview
Since this feature manages data from a CSV file, import command relies on the CsvUtil class. The CsvUtil class handles reading from and writing data to a CSV file. Below shows the relationships between different classes in Alfred.
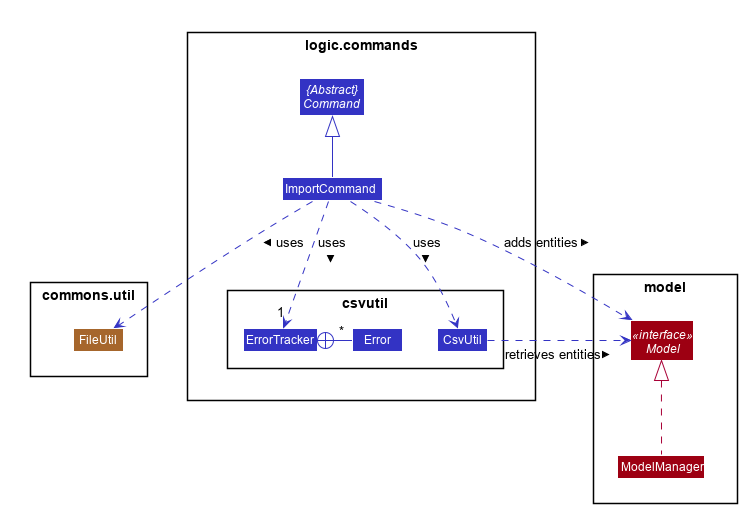
In the above class diagram, you can see that
-
1. The
ImportCommanduses theFileUtilclass, and this is so for a number of reasons. First is to validate whether user inputted file path is, in fact, a valid file path. Once it is verified, another check is done to see if the file exists at the given file path. If the file is not able to be located, theImportCommandwill not complete its execution. -
2. In addition to the
CsvUtilclass, theImportCommandalso utilizes anErrorTrackerclass. This class will store any lines in the CSV file that is invalid along with the reason why it is so. EachErrorobject referenced by theErrorTrackerwill correspond to one line in the CSV file and the cause of the error.
The activity diagram below will explain the overall flow of ImportCommand.
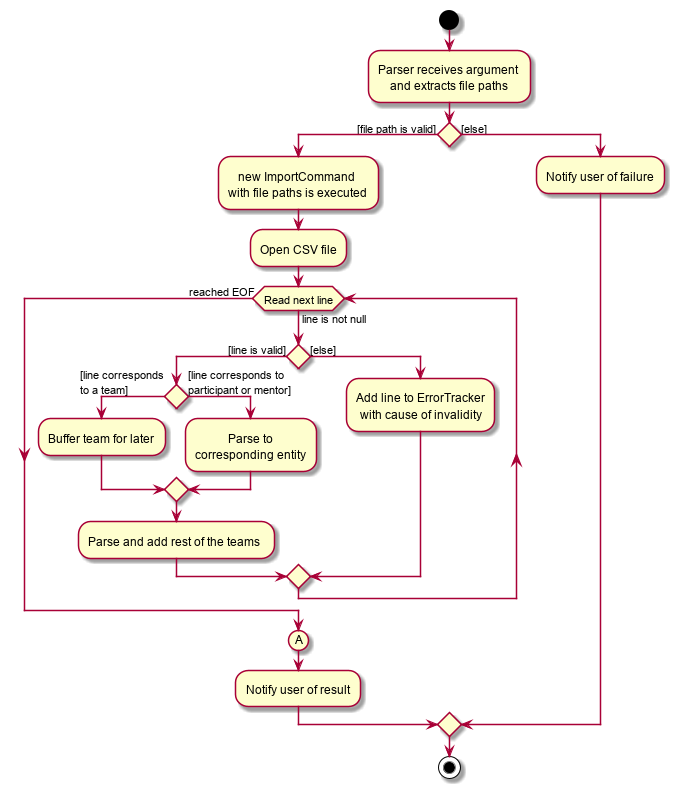
In the above diagram, you can see that teams are buffered for later use, which the reason is explained below. Also, node A, located right before the end, will be discussed in this section. Now, the sections below will give a detailed explanation of different portions of this feature.
4.1.2. Implementation: ImportCommand
Once a valid user input is parsed and passed into the ImportCommand, the command will open the file and read its content line by line. Each line is then parsed into the corresponding entity by the CsvUtil class. This will be explained further below. The following sequence diagram shows the steps involved in mass importing data into Alfred.
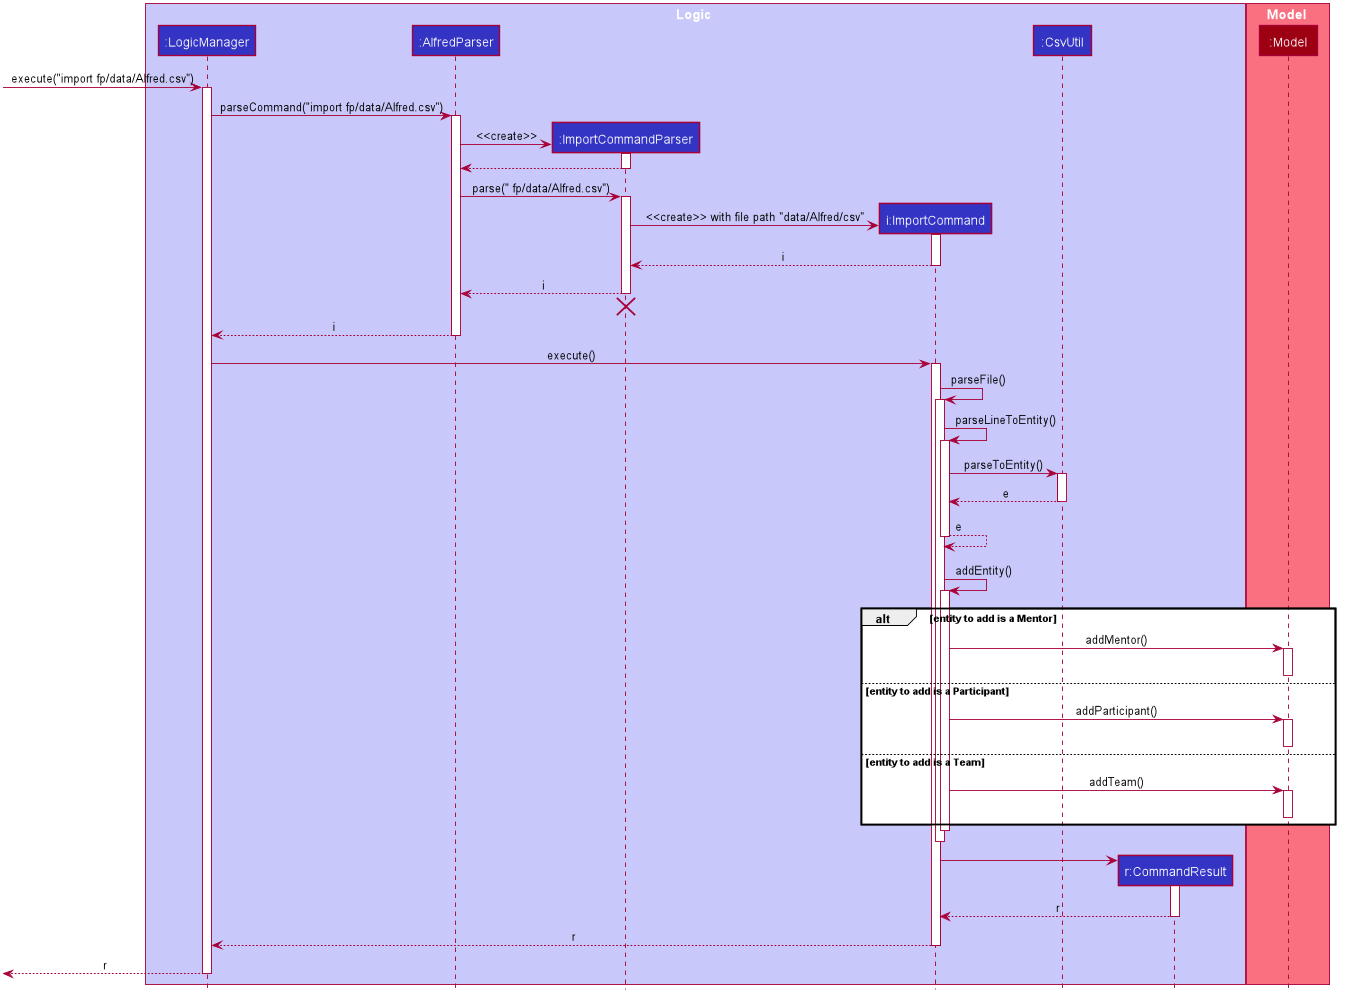
FileUtil shown in the class diagram was omitted from the above sequence diagram for simplicity as it adds little to the overall flow of execution.
As the above figure shows, the file path from the user input is extracted and passed as a field for ImportCommand. Then, Alfred proceeds to convert file content into relevant entities.
When ImportCommand parses and adds entities to Model, it is crucial that teams are the last entities to be added. In the above sequence diagram, this process of buffering teams was also omitted for simplicity. Basically, in the #parseLineToEntity() method, if a line in CSV file corresponds to a team, the line will be buffered to be parsed after all the other lines have been parsed. The reason for this is because teams may have dependencies on other participants and mentors. It is required that all of the participants and mentors associated with a team, say Team A, exist inside the Model before Team A can be added.
So as ImportCommand accesses the CSV file line by line, the line representing a team will be stored in a Queue<String> for later use. When the end of file is reached and all other participants and mentors are parsed and added to Model, the ImportCommand will poll from the Queue, parse into a relevant team, and add it to the Model until the Queue is empty.
4.1.3. Implementation: Parsing of Entities by CsvUtil
As mentioned before, the CsvUtil class is used to aid in parsing of CSV lines into entities. The process in which CsvUtil parses each entity is heavily dependent on the different fields each entity has. If you are not familiar with this yet, please check out our user guide.
The process of parsing a line into a mentor or a participant is very similar, so two entities - participant and team - will be explained.
First, the following is a sequence diagram for parsing a CSV line into a participant. The line to be parsed is "P,ID,Bruce Wayne,12345678,wbruce@wayne.ent".
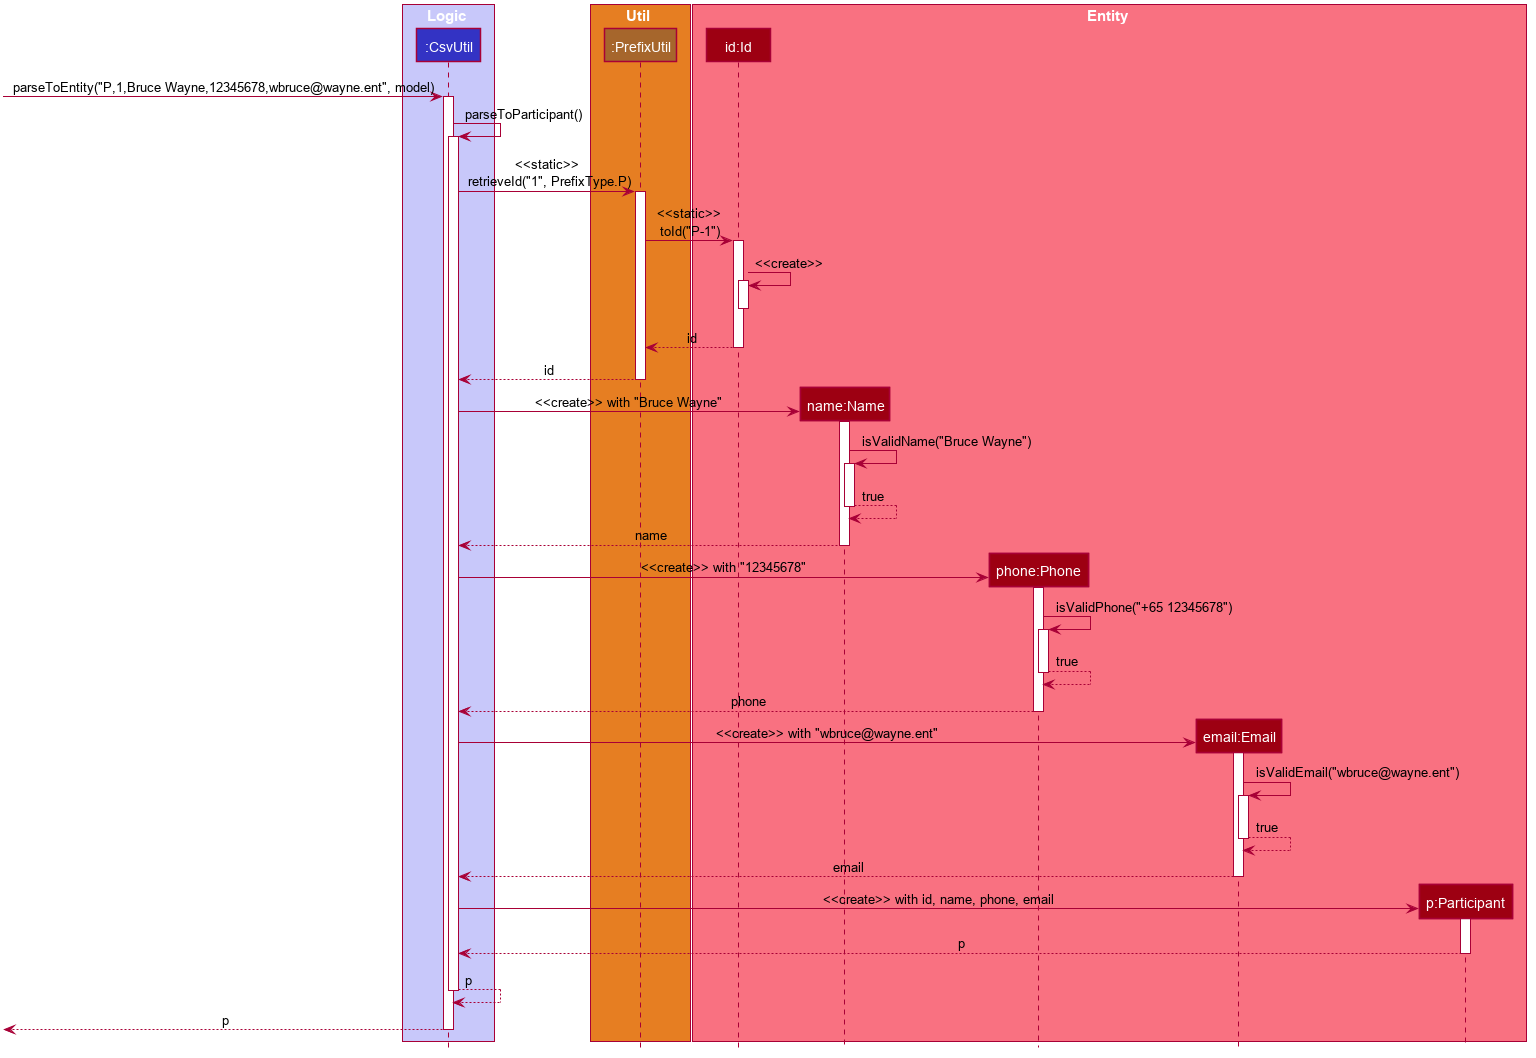
CsvUtil: Parsing to Participant Sequence DiagramGiven CSV line is first split by commas (also allows commas surrounded by arbitrary number of spaces). Then, each String in the array is (attempted to be) converted into corresponding fields of a Participant. As the diagram shows, each field class has its own method for checking if the given String argument is valid - in the form of #isValidField() method, where Field is replaced by its respective class name. Once each field is successfully converted, a Participant is created with the parsed fields. The process of parsing into a Mentor is practically equivalent of that of a Participant. The only change is in the fields being parsed.
Next is a sequence diagram for parsing a CSV line into a team. The line to be parsed is "T,,Justice League,[P-1|P-2],M-1,Social,100,Save the Earth,1".
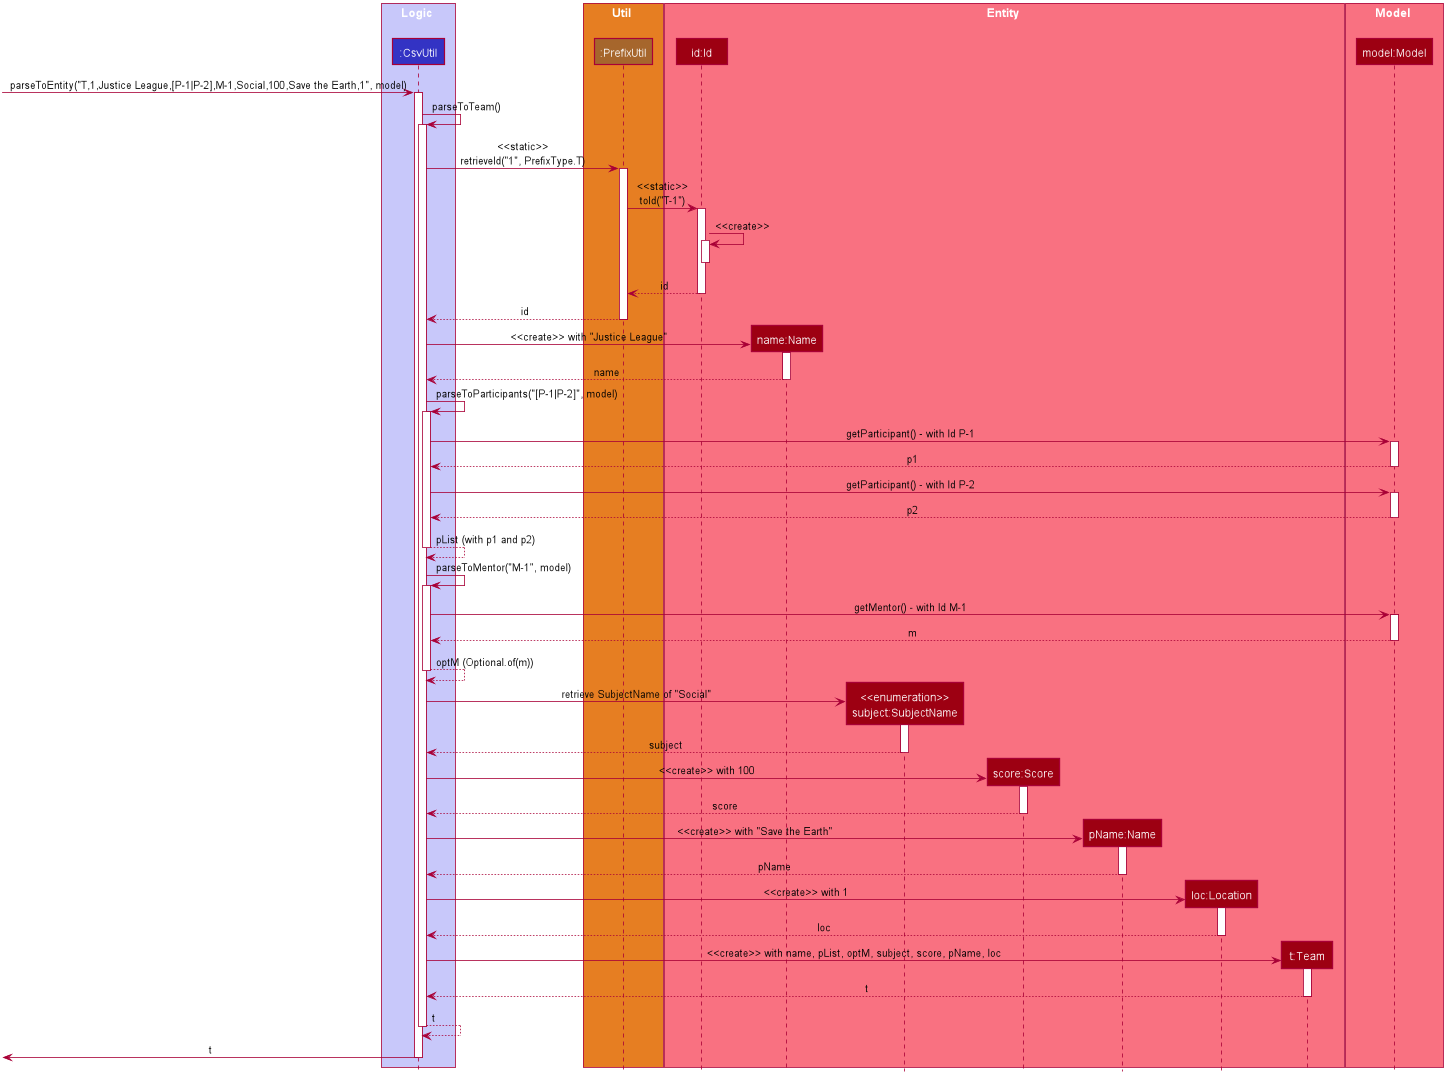
CsvUtil: Parsing to Team Sequence DiagramAlso for teams, each corresponding String is converted to its field counterpart just like participants and mentors. Hence, #isValidField() method was omitted from the diagram. The difference lies in the fact that for teams, Alfred must check if any participants or mentors it makes a reference to actually exists in Model. Thus, CsvUtil calls Model#getParticipant() and Model#getMentor() methods exposed by the Model class. If there are any exceptions raised while retrieving the participants and mentors, that line in CSV will not be loaded onto Alfred.
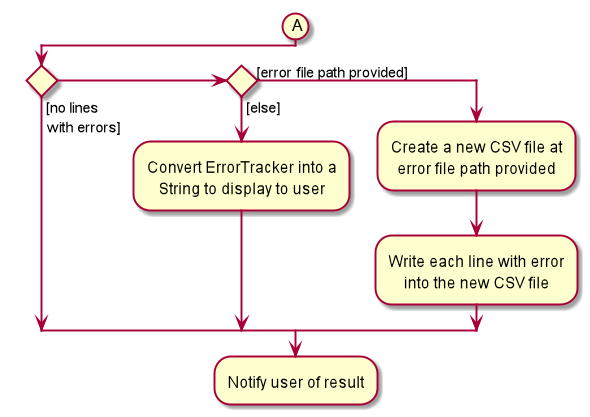
4.1.4. Implementation: Outputting Error File
Other than the CSV file path, if the user specifies an additional file path, Alfred will create a new CSV file path at that location containing every line in the user-given CSV file that had an error. For example, if lines 4, 6, and 7 were invalid in the imported CSV file, the error CSV file will contain only three lines, namely lines 4, 6, and 7 of the user-given CSV file.
The activity diagram below will illustrate what would happen if two file paths were provided. The following diagram starts at node A shown in Figure 15, “Import Command Activity Diagram”.
4.1.5. Design Considerations
When designing this feature, different aspects - list below - were considered.
Aspect: Storing of File Path
-
Alternative 1: Store as a
String-
Cons: May have cross-platform issues.
-
-
Alternative 2 (Current Choice): Store as a
Path-
Pros: Fixes cross-platform issues (by handling all possible separator characters used by different OS’s)
-
Alternative 2 was chosen because of the additional benefits Path class provides. Additional overhead of Path class (File class could also have been used) proved more effective than storing as Strings.
Aspect: Representation of an Invalid Line in CSV File
-
Alternative 1: Represent as a
Stringand print to user-
Pros: Gets the message across. The user will know the content of the line that is causing the problem.
-
Pros: Simple to manage.
-
Cons: The user will have to locate where the line is in the CSV file.
-
Cons: The user will not know why the line causes a problem.
-
-
Alternative 2 (Current Choice): Create an
Errorwrapper class-
Pros: Able to store line number, content of line, and cause of error in one object.
-
Pros: Makes sorting of multiple
Errorobjects easier through a#compareTo()method. This proves useful when a buffered line (representing a team) contains error. -
Pros: Able to display multiple information to user in a neat fashion.
-
We chose Alternative 2 because Error class will be able to provide a more detailed explanation more simply than using a String. By displaying to the user the line number and the reason why the line was not able to be imported into Alfred would save user tons of time trying to locate where the line is in the CSV file and why it caused a problem. However, we figured that knowing the line number would not help much in locating the line in the CSV file if the file is huge, hence the next aspect.
Aspect: Display of Errors
-
Alternative 1: Display to user through
CommandResultbox of the GUI-
Pros: Gets its job done.
-
Cons: May overcrowd the
CommandResultbox for a big CSV file with lots of errors.
-
-
Alternative 2: Creates a new CSV file containing all the errors.
-
Pros: Provides a 'clean slate' for the user to correct their errors.
-
Pros: The user does not have to locate the lines in their original CSV file.
-
Cons: The user will not know the reason why certain line caused an error.
-
Cons: May be a bit overkill, especially if only one or two lines were invalid.
-
This aspect has no (Current Choice) attached to any alternative because Alfred utilizes both. As mentioned before, Alternative 2 will be carried out if the user specifies an error file path. Then, whether or not the user has provided the error file path, Alfred will still include an error message in the CommandResult box if there are any.
Aspect: Assigning of Participants and/or Mentor to Teams through ImportCommand
-
Alternative 1: Do not allow assigning to Teams through
ImportCommand-
Pros: Simple to implement.
-
Pros: Placement of lines in CSV file will not cause problems while adding to Alfred.
-
Cons: Defeats the purpose of "bulk registration" if the user has to go through a 2-step process just to add one team.
-
-
Alternative 2 (Current Choice): Allow assigning
-
Pros: The user does not have to go through an n-step process to add multiple teams.
-
Cons: Relatively difficult to implement. Have to take care of dependency issues between participants/mentors and teams.
-
Initially, our plan was to disallow users from assigning other entities to Teams through ImportCommand. However, we soon realized that a huge purpose of Alfred and this feature was to facilitate managing of relationships between Teams and other entities. So, we decided to allow assignment by buffering parsing of Teams to a later stage - after all the other participants and mentors have been parsed and added into Alfred.
4.2. Export Feature
The export feature will be used to unload the data in Alfred to an external CSV file. This functionality will prove useful when the user wishes to share the aggregate data of a particular hackathon event with other people/organizations or wishes to keep a record of past hackathons for future references.
The user can choose to either export all the data regarding a specific entity or all entities by specifying the entity when typing the command. Through the following sections, implementation of the ExportCommand will be explained in detail.
4.2.1. Implementation Overview
This feature, like ImportCommand, utilizes the CsvUtil class because it also handles CSV files. As mentioned before, on top of parsing of data, CsvUtil also supports writing of different entities into a provided CSV file by converting them to their corresponding CSV Strings. Below shows the relationships between different classes involved in ExportCommand.
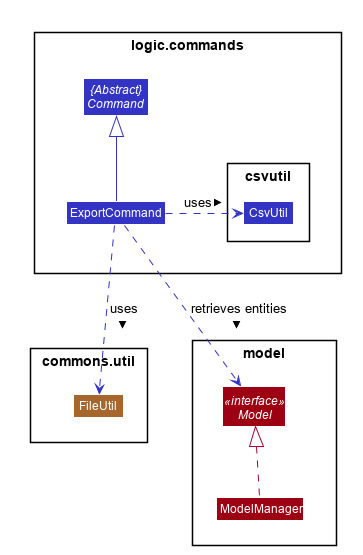
The diagram shows that much like ImportCommand, ExportCommand also utilizes utility classes, such as CsvUtil and FileUtil. However, unlike ImportCommand, since Alfred is the one creating the file this time, if the file path given by the user is not a valid path, Alfred will create and export all data to a file located at default file path, which is ./AlfredData/Alfred_Data.csv.
The activity diagram below will show in more detail how the ExportCommand is executed.

4.2.2. Implementation: ExportCommand
The above diagram illustrated the general flow of how ExportCommand is executed. You can see that majority of the work is being passed onto the CsvUtil. The sequence diagram below will show how CsvUtil manages to write all the data into a CSV file.
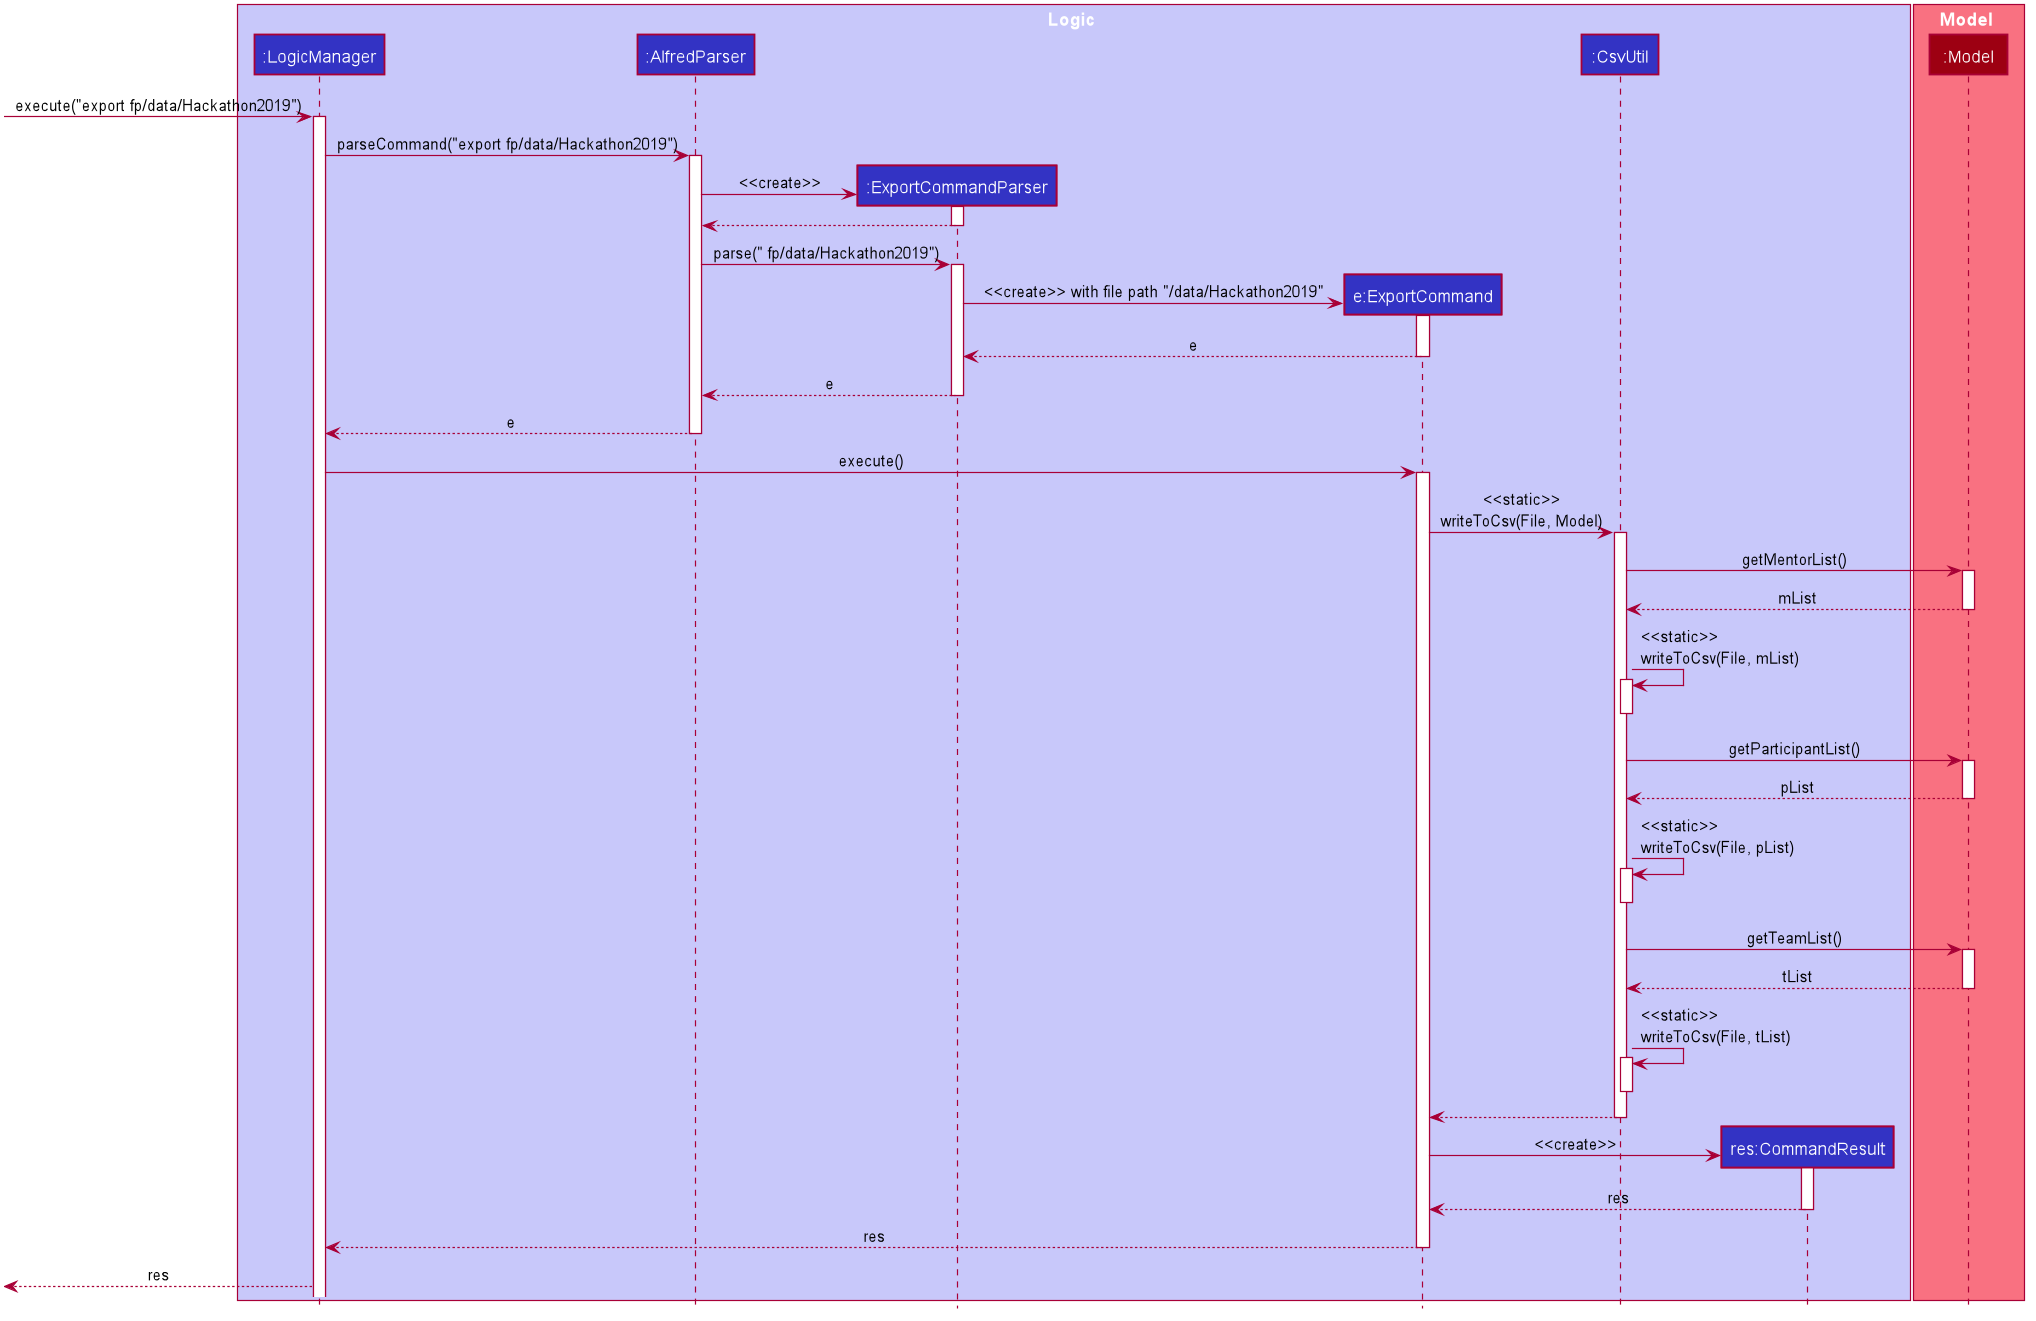
You can see that CsvUtil receives the EntityList of each entity type from Model. CsvUtil will then iterate through one entity at a time, convert to corresponding CSV String, and write to the CSV file. As such, you can see that the actual writing to a CSV file is handled by CsvUtil instead of the ExportCommand class.
4.2.3. Implementation: Subclasses of ExportCommand
Exporting all the data from Alfred to a CSV file is nice, but sometimes, the user may only want the data of a specific entity. This would be handled by the subclasses of ExportCommand, which consists of ExportMentorCommand, ExportParticipantCommand, and ExportTeamCommand. Similar to their superclass, the subclasses also depend on FileUtil and CsvUtil classes to create and write data to CSV files.
The overall flow is the same so you can refer to the aforementioned activity diagram and sequence diagram for more information. The only difference is when the subclasses call CsvUtil. If you recall, ExportCommand passes Model to CsvUtil. For each subclass, they will retrieve the respective ReadOnlyEntityList and pass to CsvUtil. The above activity diagram shows that in CsvUtil, it makes three method calls to itself: #writeToCsv(File, MentorList), #writeToCsv(File, ParticipantList), and #writeToCsv(File, TeamList). These three methods are the methods that each subclass will call.
4.2.4. Design Consideration
Aspect: Selective Exporting of Data
-
Alternative 1: Do not allow selective exporting
-
Pros: Simple to implement
-
Cons: User may want to export a portion of data in Alfred
-
-
Alternative 2 (Current Choice): Allow user to export data of specific entity type
-
Pros: Allows user to narrow the scope down to what is necessary for the user
-
Pros: Relatively simpler to implement than Alternative 3
-
Cons: User may want to export some data each across different entity types
-
-
Alternative 3: Allow user to specify a range of entity IDs to export
-
Pros: Gives user complete freedom in which data is exported
-
Cons: May be too much work for little value (if user does not find this useful)
-
For now, we have chosen Alternative 2. We thought allowing the user to choose a specific entity type would be sufficient. But implementing Alternative 3 can be done in the future to make Alfred even more customizable for the user. It would not replace Alternative 2 but the two will exist side by side. Depending on the additional parameters inputted by the user, commands will execute differently.
Aspect: Type of Files to Support
-
Alternative 1 (Current Choice): Support CSV file only
-
Pros: Simple to implement
-
Pros: Standard of file formatting is simple
-
Cons: Little freedom for the user
-
Cons: User may not be familiar with a CSV file
-
Cons: One can argue that Excel is easier to edit than CSV
-
-
Alternative 2: Support a variety of file extensions
-
Pros: Gives user a lot of freedom
-
Cons: Parsing rules for different files may be cumbersome to implement
-
Cons: Having a unified standard for file formatting may not be optimal
-
For now, data can only be exported to CSV files. This aspect can also be under the design considerations of ImportCommand. In the future, we can increase the number of file extensions supported.
4.3. Undo/Redo feature
The Undo/Redo feature, as the name suggests, allows you to undo and redo commands. Only commands that alter the state of the data in Alfred can be undone/redone. The state of the 3 EntityLists (ParticipantList, MentorList and TeamList) is tracked across the execution of different commands, and the state can be recovered through the use of the undo/redo feature. The last used IDs for each of the 3 EntityLists are also saved.
The feature has been updated in v1.4 to support multiple undos/redos. This means that invoking undo N/redo N on Alfred, where N
is an integer, allows you to undo/redo N commands at one go.
To undo/redo to next immediate command, simply invoking undo/redo on Alfred would suffice, as it implicitly calls undo 1/redo 1
in the code.
This feature is a convenience feature as it allows users of Alfred to quickly correct and recover from mistakes, greatly increasing the utility of the application.
Only a maximum of 50 data states is stored in ModelHistoryManager at any one point in time. The addition of any more data states will
result in the discarding of the oldest data state.
|
4.3.1. Implementation
The general idea is as follows: The undo/redo mechanism is mainly facilitated by the interface ModelHistory and its implementation ModelHistoryManager.
Alfred’s data is held in memory within the ModelManager object. After the execution of commands that mutate the data in Alfred, a deep copy
of all 3 EntityLists is made and saved as a ModelHistoryRecord in ModelHistoryManager. A deep copy is necessary to ensure that
any subsequent changes to data will not alter the data in the ModelHistoryRecord, allowing each ModelHistoryRecord to serve as
a pristine record of the state of the data in Alfred at the end of the execution of each command.
Whenever the undo command is invoked, ModelHistoryManager returns a ModelHistoryRecord.
A deep copy of the EntityLists contained within ModelHistoryRecord are then used to replace the EntityLists in the ModelManager for its operations, effectively
reverting the data in Alfred to a previous state.
The data in each ModelHistoryRecord in ModelHistoryManager is stored in memory, and is not stored on disc, so it will
persist only while the Alfred application is running.
|
4.3.2. Implementation: How ModelHistoryManager Keeps Track of the State of the Data in Alfred
The following sequence diagram shows the sequence of method calls used to store the state of the data in
Alfred in ModelHistory (ModelHistoryManager is an implementation of the ModelHistory interface) after
the execution of a DeleteParticipantCommand:
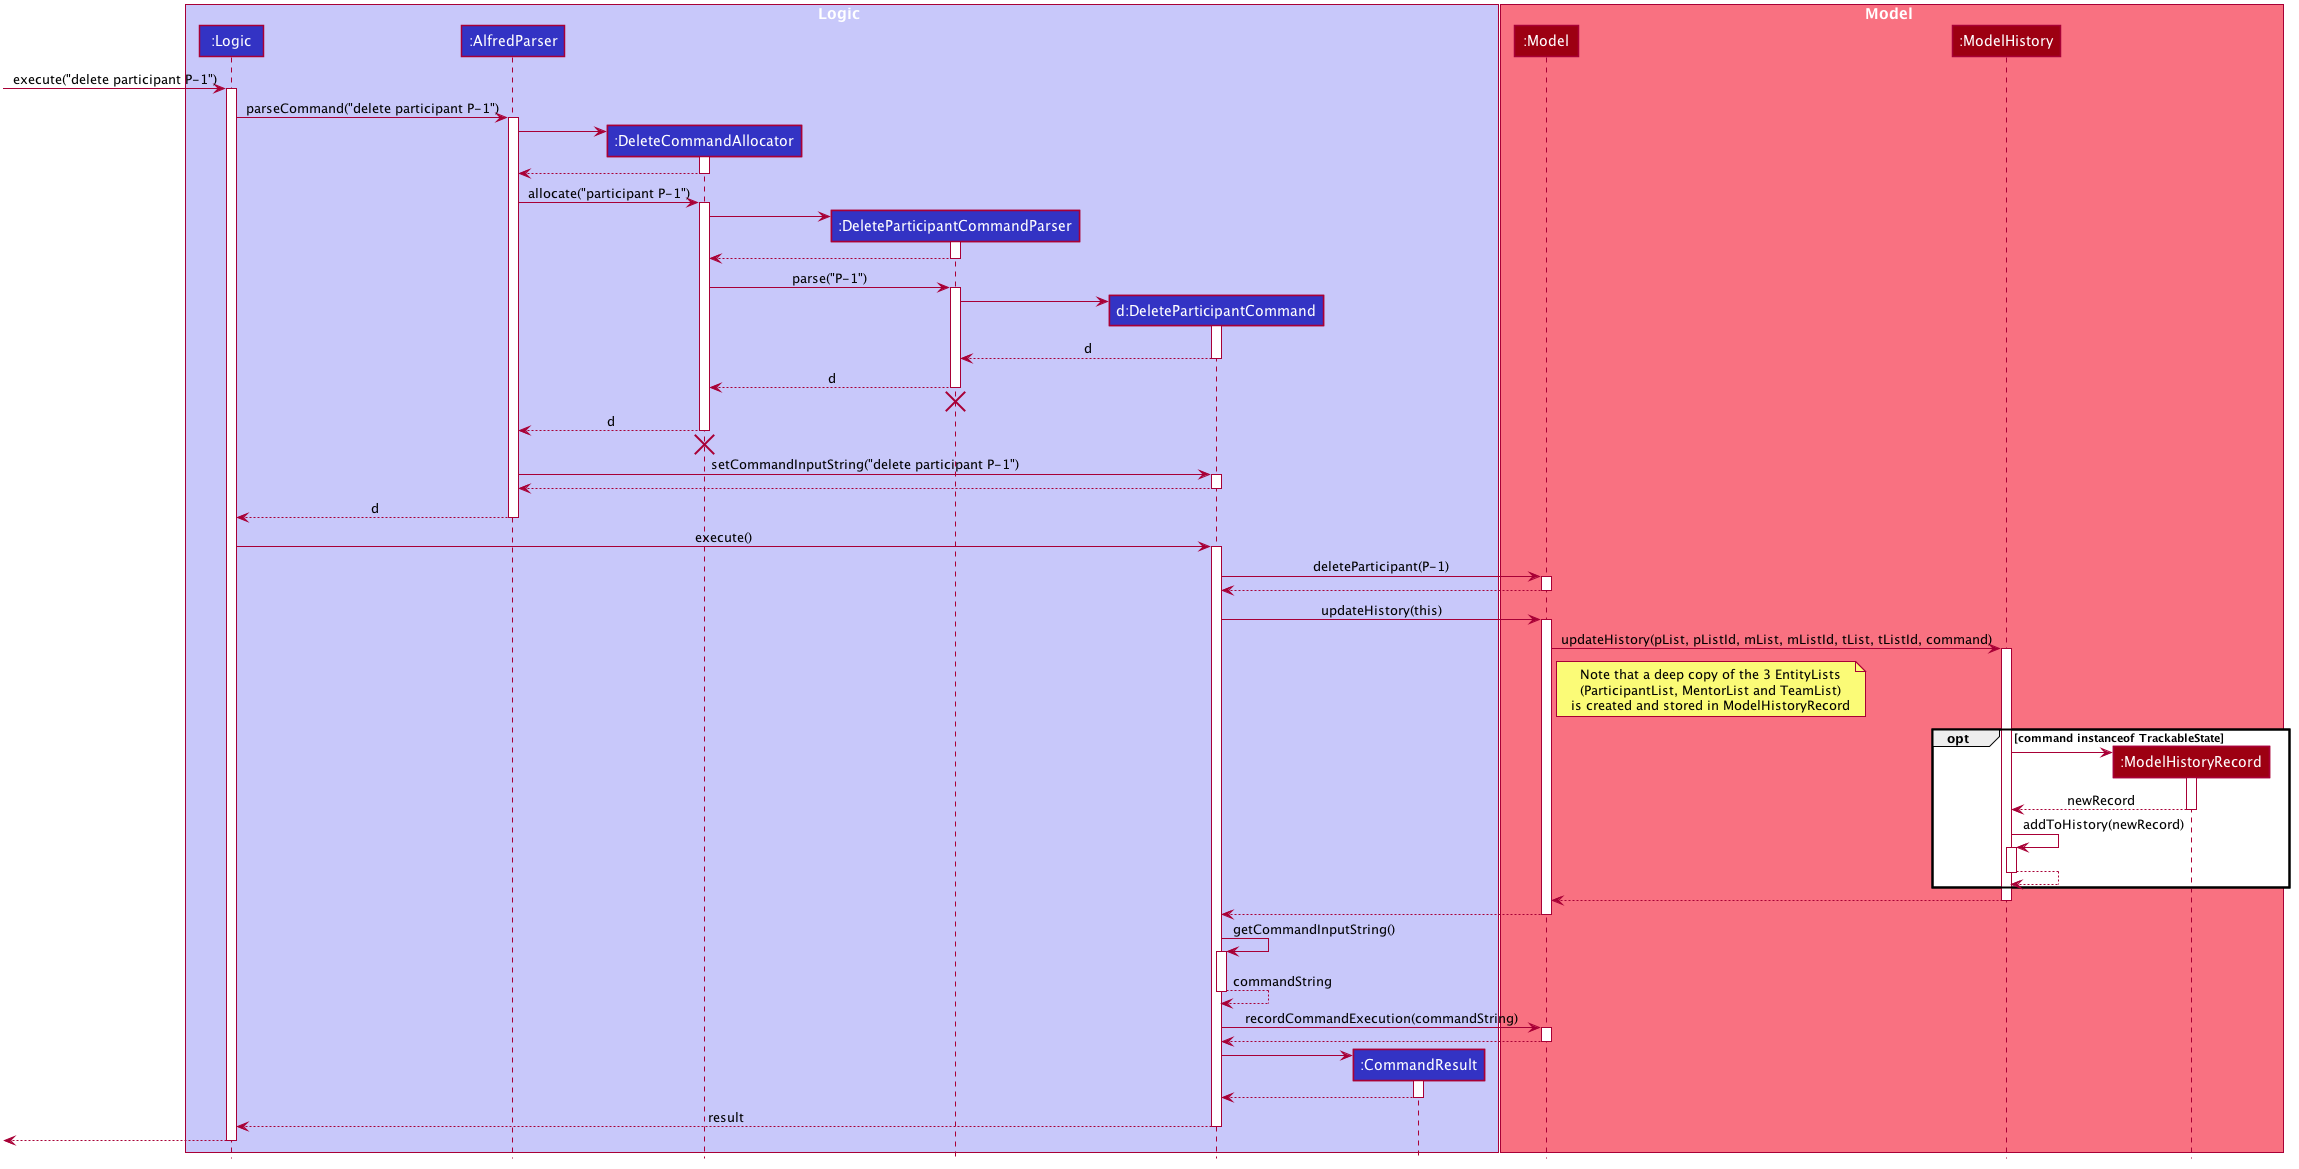
ModelHistoryManagerThe top half of the diagram covers the creation of the DeleteParticipantCommand object, and the bottom half covers
what happens when the execute() method of the DeleteParticipantCommand object is called. The important thing to note is the fact
that a deep copy of the 3 EntityLists is created and stored as a ModelHistoryRecord in ModelHistoryManager.
An important issue to take note of is that only commands that implement the TrackableState interface will cause a new ModelHistoryRecord
to be created and stored in ModelHistoryManager. The TrackableState interface is a marker interface, and is used to mark
the commands that mutate data in Alfred. All command types except the following implement the TrackableState interface (and
will therefore have the state of the data recorded in ModelHistoryManager after command execution):
help, list, find, history, leaderboard, getTop, export, help, home, undo, redo.
4.3.3. Implementation: How ModelManager is Updated When the Undo Command is Executed
The following sequence diagram shows what happens when the UndoCommand is executed.

The important issue to take note of here is that the code first checks whether it is valid to undo to a certain state by
calling the canUndo() method in ModelHistory. The implementation of ModelHistory in ModelHistoryManager does so by checking
if there are sufficient states to undo to, otherwise an exception is thrown.
| A analogous process is executed for the Redo Command. |
4.3.4. Behaviour of Undo/Redo Mechanism
ModelHistoryMangager contains a List of ModelHistoryRecord, and a pointer pointing to the ModelHistoryRecord that
reflects the current state of the data in Alfred.
In order to better illustrate how the state of the data is tracked and stored in ModelHistoryManager, consider the following example.
The following commands are executed:
-
AddParticipantCommand:
add participant n/Clark Kent p/+6598321212 e/clark.kent@supermail.com -
AddMentorCommand:
add mentor n/Lex Luthor o/LexCorp p/+6598321010 e/lex.not.evil@gmail.com s/Social -
ListParticipantCommand:
list participants -
UndoCommand:
undo 2 -
AddTeamCommand:
add team n/Justice League s/Social pn/BetterThanAvengers l/12
This is the state of ModelHistoryManager when Alfred is first started.
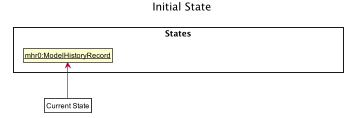
ModelHistoryManagerThis is what happens after each step:
Step 1. AddParticipantCommand: add participant n/Clark Kent p/+6598321212 e/clark.kent@supermail.com
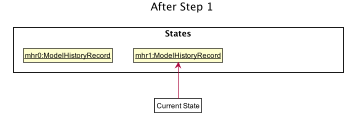
ModelHistoryManager after Step 1A new ModelHistoryRecord is created to reflect the state of the data in Alfred after the execution of the AddParticipantCommand.
Step 2. AddMentorCommand: add mentor n/Lex Luthor o/LexCorp p/+6598321010 e/lex.not.evil@gmail.com s/Social

ModelHistoryManager after Step 2A new ModelHistoryRecord is created to reflect the state of the data in Alfred after the execution of the AddMentorCommand.
Step 3. ListParticipantCommand: list participants
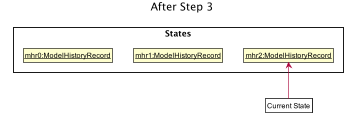
ModelHistoryManager after Step 3Note that no new ModelHistoryRecord is created because the ListParticipantCommand does not alter the state of the data in Alfred.
Hence, it does not implement the TrackableState interface.
Step 4. UndoCommand: undo 2
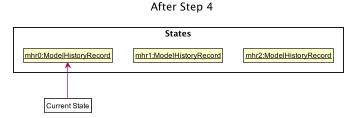
ModelHistoryManager after Step 4After executing the undo 2 command, the pointer in ModelHistoryManager shifts backwards by 2 to point to the ModelHistoryRecord
at the zero-th index.
Note that this means that undo 3 would throw an error, as you cannot move beyond the very first ModelHistoryRecord in ModelHistoryManager.
Step 5. AddTeamCommand: add team n/Justice League s/Social pn/BetterThanAvengers l/12

ModelHistoryManager after Step 5Note that the execution of a new command will invalidate the ModelHistoryRecord after the pointer. This is because all subsequent
data states are the result of transformations that have already been undone, so it is not valid to be able to redo to them.
4.3.5. Design Considerations
When designing the undo/redo feature, there were some design considerations to take note of.
Aspect: How Undo/Redo Executes
-
Alternative 1 (current choice): Saves the entire data state of Alfred in memory.
-
Pros: Easy to implement.
-
Cons: May have performance issues in terms of memory usage.
-
-
Alternative 2: Individual command knows how to undo/redo by itself.
-
Pros: Will use less memory (e.g. for
delete, just save the person being deleted). -
Cons: We must ensure that the implementation of each individual command are correct, which is not trivial for certain commands, such as
import, which provides a best-effort implementation and tries to import as many valid data entries as possible. In order to implement anundomethod for this, we would have to keep track of the new Entities that got created due to the command execution and then invoke deletion of these Entities.
-
Given the large number of commands that are available in Alfred, it is not very scalable to implement an undo/redo method for each of the commands. It is also more extensible to use Alternative 1 as it allows future commands to be added without the need for further changes for the undo/redo feature - simply get the new command’s class to implement the TrackableState interface if it alters the state of the data in Alfred.
Aspect: Use of Marker Interface
Allows for an easy way to determine if the state of the data should be saved after the execution of the command.
It is also very easy to change in the codebase. This means that should a feature in the future alter the state of the
data in Alfred after execution, it is trivial to allow ModelHistoryManager to track the state.
Aspect: Limitation of Number of Data States Stored
Given that the Undo/Redo feature saves the state of the data in Alfred after the execution of TrackableState commands,
it is important to ensure that memory usage by ModelHistoryManager is limited, otherwise Alfred will run very slowly and
potentially crash once a substantial number of commands have been executed.
In order to accommodate this design for the Undo/Redo feature, we decided to limit the number of ModelHistoryRecord stored in
ModelHistoryManager to 50. It is unlikely that a user would want to undo more than 50 commands at a go, as that would indicate
a very significant error in the workflow, and recovering from that should not have a reliance on the Undo/Redo feature.
4.4. History feature
Closely related to the undo/redo feature, the history feature allows you to examine up to 50 previously executed commands
in order to provide you with a visual understanding of the history of commands executed. Specifically, it provides you information
on how many commands are undo-able/redo-able, and which commands are undo-able/redo-able. Otherwise, it can be difficult to
know which commands you are undo/redo-ing, especially when many commands have been executed.
Simply execute history in Alfred to navigate to the "History" section of the Graphical User Interface and examine what commands
are undo-able/redo-able.
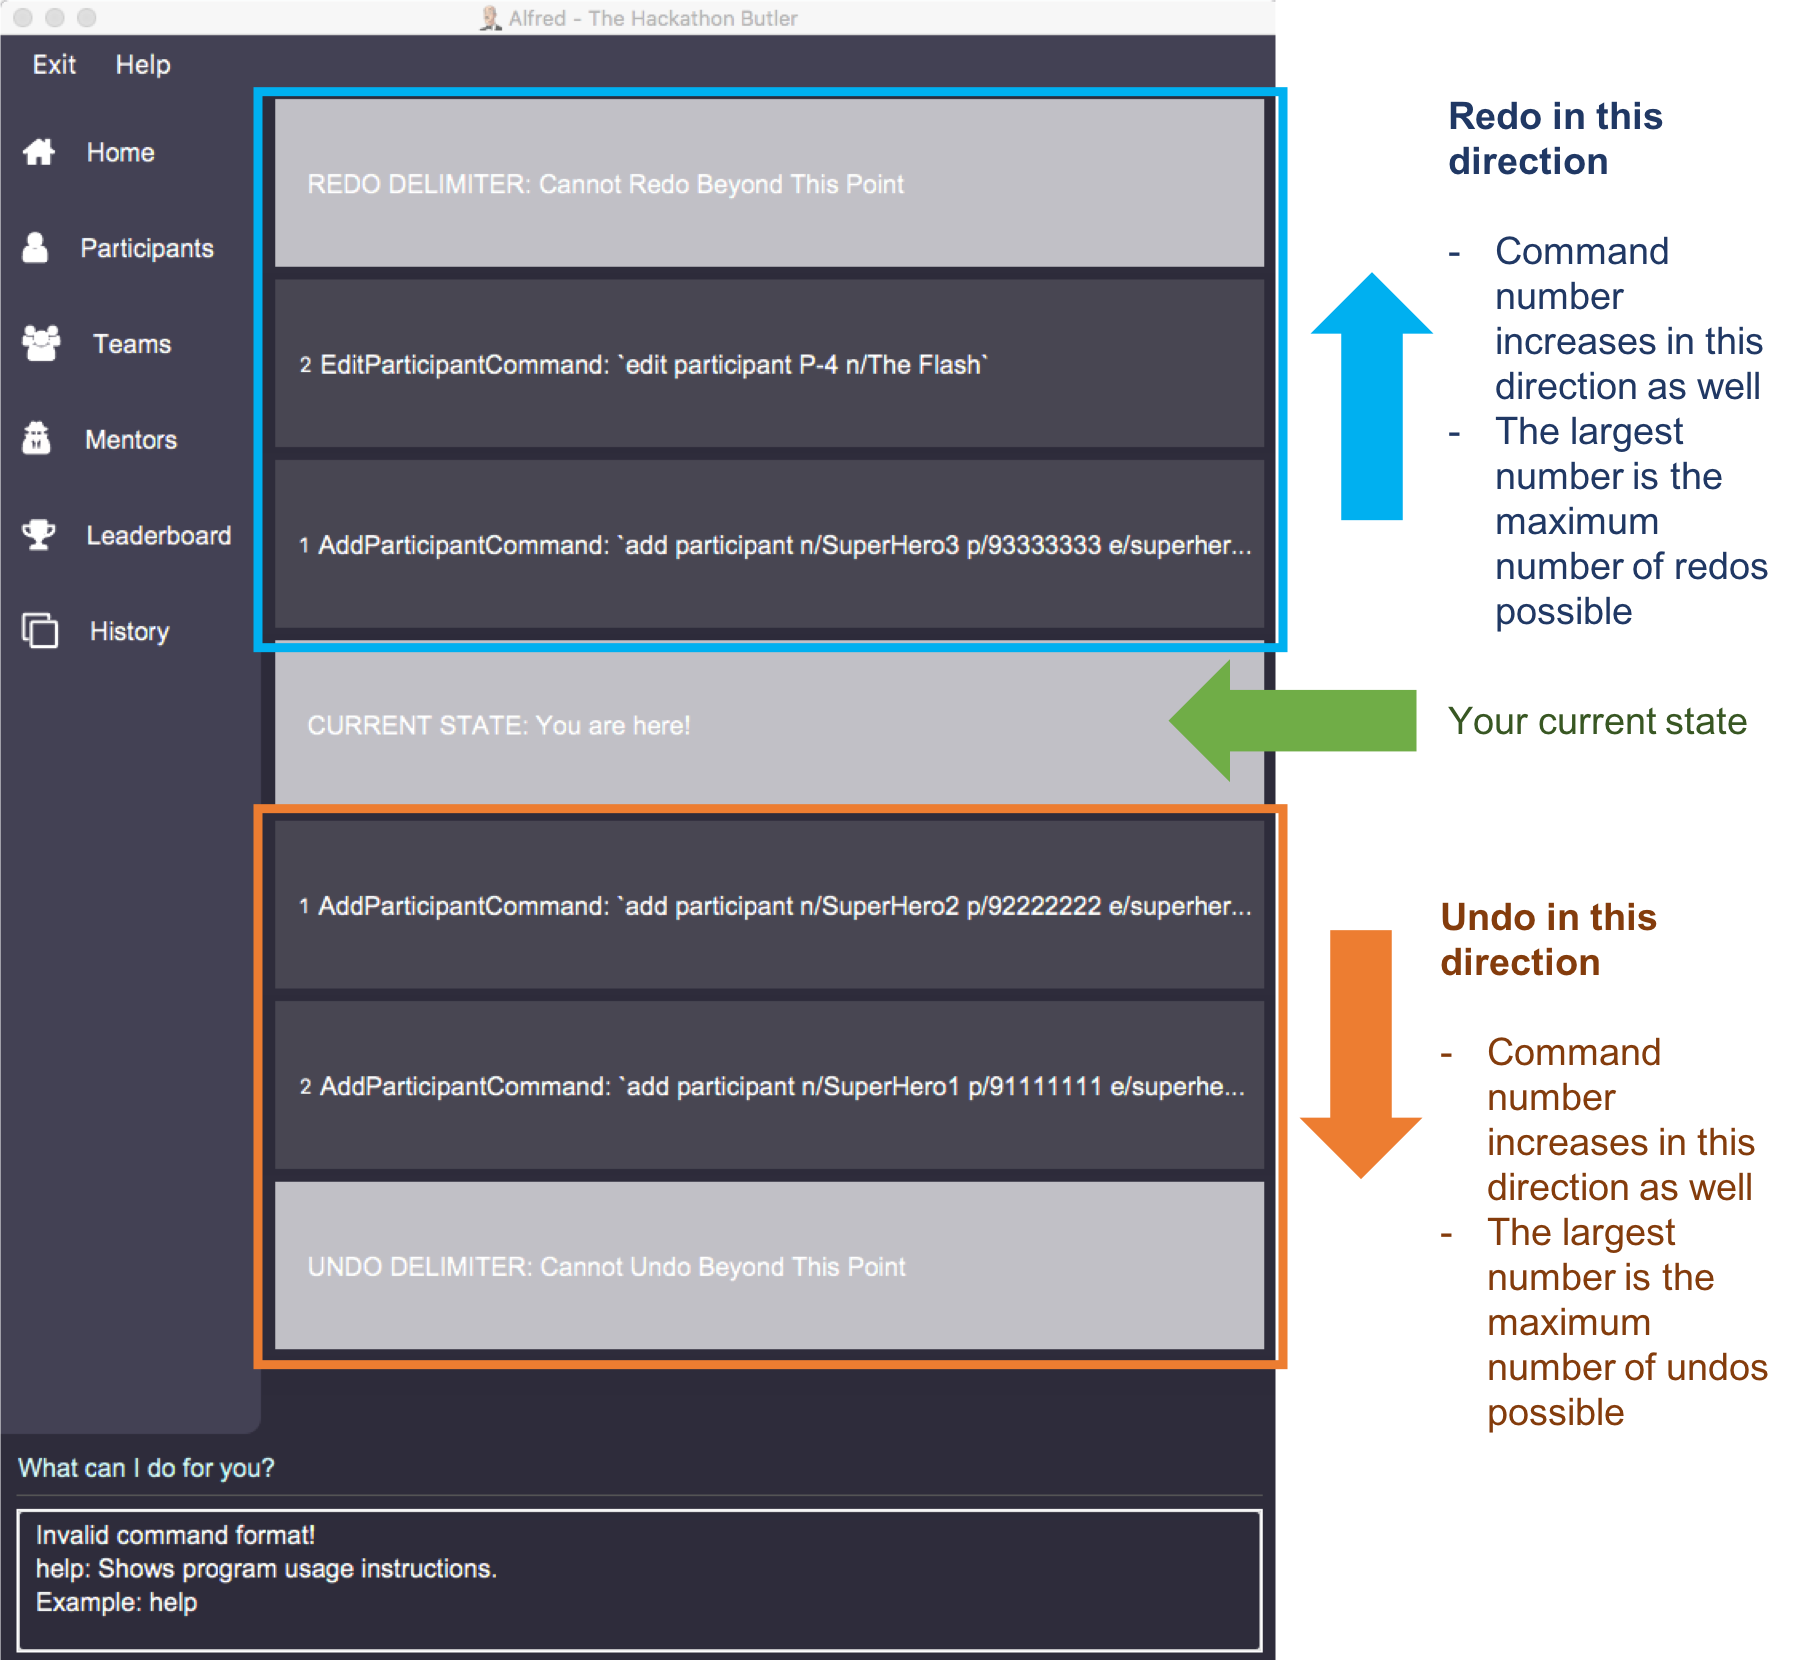
history commandNote that there are 3 types of delimiters:
-
Redo Delimiter: No redos are possible beyond this point
-
Current Delimiter: This is the current state of the data relative to all the commands previously executed.
-
Undo Delimiter: No undos are possible beyond this point
4.4.1. Implementation
Most of the functionality required for the history feature is similar to that of the undo/redo feature. Specifically,
there is a similar reliance on the ModelHistory interface and its implementation ModelHistoryManager to provide the information
on which commands are undo-able and redo-able, along with their respective command input strings. See the sequence diagram below
for more information.
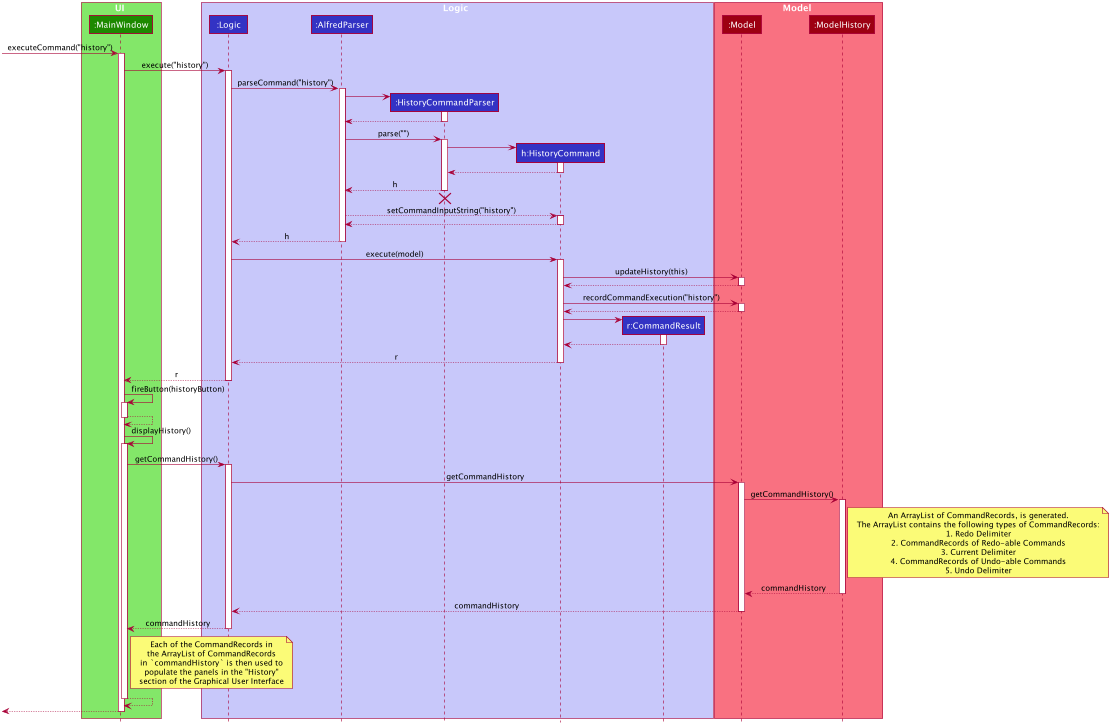
Since ModelHistoryManager keeps a linear history of Alfred’s data state after commands are executed, and it has a pointer
to the current data state, the redo-able commands are simply the ones after the pointer, and the undo-able commands are the one before
the pointer. The panels displayed in the "History" section of the Graphical User Interface is simply a visual representation of
this sequential ordering of datas states. The call to getCommandHistory() in Model will return an ArrayList of CommandRecords, where each CommandRecord
specifies the command input string as well as whether the CommandRecord is a delimiter. This ArrayList is then provided back to
the UI for rendering in the "History" section of the Graphical User Interface.
4.4.2. Design Considerations
Given the close relationship between this feature and the undo/redo feature, the design considerations are very similar as well.
See Section 4.3, “Undo/Redo feature” for more information.
4.5. Command History Navigation
Since Alfred is ultimately a Command-Line Interface (CLI) application, it would be good to integrate some of the more useful features of CLI applications into Alfred. This feature allows users to go through previously executed commands by pressing the ALT+UP/DOWN arrow keys. Although it would be more convenient to use the UP/DOWN arrow keys to navigate the command history, the UP/DOWN arrow keys have been mapped to the Command Suggestions feature in Alfred.
This feature allows users to quickly re-use previously exeuted commands without having to go through the hassle of re-typing everything. This is particularly useful when the commands are long, and only small modifications are necessary to the command.
Only successfully executed commands can be navigated to using the ALT+UP/DOWN keys. Invalid comands will not be stored, and hence
cannot be accessed using this feature. The only exception to this is the import command, as it is a 'best-effort' command that raises exceptions for certain entries
in the csv file, but seeks to import as many valid data entries as possible. Hence, the import command can be navigated to using
the ALT+UP/DOWN arrow keys even when it does not completely succeed during execution.
|
4.5.1. Implementation
Every time a valid new command is executed, the string used to generate the command (i.e. the text that the user types into
Alfred’s Command Input Box) is stored in the Command object.
The main class responsible for remembering and providing the previously used command input strings is the CommandHistoryManager class,
which implements the CommandHistory interface. The CommandHistory interface only exposes 3 methods: saveCommandExecutionString,
getPrevCommandString and getNextCommandString. The latter 2 methods directly map to the 2 situations of pressing the ALT+UP and
pressing the ALT+DOWN keys respectively.
When the Command object is executed, that string is then stored in the CommandHistoryManager. A linear list of successfully
executed commands' input strings is stored in CommandHistoryManager, and a pointer to the current string being displayed in the textbox
is used to indicate which is the currently active string.
Only the last 50 commands are stored in CommandHistoryManager. Anything beyond that is discarded.
|
4.5.2. Implementation: Setting and Storing of Command Input String
The following sequence diagram describes the sequence of method calls used to set and store the command input string in
CommandHistoryManager
ModelHistoryManager4.5.3. Implementation: Arrow Key Invocation
The following sequence diagram describes the sequence of method calls used to set the text in Alfred’s Command Input Box whenever the ALT + UP/DOWN arrow keys are pressed.
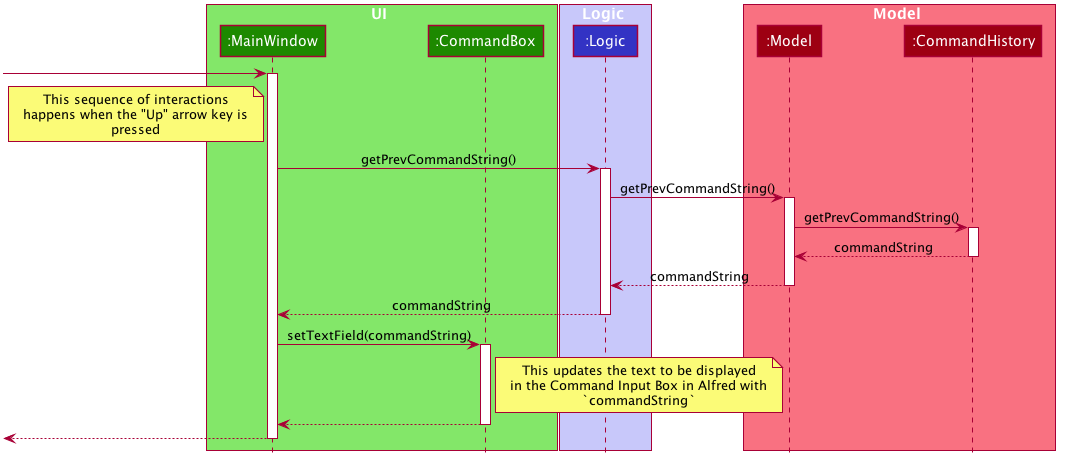
An analogous process is executed when the ALT+DOWN arrow keys are pressed.
4.5.4. Design Considerations
The following are some design considerations for the Command History Navigation feature.
Aspect: Use of CommandHistoryManager
A separate class was created for managing the command history. Although this meant that Model would have a further dependency on another class and hence cause an increase in the coupling between objects, this implementation adheres to the Single Responsibility Principle and abstracts away the details of handling the command history to a purpose-built class. This adheres better to the OOP-style of programming and results in conceptually cleaner code.
Aspect: Limitation of Command History Size
In order to ensure that CommandHistoryManager does not occupy an increasingly large portion of memory as more and more
commands are executed, it is necessary to limit the number of commands that are stored. Otherwise, Alfred’s performance
will suffer as more commands are executed.
Furthermore, it is very unlikely for user to want to navigate more than 50 commands into history, as it would likely be more convenient to re-type the command if that is the case.
Aspect: Usage of Arrow Keys
Most CLI applications with such a Command History Navigation feature would use the UP/DOWN arrow keys directly, but the UP/DOWN arrow keys have been mapped for a different use (Command Suggestion Feature) in Alfred. Hence, we decided to use the ALT modifier key for the feature. It is an inconvenience, but likely a minor one.
Aspect: Navigation to Successfully-Executed Commands
As mentioned above, only successfully executed commands can be navigated to using this feature. This is because unsuccessful commands will still remain within the Command Input Box in Alfred, which the user can readily edit. Only upon successful command execution will the text in the Command input Box disappear, so this feature is necessary to retrieve the Command’s input text.
4.6. Home feature
Entering the home command will prompt the Logicto generate a Statistics object. The Statistics object is generated by obtaining entity lists of different types(ParticipantList, TeamList, MentorList) from Model. The respective lists are then converted to the Stream data structure and filtered through to obtain the distribution of each entity type by Subject, as well as the total number of each entity. These information is stored in the Statistics object. The Statistics object is then used to construct a StatisticsListPanel, where the information is parse to be displayed as a distribution bar graph.
The following sequence diagram shows how the home operation works:
![][width=790](images/HomeCommandSequenceDiagram.png)
home command4.6.1. Design Considerations
The following are some design considerations for the home command.
Aspect: Finding the distribution of Teams and Mentors by subjects
-
Alternative 1: Implementing methods to keep track of number of mentors or participant under the respective TeamList or ParticipantList class.
-
Pros: Each of TeamList or Participant list will have their individual responsibilities in keeping track of the distribution of its teams or mentors.
-
Cons: Clutters up the Model and ModelManger interface.
-
Cons: Does not make use of existing methods under Model.
-
-
Alternative 2: Getting TeamList or ParticipantList from Model and implementing operation to find the distribution separately.
-
Pros: Makes use of existing Model methods of getting TeamList and ParticipantList.
-
Pros: Does not clutter up Model and ModelManager with different methods
-
Pros: Greater flexibility in implementing methods to find the distribution of teams or mentors.
-
Cons: Clutters up the Model and ModelManger interface.
-
Cons: Does not make use of existing methods under Model.
-
Decision: We decided to proceed with this alternative 2 because it makes use of existing methods under Model and provides greater flexibility on how I can find the distribution number by subject from the TeamList or ParticipantList.
4.7. Command suggestion feature
This feature provides suggestions by predicting the commands that a user intends to enter.
| Only suggestions that start with the same alphabets or spaces as those entered by user will be suggested. |
4.7.1. Implementation
The main class responsible providing suggestions is the AutoCompleteCommandBox class.Typing into the AutoCompleteCommandBox will prompt the attached Listener to be activated.
Activation of the Listener will prompt it to filter through the set of predefined command suggestions.
The commands that start with the same alphabet or alphabets entered by user will be filtered through.
The first four result will then be mapped to their respective TextFlow object and added to the ContextMenu.
This ContextMenu will then appear as a pop up box. Pressing up arrow and down arrow keys will enable the user to choose a command suggestion.
Additionally, pressing enter will filter out different Text from the TextFlow object. The AutoCompleteCommandBoxsetText method will then be called to set the JFXTextField to the said Text object.
Aspect: How to store a set of correct commands and search through it as the user types
 In order to provide suggestions as a user types, there needs to be a way to store the set of correct commands as strings in the system, and search through it to check if it contains some parts of user input. The results will then be provided to the user as suggestions.
* *Alternative 1:* Use an `ArrayList` and go through every element in the array list one by one to look for commands that matches the user input.
-
Pros: Easy to implement
-
Pros: When new commands are implemented, they can easily be added into the
ArrayList -
Cons: Allows duplicates, if duplicate commands are added into the
ArrayList, duplicate suggestions may be provided. -
Cons: Searching through the
ArrayListis inefficient asStreamis not used. -
Alternative 2: Store the commands in a
Setand convert it to aStreamto search through the commands.
*Pros: Prevent duplicates, so that duplicate commands will not be entered accidentally.
-
Pros: More efficient.
-
Pros: Easier to search through the set of commands when it is stored as
Stream.
I have decided to proceed with this option as preventing duplicates enables a more defensive style of programming. It is also more efficient.
Aspect: How to fill up user input text field when a command suggestion is chosen
upon choosing a command suggestion, it template(the command suggestion excluding blue-colored instructions and grey-colored guides) will be used to occupy the user input text field.
-
Alternative 1 :Map each command suggestion to their respective templates in
Stringform -
Pros: Easy to implement.
-
Cons: Tedious to implement(requires many lines of code).
-
Cons: Duplicate logic will be implemented, as the templates could be extracted from the command suggestion itself.
-
Alternative 2 : Filter out the relevant text template from the command suggestion that is choosen.
-
Pros: No duplicate logic is implemented as the templates are extracted directly from the choosen command suggestion.
-
Pros: Lesser code needs to be written in order to extract the template from the choosen command suggestion.
-
Pros: Use of regular express ion may be harder to implement.
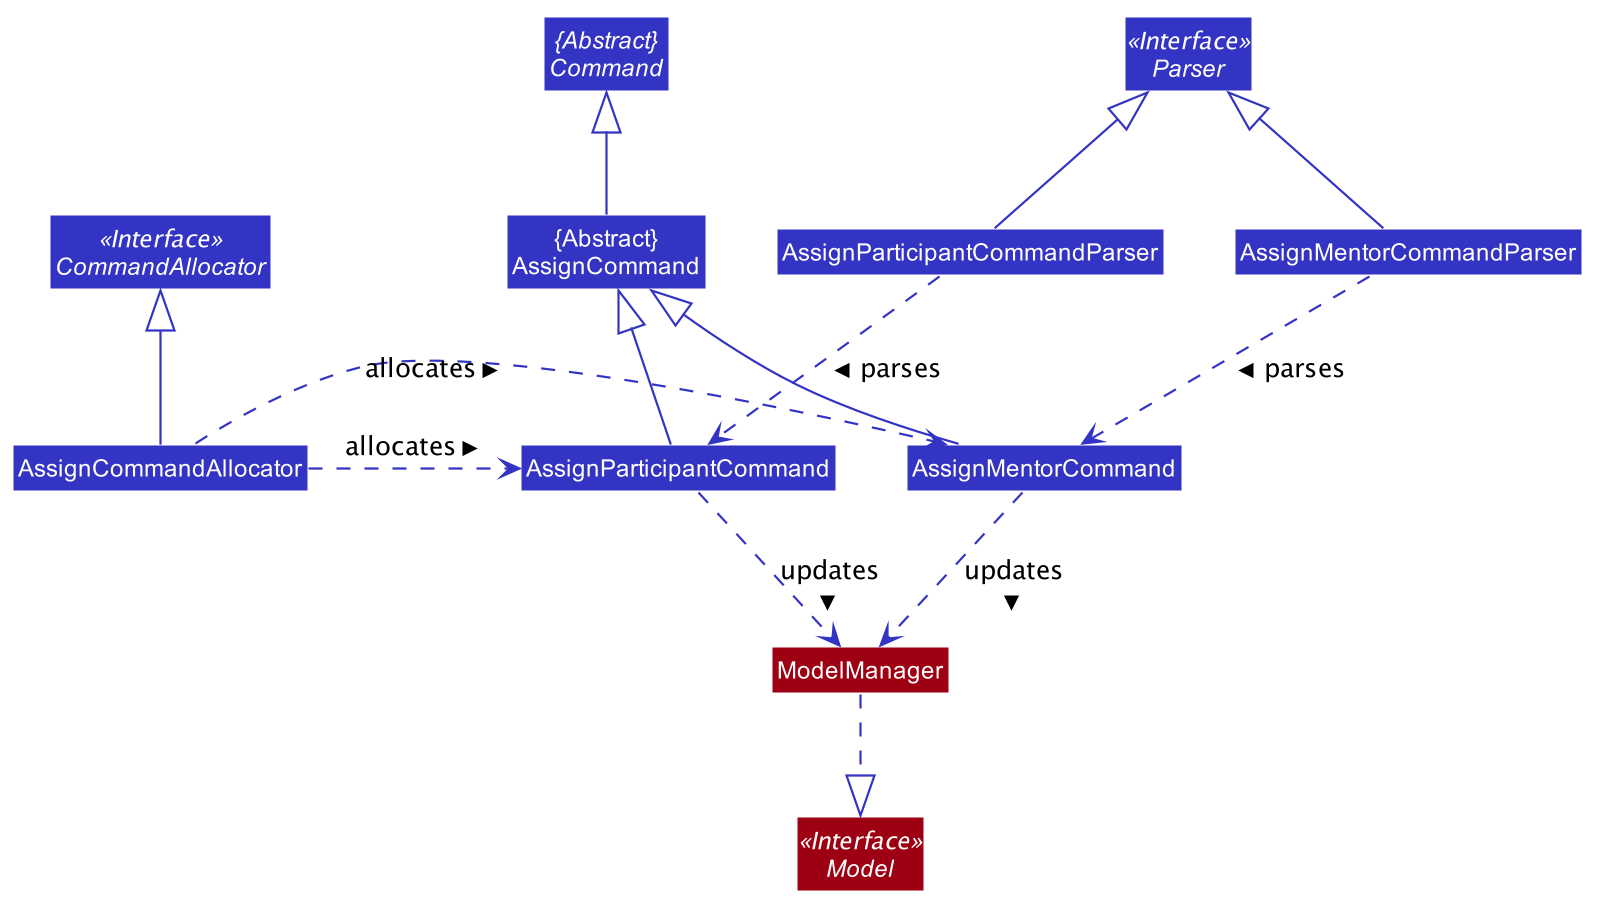
4.8. assign / remove feature
The Class Diagram below showing the high level representation of the Object Oriented solution devised to implement the assign feature.
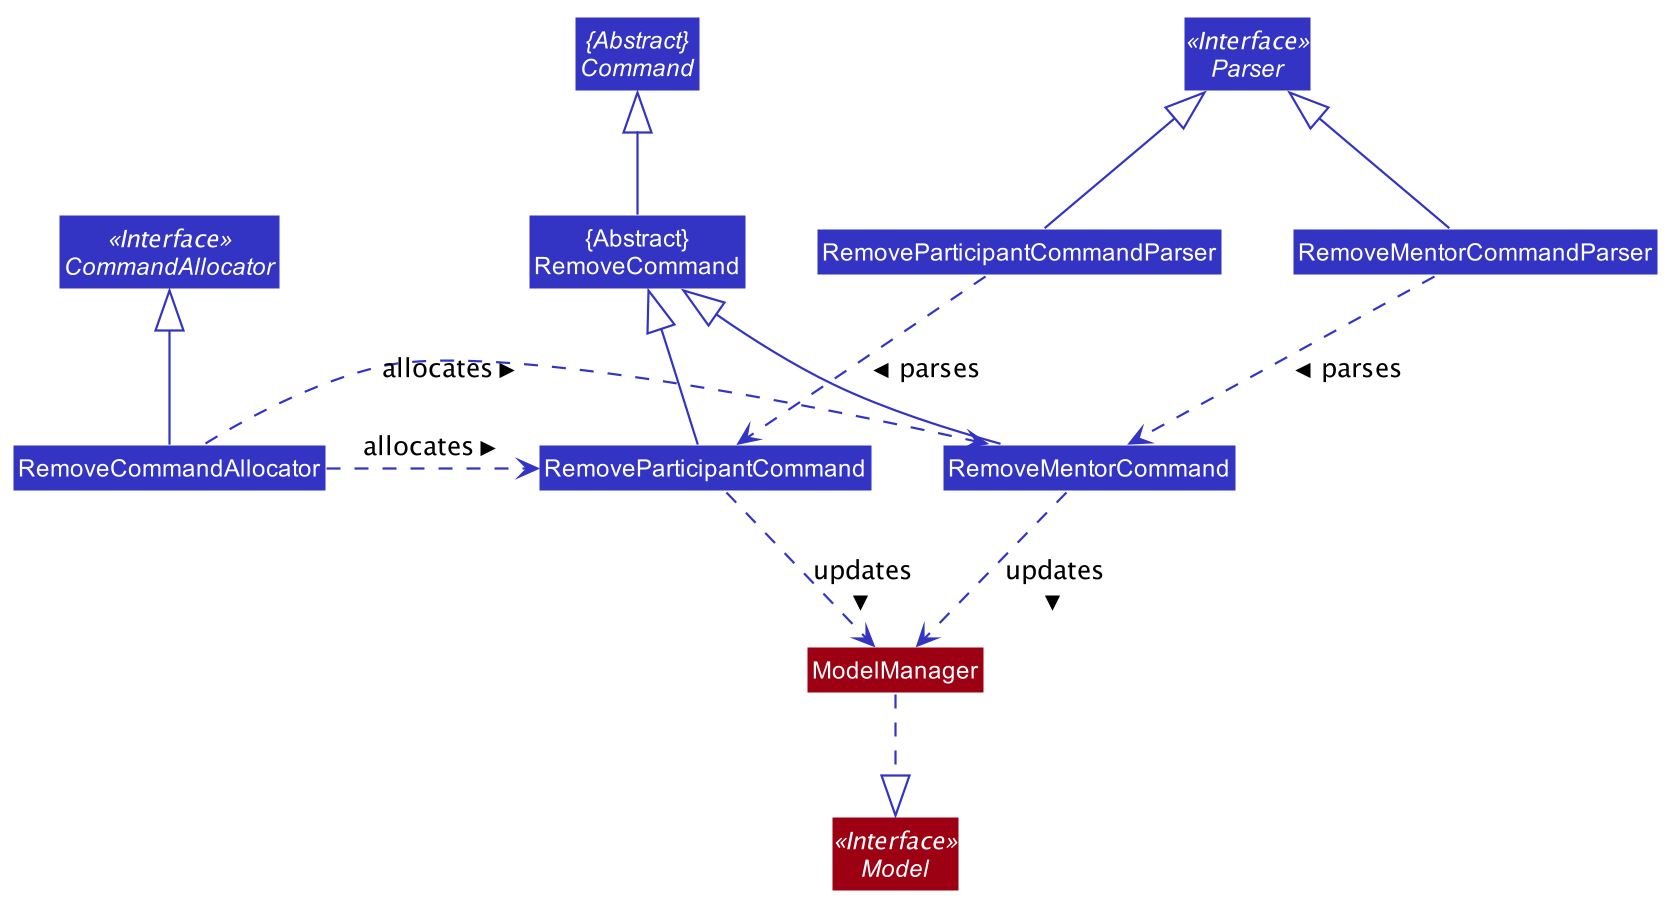
The Class Diagram below showing the high level representation of the Object Oriented solution devised to implement the remove feature.
Upon successful assignation, the new participant or mentor will be stored internally in the list of participants or Optional mentor field in the Team object. Upon successful removal of Participant or Team, the specified participant or mentor will be removed from the Team object. Additionally, it calls the following operations:
-
ModelManager#addMentorToTeam– adds mentor to a specified team -
ModelManager#addParticipantToTeam– adds participant to team -
ModelManager#removeParticipantFromTeam– removes participant from team -
ModelManager#removeMentorFromTeam– removes mentor from team
4.8.1. assign feature
The following sequence diagram shows how the assign participant operation works:
![][width=790](images/AssignParticipantCommandSequenceDiagram.png)
assign participant command-
The
assign mentorcommand will add the new mentor under theOptional<Mentor>field in the specifiedTeamobject. This is provided that there is no existing mentor in the team. The sequence diagram ofassign mentoris similar to that ofassign participant.
4.8.2. remove feature
-
The remove participant will first search through the list of participant under the specified
Teamobject. This checks whether the specified participant is a member of the team in the first place. If it is not a member, an error will be thrown. Whereas if it is a member, the specified participant will be removed from the list of participant.
The following sequence diagram shows how the remove participant operation works:
![][width=790](images/RemoveParticipantCommandSequenceDiagram.png)
remove participant command-
The
remove mentorcommand will first check whether theOptional<Mentor>field under the specifiedTeamobject is not empty and corresponds to the specified mentor. This checks whether the team have not been assigned a mentor, or they have been assigned to a different mentor. Under any of these cases, and error will be thrown. Whereas if the team is assigned the specific mentor, the specified mentor will be removed from theOptional<Mentor>field.The sequence diagram ofremove mentoris similar to that ofremove participant.
4.9. Scoring
As its name suggests, this feature’s intended purpose is to aid users in the process of giving scores to the teams participating the hackathon. The score command is a crucial feature of Alfred as judging and scoring are core activities within every hackathon. Alfred provides the following implementations of the score command:
-
score add: allows users to add a certain number of points to a team’s score -
score sub: allows users to subtract a certain number of points from a team’s score -
score set: allows users to set a team’s score to a certain number of points -
score reset: allows users reset a team’s score to 0
4.9.1. Implementation Overview
This feature and its varieties have been implemented in a relatively straightforward manner, as the Class Diagram below showing the high level representation of the Object Oriented solution devised to implement this feature highlights.
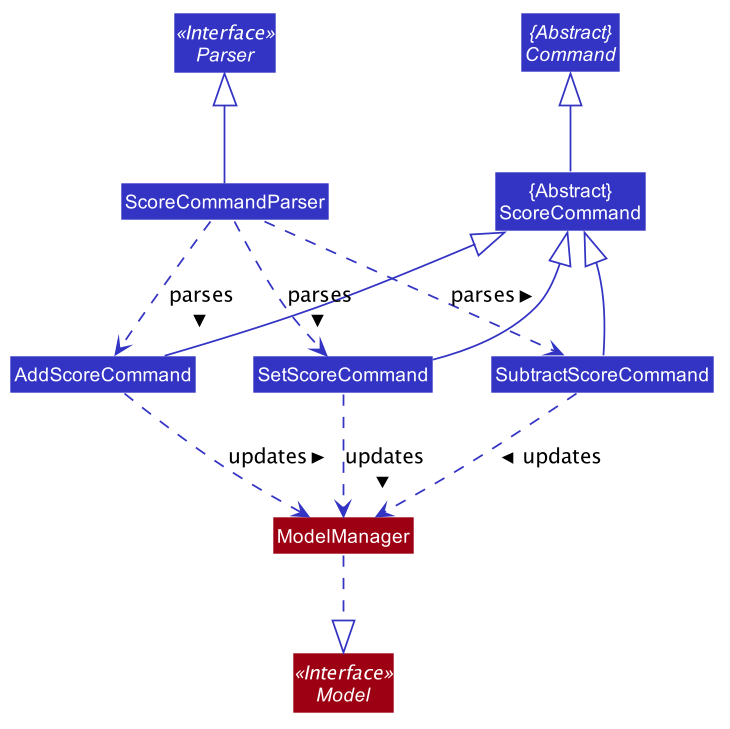
From the above diagram it can be seen that each different implementation of the score command inherits from the same ScoreCommand abstract class. The ScoreCommand abstract class provides a base for the implementation of the current specific score commands and in the future any further additions made to the score command functionality must also follow this same convention.
Secondly, there is no ResetScoreCommand class. This is done intentionally as the SetScoreCommand can be reused to reset a particular team’s score, thereby making better use of abstraction.
A representation of how the above classes interact to provide execute a user’s command is highlighted in the sequence diagram below. This sequence diagram illustrates the object interactions when a user types the command score add T-1 40. For context, this command adds 40 points to the team with ID "T-1".
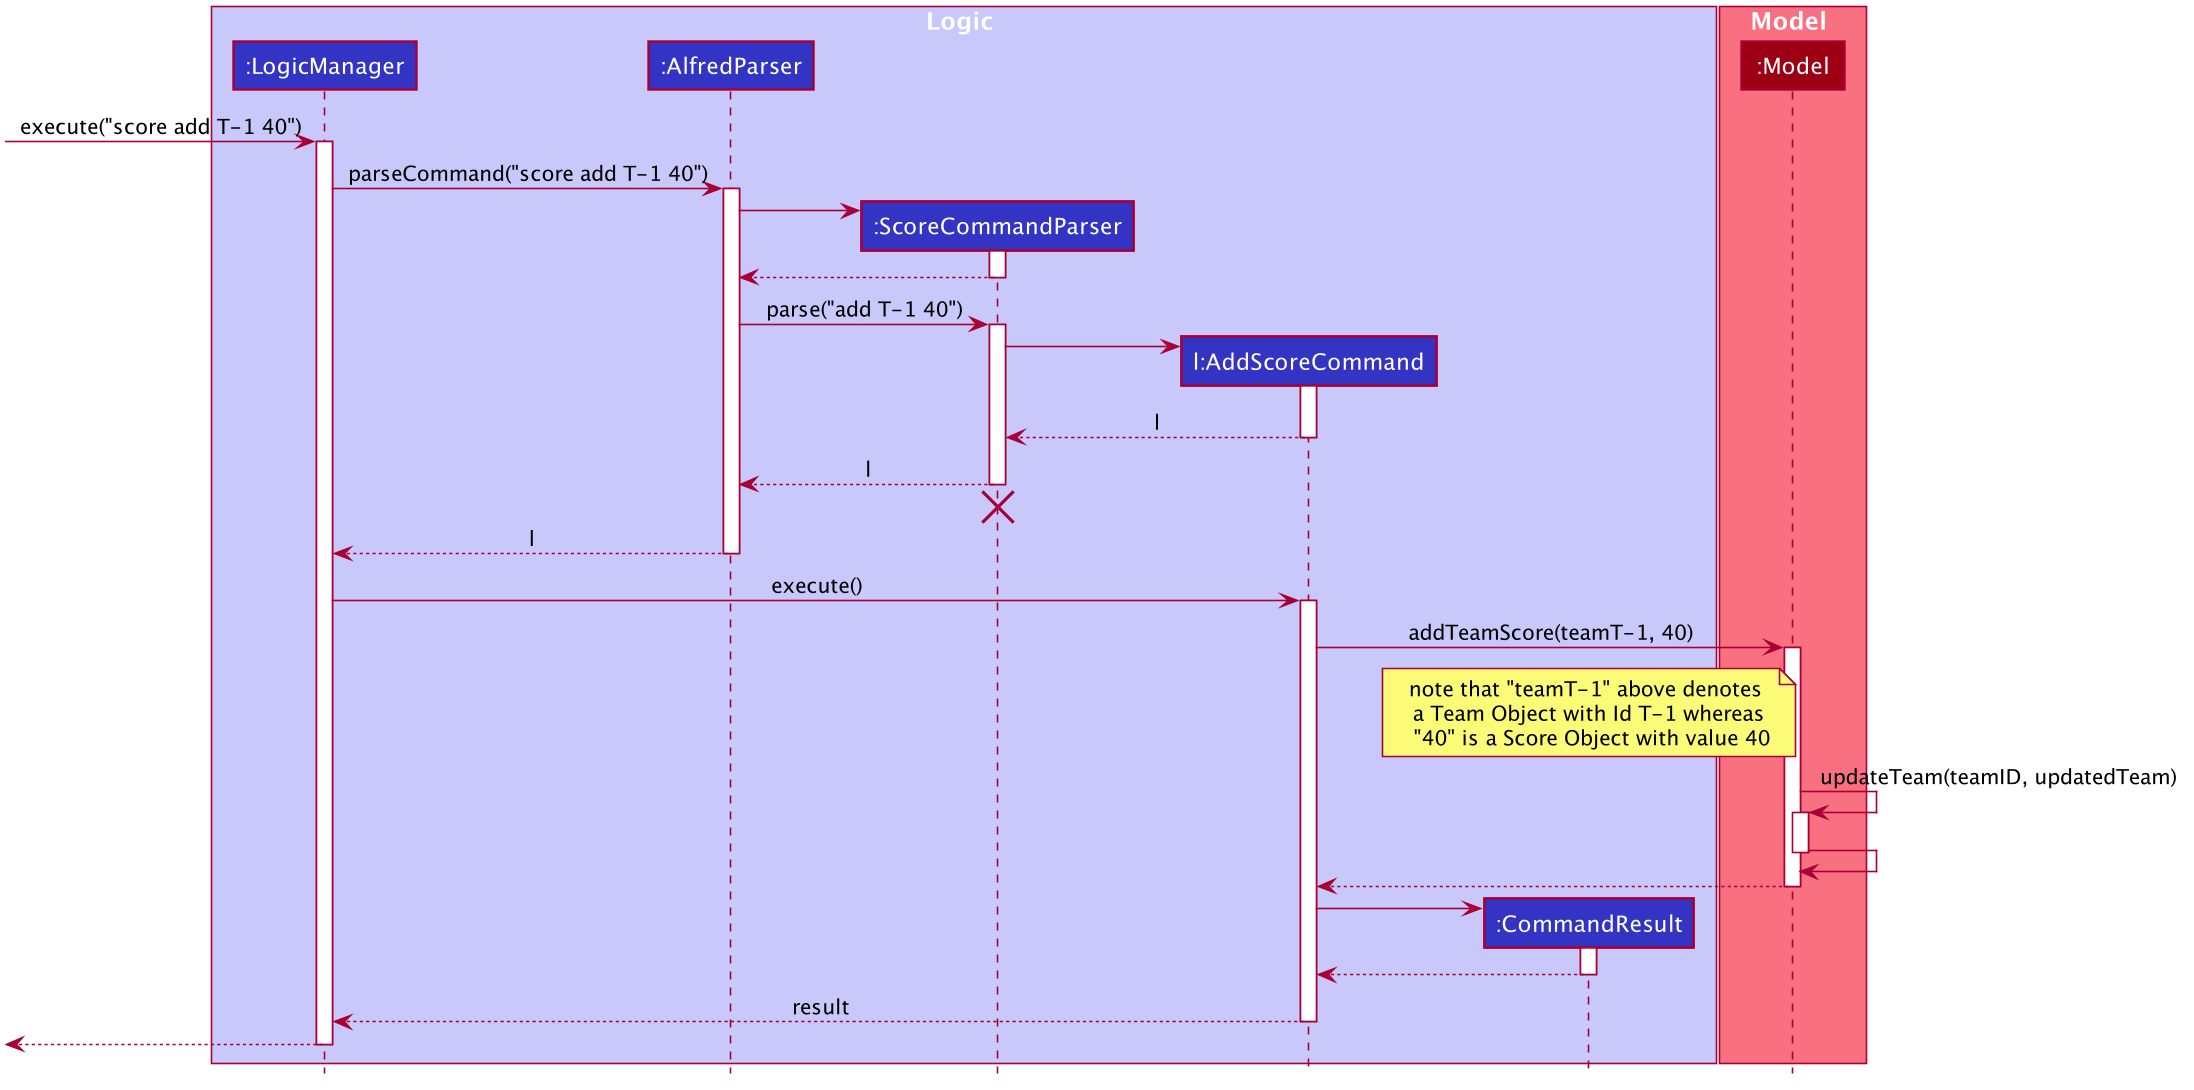
As seen from the above diagram, the execution of the score add command can be put in simple words as per the following steps:
-
Step 1:
LogicManagerstarts executing the user’s command and calls theAlfredParserto parse it. -
Step 2:
AlfredParserfind the appropriateParserto parse the command and creates a newScoreCommandParserto parse the arguments of the score command, essentially "add T-1 40". -
Step 3: The
ScoreCommandParserthen parses the arguments and is responsible for:-
Checking which specific implementation of the
scorecommand is being called (in this case "add") and ensuring it is a valid method. -
Parsing the Team ID specified by the user and ensuring it is of a correct format.
-
Parsing the Score specified by the user and ensuring it is a valid score.
-
-
Step 4:
ScoreCommandParserthen creates a newAddScoreCommandobject with the above parsed Team ID and Score, which is then returned all the way toLogicManager -
Step 5:
LogicManagerthen executes theAddScoreCommandobject upon which theAddScoreCommandobject callsModel'saddTeamScore()method which updates the specific team’s score withinModel. The updating is done by theupdateTeam(teamID, updatedTeam)method ofModelwhich updates the Team object with ID "teamID" withinModelto match the "updatedTeam" team object. -
Step 6: Upon updating the team’s score in
Model, theAddScoreCommandobject creates a newCommandResultobject which is returned to the UI component (not shown in the diagram) to display a feedback message to the user.
Though the above diagram and steps are designed in the context of a score add command, the logic applies to every other type of score command as well. The only difference is that the ScoreCommandParser creates the appropriate command object for the command and each command object calls a different method from Model, as per the following:
-
score subtract:ScoreCommandParsercreates a newSubtractScoreCommandinstead of anAddScoreCommandand thisSubtractScoreCommandobject calls thesubtractTeamScore()method ofModel. -
score setandscore reset:ScoreCommandParsercreates a newSetScoreCommandinstead of anAddScoreCommandand thisSetScoreCommandobject calls thesetTeamScore()of methodModel.
4.9.2. Design Considerations
To develop the score feature a few considerations and decisions had to be made with regards to how to implement the feature at various steps. This section focuses on some of the aspects wherein we faced dilemmas and how we addressed them.
Aspect: How to implement the Score Commands
Currently, Alfred’s score commands all inherit from a single ScoreCommand abstract class rather than each command class inheriting directly from the command class. This was done in order to provide a concrete base for the score commands, but more importantly also to make better use of polymorphism within our codebase. This use of polymorphism allows the Alfred codebase to avoid several code repetitions, for example by facilitating the use of a single parser class to parse the score commands as it can then simply return a ScoreCommand object regardless of which specific score command is called. Thanks to this, we avoid having to make a parser for every single score command.
Aspect: How to implement score sub (Subtract Score Command)
While traditionally a subtract command would be implemented using an add command only with negated values, this is not quite possible in Alfred’s case. Within Alfred Score objects have a strict restriction that they cannot be created with negative values as a team’s score can never be negative. This restriction cannot be relaxed as it ensures that any data being imported into Alfred does not violate this property either. Due to this the score sub command could be implemented by reusing the AddScoreCommand and hence why it has its own command class SubtractScoreCommand.
Aspect: Implementation of score reset command
-
Alternative 1: Create a
ResetScoreCommandclass-
Pros: Lowers confusion as all the relevant code is in its own class rather than mixed with other code.
-
Cons: Leads to duplication of code as the command is very similar to the
score setcommand, making it poor software engineering practice.
-
-
Alternative 2 (Current Choice): Reuse the
SetScoreCommandclass-
Pros: Better use of abstraction and reduces the amount of duplicate code written.
-
Cons: Overcrowds a single class as feedback messages and other properties of the
score resetcommand also need to be written within it.
-
Upon close inspection it was observed that the removal of duplicate code would far outweigh the convenience and orderliness of having a separate class for the command, especially considering that a ResetScoreCommand would have far more duplicate code than unique code as compared to the SetScoreCommand. Bearing this in mind, we ultimately decided to choose "Alternative 2" as it would allow for better reuse of existing code and follow better software engineering practices.
4.10. Leaderboard and Get Top Teams
The leaderboard and getTop K commands are two very important features of Alfred as they allow the user to automatically sort the teams by their scores, fetch any number of top teams in the competition and identify and break ties between teams conveniently. The execution of either of these commands displays the resultant teams on the UI in their correct sorted order. The following subsections explore the implementation of each of these commands and provide an insight into the design consideration made when developing them.
4.10.1. Implementation Overview
The implementation of these two commands is very similar in nature. They both:
-
rely on updating a
SortedListof teams present within theModelManagerclass, which will be referred to assortedTeamListin subsequent sections. This list is used to display the command’s results on the UI. -
use an ArrayList of
Comparator<Team>objects to contain additional comparators. These are used to break ties between teams on a basis other than score. -
use a
SubjectNameobject to filter the leaderboard or top teams by a certain category, if specified by the user.
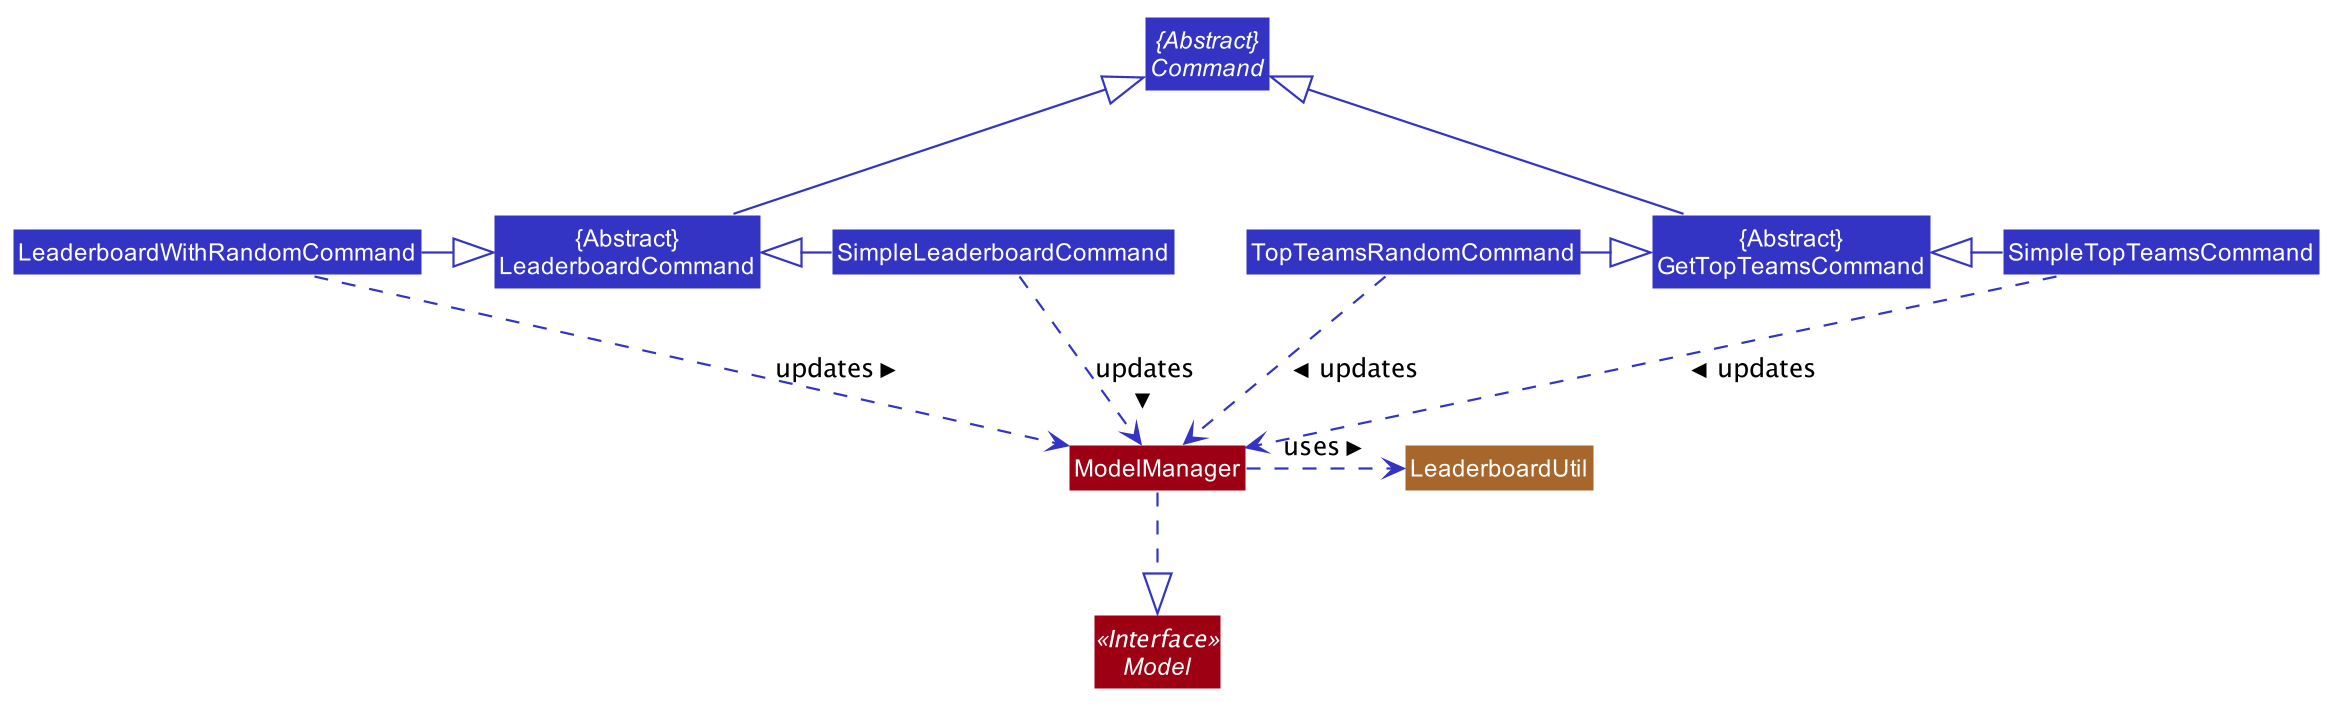
The class diagram below provides a high level representation of the Object-Oriented solution devised to implement the leaderboard and getTop K commands.
From the above class diagram, there are two important matters to note regarding the implementation of these features:
-
1. The
LeaderboardCommandandGetTopTeamsCommandare implemented as abstract classes which extend theCommandabstract class. Any command to do with leaderboards or getting the top teams extends either one of these abstract classes depending on which command it is. -
2. The
ModelManagerclass uses another classLeaderboardUtilwhich provides utility methods for the Leaderboard and Get Top Teams commands, such as fetching an appropriate number of teams for thegetTop Kcommand and breaking ties between teams for both commands.
With the class structure covered, the following sub-sections explain how the different classes in Alfred interact to produce a result for the user, and finally the design considerations that were made for each command.
4.10.2. Leaderboard Command Implementation
The leaderboard command fetches a leaderboard consisting of all the teams registered for the hackathon, in descending order of their score. Moreover, if the user specifies a SubjectName then the leaderboard will only consist of teams with that particular subject.
Additionally, if tiebreak methods are specified, ties between the teams will be broken in one of two ways (or a combination of both):
-
Comparison-based tiebreakers: wherein the user picks certain tiebreak methods which rely on comparing certain properties of teams, such as the number of participants they have.
-
Non-Comparison-based tiebreakers: wherein the user breaks ties on non-comparison based methods (currently only the "random" method) in addition to any Comparison-based tiebreakers.
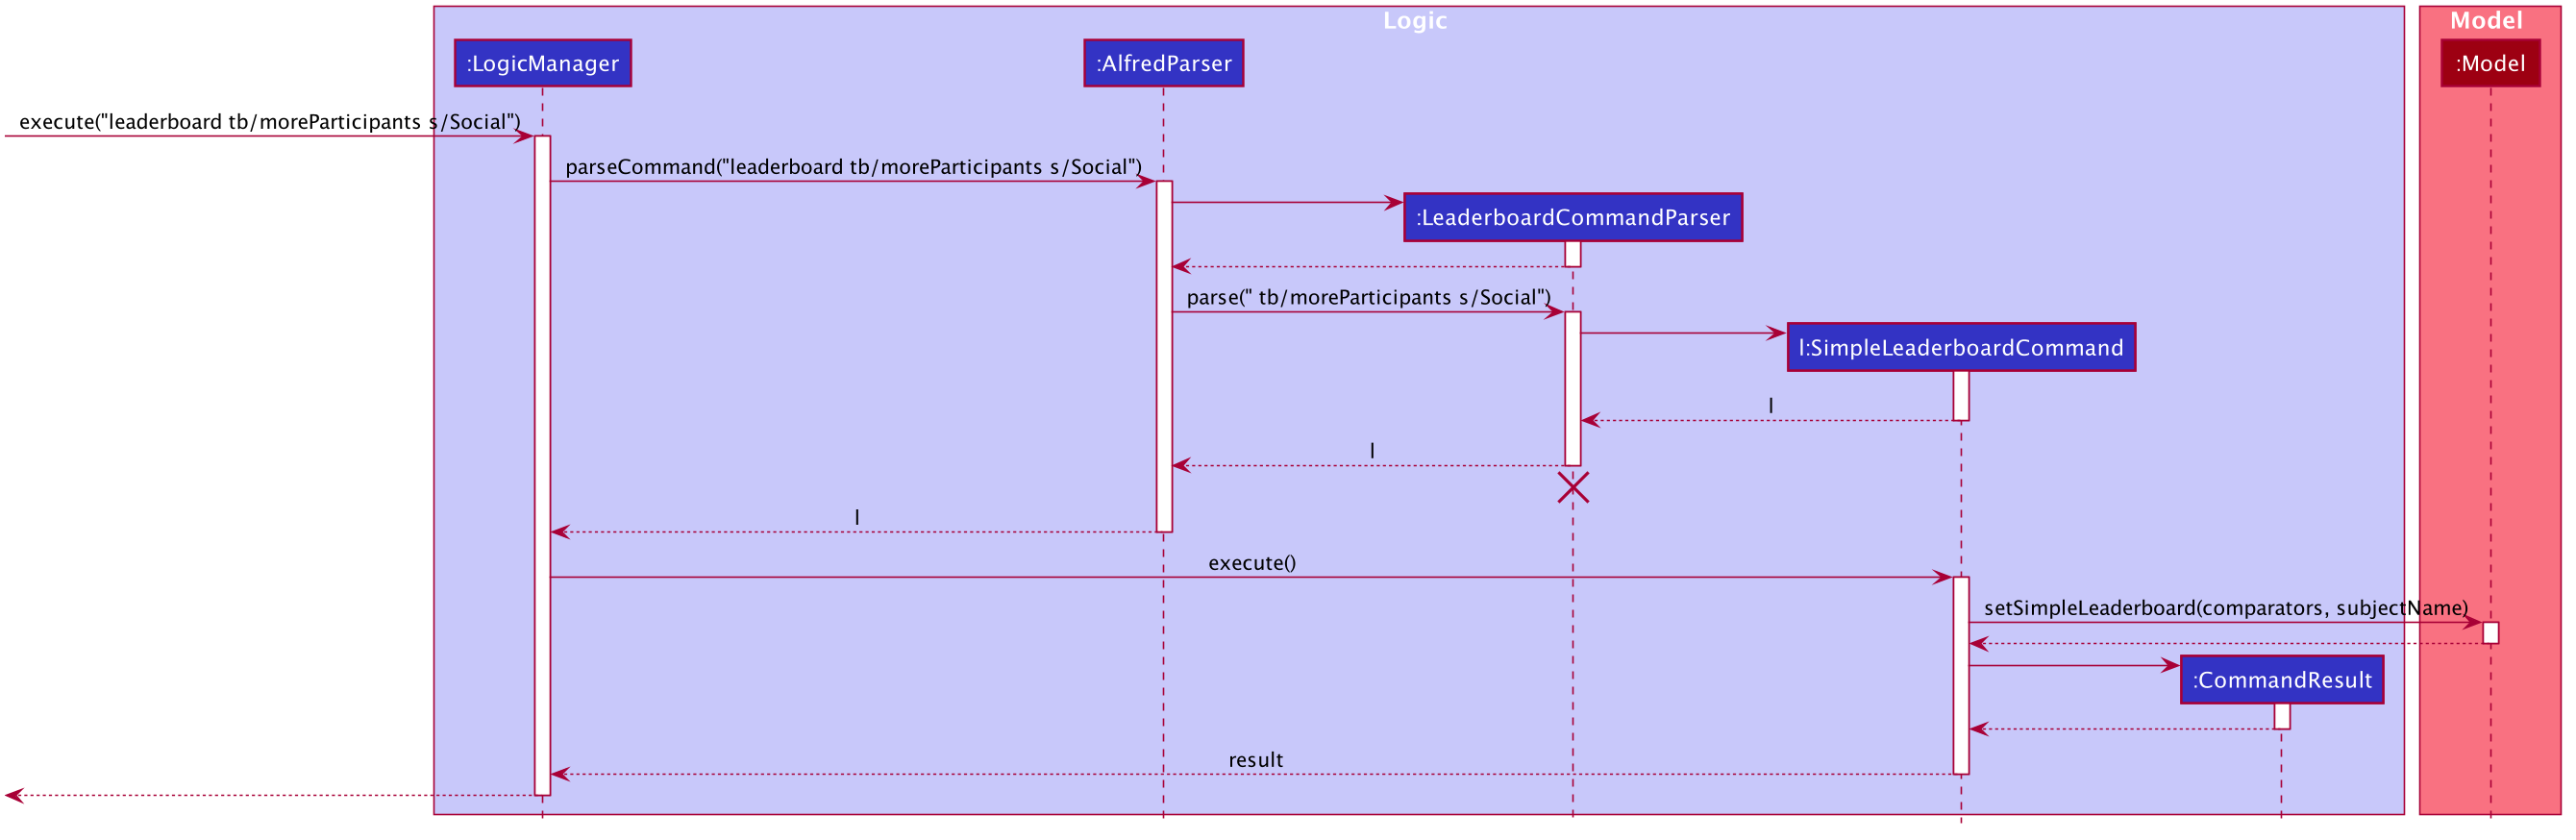
Given below is the sequence diagram illustrating the flow of events which generates a result for the user when he types the command leaderboard tb/moreParticipants s/Social. For your reference, here the prefix "tb/" is used to precede a tie-break method, "moreParticipants" is a tie-break method which gives a higher position to teams with more participants, and "Social" is a SubjectName within Alfred. Essentially this demonstrates the flow for a "Comparison-based tiebreak".
The observations of the above diagram can be put into the following steps:
-
Step 1:
LogicManagerstarts executing the user’s command and calls theAlfredParserto parse it. -
Step 2:
AlfredParserfind the appropriateParserto parse the command and creates a newLeaderboardCommandParserto parse the arguments of the leaderboard command, essentially "tb/moreParticipants s/Social". -
Step 3: The
LeaderboardCommandParserthen parses the arguments and is responsible for:-
Checking whether the user has specified a subject. If so it sets the value of a local variable "subjectName" of type "SubjectName" to the appropriate subject, otherwise it stays as null.
-
Checking whether any tiebreak methods are present.
-
Parsing the tie-break part of the command, particularly "tb/moreParticipants". Based on this input, it creates a new
ArrayList<Comparator<Team>>object and appends the appropriate comparators to it based on the specified tiebreak methods.
-
-
Step 4:
LeaderboardCommandParserthen creates a newSimpleLeaderboardCommandobject with the above list of comparators and subject as input parameters. This is then returned all the way toLogicManager -
Step 5:
LogicManagerthen executes theSimpleLeaderboardCommandobject upon which theSimpleLeaderboardCommandobject callsModel'ssetSimpleLeaderboard(comparators, subjectName)where comparators is the ArrayList of comparators and subjectName is theSubjectNameused to create theSimpleLeaderboardCommand. -
Step 6:
Model'ssetSimpleLeaderboard(comparators, subjectName)method updates thesortedTeamListwithinModelitself, by applying the comparators to it and filtering the list by the subjectName specfied. -
Step 7: Upon doing so, the
SimpleLeaderboardCommandobject creates a newCommandResultobject which is returned to the UI component (not shown in the diagram) to display a feedback message to the user and signals the UI to display the teams from thesortedTeamList.
This flow of events, albeit a few differences, is the same for every variation of the leaderboard and getTop K commands explored subsequently.
Do note that if the user’s input did not specify any tie-break methods, hence just being leaderboard s/Social then the SimpleLeaderboardCommand object would be created with an empty ArrayList of comparators. If the user’s input did not specify any subject, hence just being leaderboard, then the SimpleLeaderboardCommand object would be created with the SubjectName variable "subjectName" being null, in which case no filtering of sortedTeamList takes place. The flow of events for this particular scenario would be unchanged from the above illustration.
The leaderboard command with the tiebreak method random follows a slightly different sequence. Given below is the sequence diagram illustrating the flow of events when the user types the command "leaderboard tb/moreParticipants random". For your reference, here the prefix "tb/" is used to denote a tie-break method and "moreParticipants" is a tie-break method which gives a higher position to teams with more participants, and "random" is another non-comparison based tie-break method.
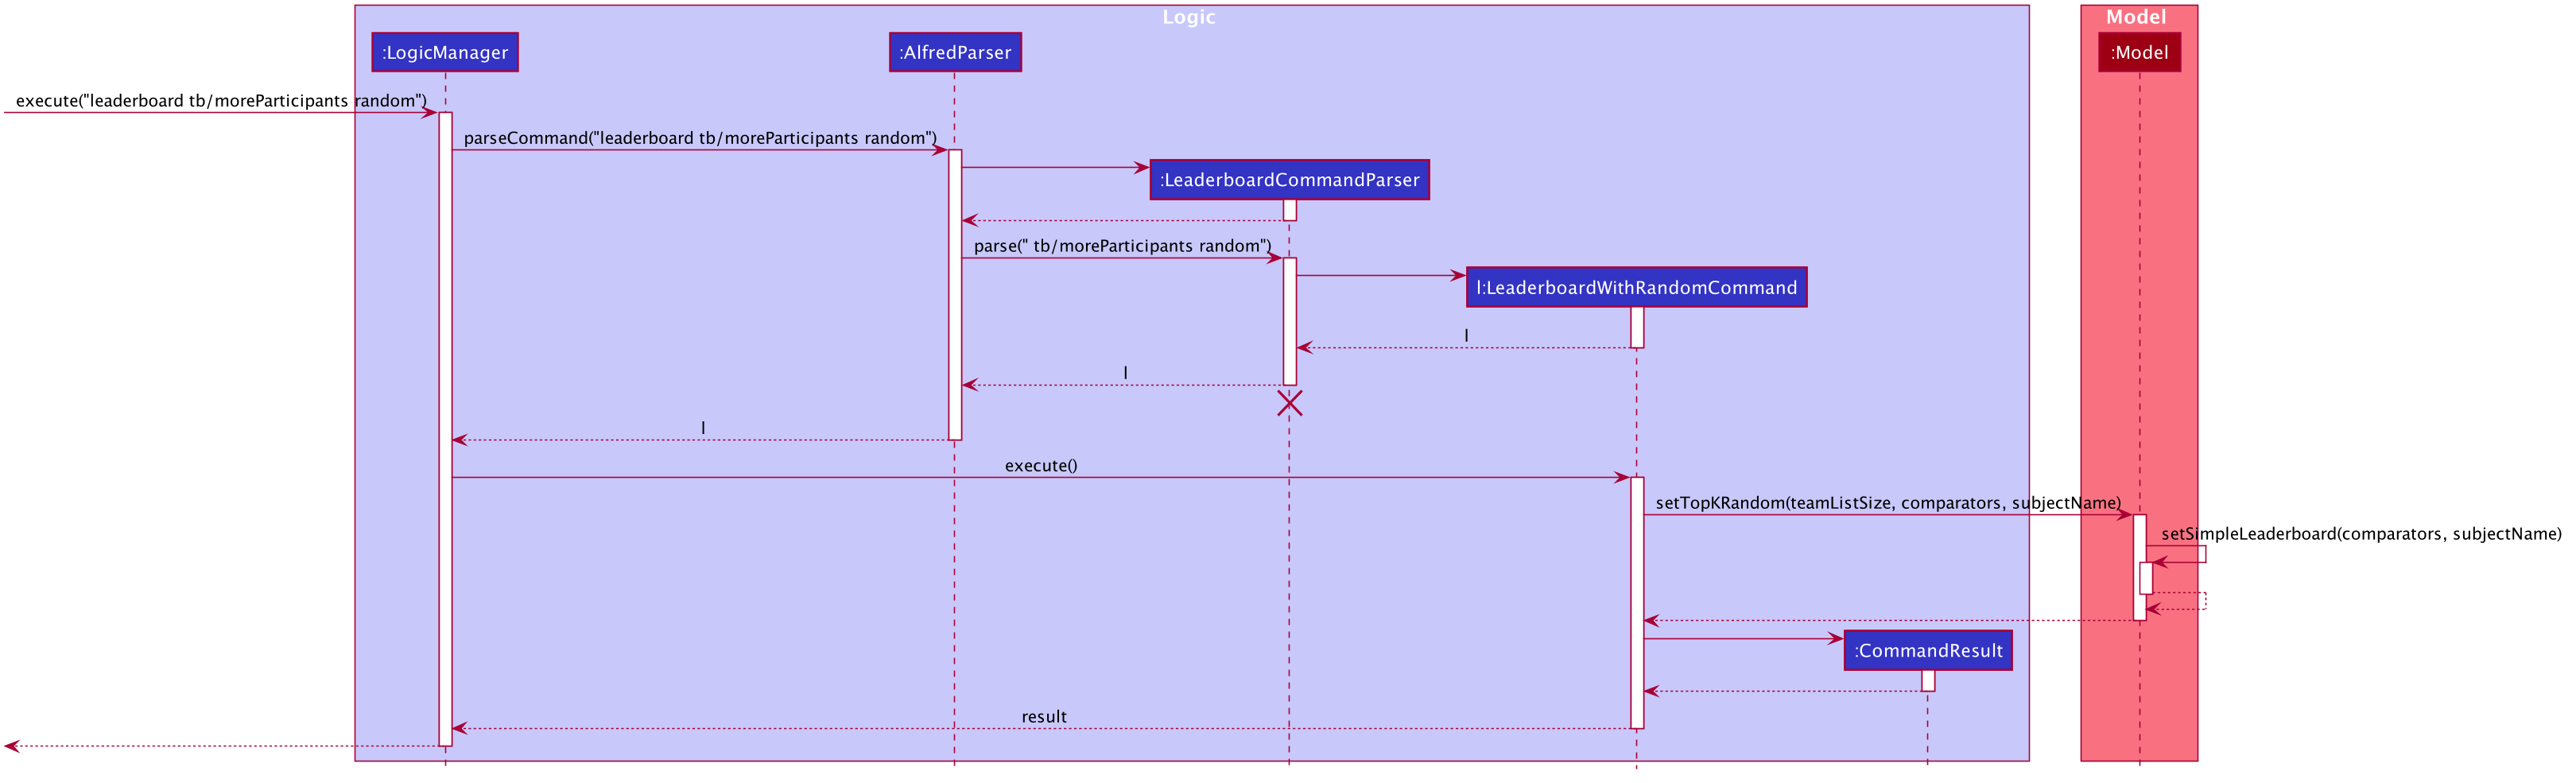
The above sequence follows the exact same logic as that for the Simple Leaderboard as explained above.
However, in this case the LeaderboardWithRandomCommand class calls the setTopK(teamListSize, comparators, subjectName) method of Model which essentially filters out the teams with subject "subjectName", breaks any remaining ties after applying the tie-break methods between teams on a random basis, and fetches a number of teams equal to teamListSize which is the size of the sortedTeamList, thereby reflecting the total number of teams in the hackathon.
Secondly, Model calls its own method setSimpleLeaderboard(comparators, subjectName) which was used for the leaderboard command without random tiebreak. This method abstracts the process of clearing sortedTeamList of any sorting, filters it by SubjectName if required, and then applies the new comparators to it. It is used to fetch and appropriately sort the appropriate teams in sortedTeamList before the algorithm for random winners can be applied to the sortedTeamList.
4.10.3. Design Considerations
There were several questions we asked ourselves over the course of developing the leaderboard feature. The following contains certain aspects we had to consider during the development stage and details how and why we decided to use a certain methodologies over others.
Aspect: How to store the sorted list of participants
-
Alternative 1: Use the existing List in
ModelManagerstoring the teams.-
Pros: Easier to implement as lesser extra code involved, as most getters and setters have already been coded.
-
Cons: Sorting will be more complicated and potentially slower with large number of teams as the other lists are
FilteredListobjects, whose API doesn’t allow direct sorting. -
Cons: An existing List is likely to be used by other commands to display data on the UI, so with any sorting will have to undone each time after use; a process which is prone to careless errors.
-
-
Alternative 2 (Current Choice): Use a new
SortedListobject from the JavaFX Library-
Pros: Easy and quick to sort contents with the
SortedListAPI. -
Pros: A new list means the sorting will not interfere with any other feature’s operations, such as the
listcommand which uses the existingfilteredTeamListholding all the teams. -
Cons: Another List to handle in
ModelManagerwhich increases the amount of code.
-
Due to the overwhelming benefits and conveniences that a new SortedList of teams would bring in the development of Alfred’s leaderboard and getTop K commands, particularly with the convenience of sorting it allows through its API, we decided to rely on "Alternative 2" with regards to this dilemma.
Aspect: Designing Leaderboard’s Command Classes
-
Alternative 1: Use a single
LeaderboardCommandclass-
Pros: Lesser duplicate code as both ("random" and "non-random") tiebreak methods can be handled within a single class.
-
Cons: Introduces control coupling as the
LeaderboardCommandParserwill have to send a flag toLeaderboardCommandto indicate whether "random" should be applied or not as a means of tie-break.
-
-
Alternative 2 (Current Choice): Use an Abstract
LeaderboardCommandclass inheriting fromCommandwhich anyleaderboardrelated commands will themselves extend.-
Pros: Single Responsibility Principle will be better respected as any change in logic for one type of
leaderboardcommand will only affect its respective class. Secondly, no longer a need for a flag as the parser can directly call the appropriate command class. -
Cons: Introduces slight duplication in code as each class will contain a similar segments of code for checking the status of the teams in
Model.
-
We decided to follow "Alternative 2". Firstly, if a single class were being used, it would be difficult to distinguish which type of leaderboard command should be called - whether a leaderboard with or without "random" as tiebreak should be used. This would require the LeaderboardCommandParser to pass a flag signalling whether the "random" version should be called or not, which introduces control coupling. Although with a single distinct method (ie "random") this seems manageable, as the scale of Alfred increases with more non-comparison based methods such as "random" being introduced, passing a flag from LeaderboardCommandParser to the Leaderboard command class would become less and less manageable. Secondly, we wanted to avoid coupling the Parser and Command classes in a way which Parser influences the behaviour of the Command as it introduces leeway for errors.
Aspect: Where to Write Algorithms used by leaderboard (and getTop K) Command
-
Alternative 1: Write the methods as private within
ModelManageritself-
Pros: Relevant code is in close proximity to where it is being called allowing for easy reference of what is being done and quick rectification if needed.
-
Cons: Would harm Single Responsibility Principle as
ModelManagerwould need to be changed in case there is change in required to the Leaderboard Algorithms, whereas it should only be changed if there is a change required toModel
-
-
Alternative 2 (Current Choice): Create a new
LeaderboardUtilclass-
Pros: Maintains single responsibility principle and ensures greater abstraction as complicated algorithms are simply handled by another class altogether.
-
Cons: Increases the amount of coding and documentation required. Additionally, it brings about the inconvenience of having to shift between classes to view the available methods and their implementations.
-
"Alternative 2" was eventually selected as it follows better Object-Oriented Programming practices. By abstracting away the methods used to sort and tie-break teams and keeping them in another class, the overall readability of the code is enhanced and would be easier for any future programmers working on this project to understand and work on.
4.10.4. Get Top Teams Implementation
The getTop K command fetches the top "K" number teams sorted in descending order of their points, where K is a positive integer inputted by the user. The getTop K command follows a similar pattern as the leaderboard command in the sense that ties between teams are broken in one of two ways (or a combination of both):
-
Comparison-based tiebreakers: wherein the user picks certain tiebreak methods which rely on comparing certain properties of teams, such as the number of participants they have.
-
Non-Comparison-based tiebreakers: wherein the user breaks ties on non-comparison based methods (currently only the "random" method) in addition to any Comparison-based tiebreakers.
Given below is the sequence diagram illustrating the flow of events which generates a result for the user when he types the command "getTop 3 tb/moreParticipants". For your reference, here the prefix "tb/" is used to denote a tie-break method and "moreParticipants" is a tie-break method which gives a higher position to teams with more participants. This essentially reflects a tie being broken by comparison-based tiebreakers.
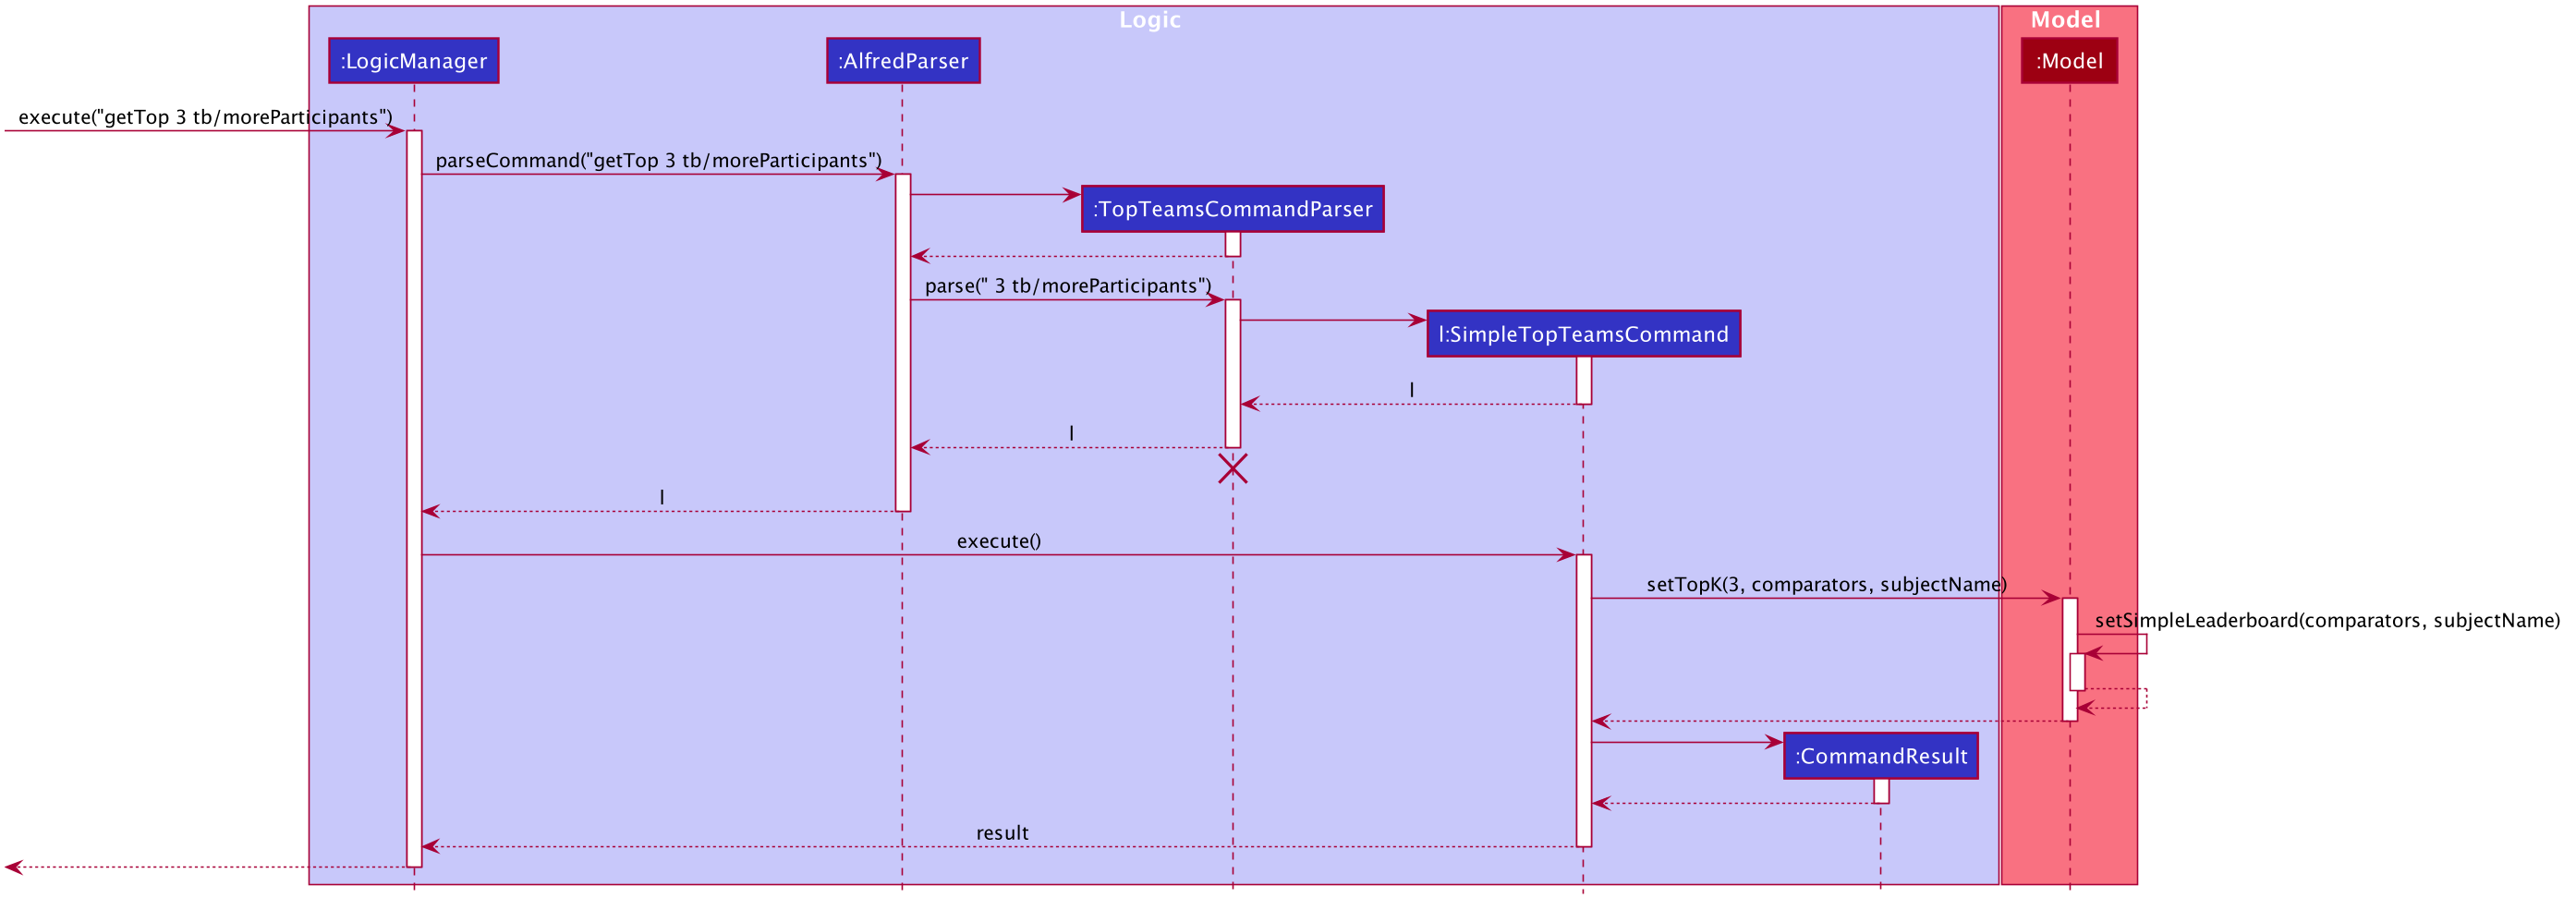
The above diagram follows a logic very similar to the leaderboard command’s logic, and can be broken down into the following steps
-
Step 1:
LogicManagerstarts executing the user’s command and calls theAlfredParserto parse it. -
Step 2:
AlfredParserfind the appropriateParserto parse the command and creates a newTopTeamCommandParserto parse the arguments of the leaderboard command, essentially "tb/moreParticipants". -
Step 3: The
LeaderboardCommandParserthen parses the arguments and is responsible for:-
Checking whether the value of "K" (3 in this case) the user inputted is valid.
-
Checking whether the user has specified a subject. If so it sets the value of a local variable "subjectName" of type "SubjectName" to the appropriate subject, otherwise it stays as null.
-
Checking whether any tiebreak methods are present.
-
Parsing the tie-break part of the command, particularly "tb/moreParticipants". Based on this input, it creates a new
ArrayList<Comparator<Team>>object and appends the appropriate comparators to it based on the specified tiebreak methods.
-
-
Step 4:
TopTeamCommandParserthen creates a newSimpleTopTeamsCommandobject with the above value of "K", list of comparators and subject as input parameters. This is then returned all the way toLogicManager -
Step 5:
LogicManagerthen executes theSimpleTopTeamsCommandobject upon which theSimpleTopTeamsCommandobject callsModel'ssetTopK(3, comparators, subjectName)where comparators is the ArrayList of comparators and subjectName is theSubjectNameused to create theSimpleLeaderboardCommandand 3 is the value of "K" the user supplied. -
Step 6:
Model'ssetSimpleLeaderboard(comparators, subjectName)method updates thesortedTeamListwithinModelitself, by applying the comparators to it and filtering the list by the subjectName specfied. Once this is done, the algorithm to get the top teams is applied thesortedTeamListcontains the final list of teams. -
Step 7: Upon doing so, the
SimpleLeaderboardCommandobject creates a newCommandResultobject which is returned to the UI component (not shown in the diagram) to display a feedback message to the user and signals the UI to display the teams from thesortedTeamList.
It is noteworthy that Model calls its own method setSimpleLeaderboard(comparators) which was associated with the leaderboard command. This is however a simple reuse of code to set the reset Model 's sortedTeamList, filter it by the subject if needed and apply the relevant comparators to it, before the algorithm for fetching the top three (or any number) teams can be applied.
When it comes to the getTop K command being used with the "random" method of tiebreak, the flow of events is resembles the above very closely. Given below is the sequence diagram illustrating the flow of events which generates a result for the user when he types the command "getTop 3 tb/moreParticipants random". For your reference, here the prefix "tb/" is used to denote a tie-break method and "moreParticipants" is a tie-break method which gives a higher position to teams with more participants whereas "random" represents the "random" method of tiebreak.
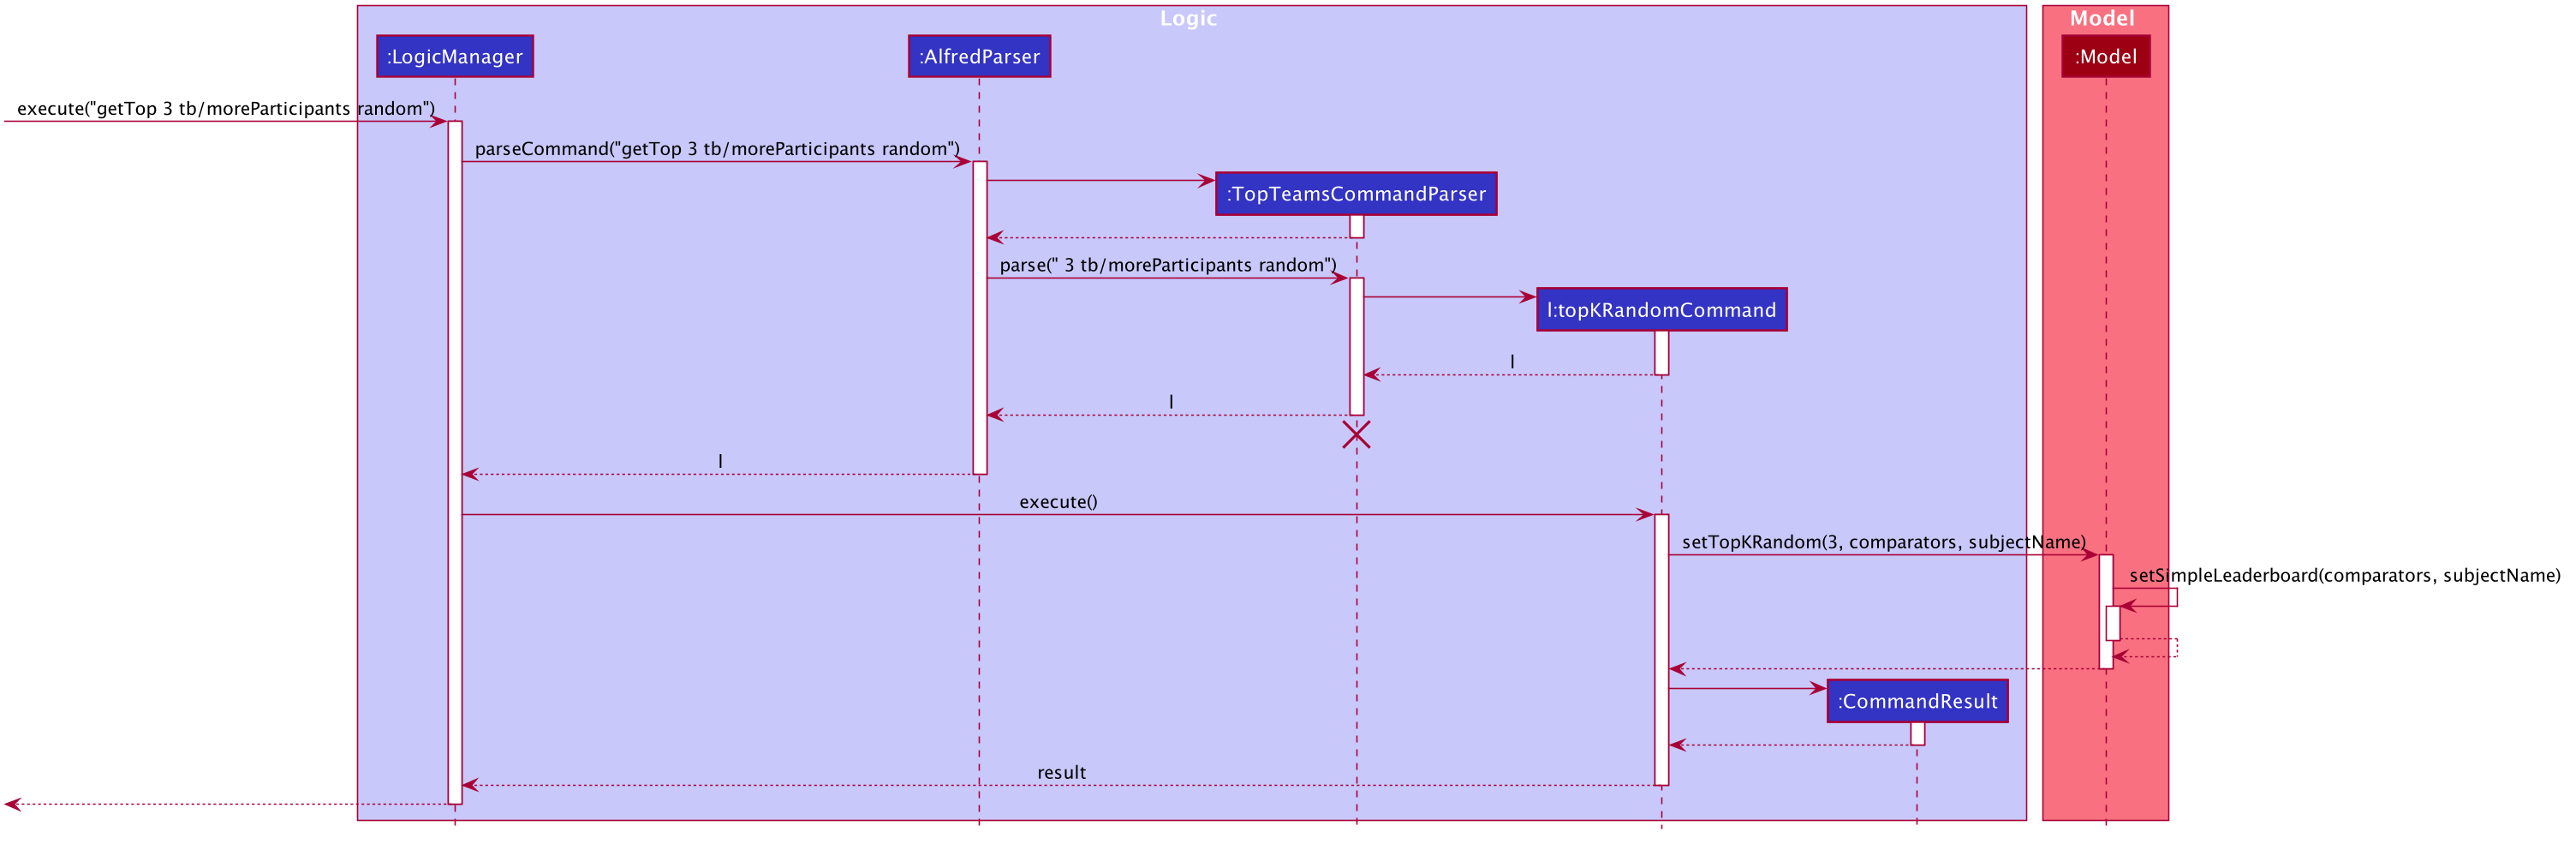
From the above diagram it can be inferred that the implementation of random winners does not deviate far from the implementation without random winners.
The first difference is that the TopTeamsCommandParser object now returns a topKRandomCommand object. Secondly, the topKRandomCommand object calls the setTopKRandom(3, comparators, subjectName) method of Model. It essentially modifies the sortedTeamList within Model to only show the top three teams (within a certain subject category if specified) as per their scores and the relevant tiebreakers as per the list of comparators comparators, and breaks any remaining ties based on the random method.
4.10.5. Design Considerations
Since the implementation of the getTop K command is almost identical to that of the leaderboard command, the design considerations made for the leaderboard command apply to the implementation of this feature as well (See Section 4.10.3, “Design Considerations”). However, there were some unique aspects we had to consider with regards to the getTop K command, all of which is detailed below.
Aspect: Where to Store the Top K Teams
-
Alternative 1 (Current Choice): Use the
SortedListinModelManagerused for theleaderboardcommand.-
Pros: Requires lesser code - a new list would involve new getters and setters and additional code in the UI component to display this list on the UI.
-
Cons: Can be cause for confusion since
leaderboardandgetTop Kcommands would be using the same list.
-
-
Alternative 2: Use a new
SortedListobject.-
Pros: Less confusion as the
leaderboardandgetTop Kcommands use distinct lists for their operations. -
Cons: Additional code and attention required to handle an additional list, which can lead to potential errors.
-
After careful consideration, "Alternative 1" was chosen as it would make fewer modification to ModelManager and the UI component, particularly with regards to adding duplicate code to handle the two different lists. Moreover, since the calls to ModelManager 's methods reset the SortedList storing the sorted teams, there is likely to be lesser confusion and room for error when handling a single list for the two different commands.
Aspect: Handling Situation when K is greater than the number of teams
-
Alternative 1 (Current Choice): Show all the teams in the hackathon
-
Pros: Avoids frustrating the user if he constantly inputs a value greater than the number of teams, especially if he wants a quick overview.
-
Cons: Could be potentially seen as a bug as users and testers may notice a disparity between the number of teams shown and the number requested for.
-
-
Alternative 2: Display an error to the user
-
Pros: May prevent some confusion in case user notices a disparity between the value he inputted and the number of teams actually shown.
-
Cons: Can be frustrating in case user wants a quick overview without having to worry about the total number of teams present.
-
We decided to prioritise user convenience in this situation and rather than displaying an error every time he inputs a value too large for K in the getTop K command, we decided to show all the teams. This aspect of the feature has been made abundantly clear in the User Guide and seeks to minimise user frustration especially since we do not want the user to worry too much about remembering how many teams have signed up.
Aspect: Implementation of Leaderboard
-
Alternative 1: Implement
leaderboardcommand withgetTop Kcommand keepingKas the size of the teamlist-
Pros: Better and greater re-usage of code present within
ModelManager. -
Cons: Introduces coupling as changes made to the
getTop Kcommand will affect theleaderboardcommand.
-
-
Alternative 2 (Current Choice): Have a separate method within
ModelManagerto handle theleaderboardcommand.-
Pros: The two commands' logic are kept separate so neither affects the other in case of changes.
-
Cons: May be seen as a duplication of code.
-
The reason "Alternative 2" was selected was because ModelManager 's setSimpleLeaderboard(ArrayList<Comparator<Team>> comparators) method resets the SortedList of teams within ModelManager and applies the relevant comparators to it to sort it as desired. Hence, it is abstracting away this process into a single method so a better re-usage of code can take place in other methods. This method is reused by ModelManager 's setTopK() method when using the getTop K command, whereas the setSimpleLeaderboard(ArrayList<Comparator<Team>> comparators) method is sufficient to sort all the teams in the desired order. So instead of calling it again within another method, the setSimpleLeaderboard(ArrayList<Comparator<Team>> comparators) method which was meant to abstract away some processes is itself used to handle the leaderboard command. So indeed in the end, "Alternative 2" does not introduce duplication of code, but rather introduces better use of abstraction.
4.10.6. Tiebreaking and Filtering by Subject
In the above sections, the UML diagrams gloss over how tiebreaking and filtering by subjects is parsed and understood by Alfred. This process is better explored in this section as per the explanations below.
The basic of tie-breaking revolves around using Comparator s to sort the teams in a particular order. Each tiebreak method available in Alfred has a Comparator associated to it and all these can be found in the Comparators class.
The basic of filtering by subject revolves around the SubjectName input parameter to the LeaderboardCommand and GetTopTeamsCommand classes. The user’s specified subject is parsed and used as an input parameter in the aforementioned classes' constructors, which they then use for filtering the sortedTeamList in Model.
The activity diagram below illustrates the internal workings within the LeaderboardCommandParser and TopTeamsCommandParser when parsing tiebreak methods and the subject. Do note that in the below diagram the term Parser encapsulates both of these Parser s as they operate in almost identical ways.
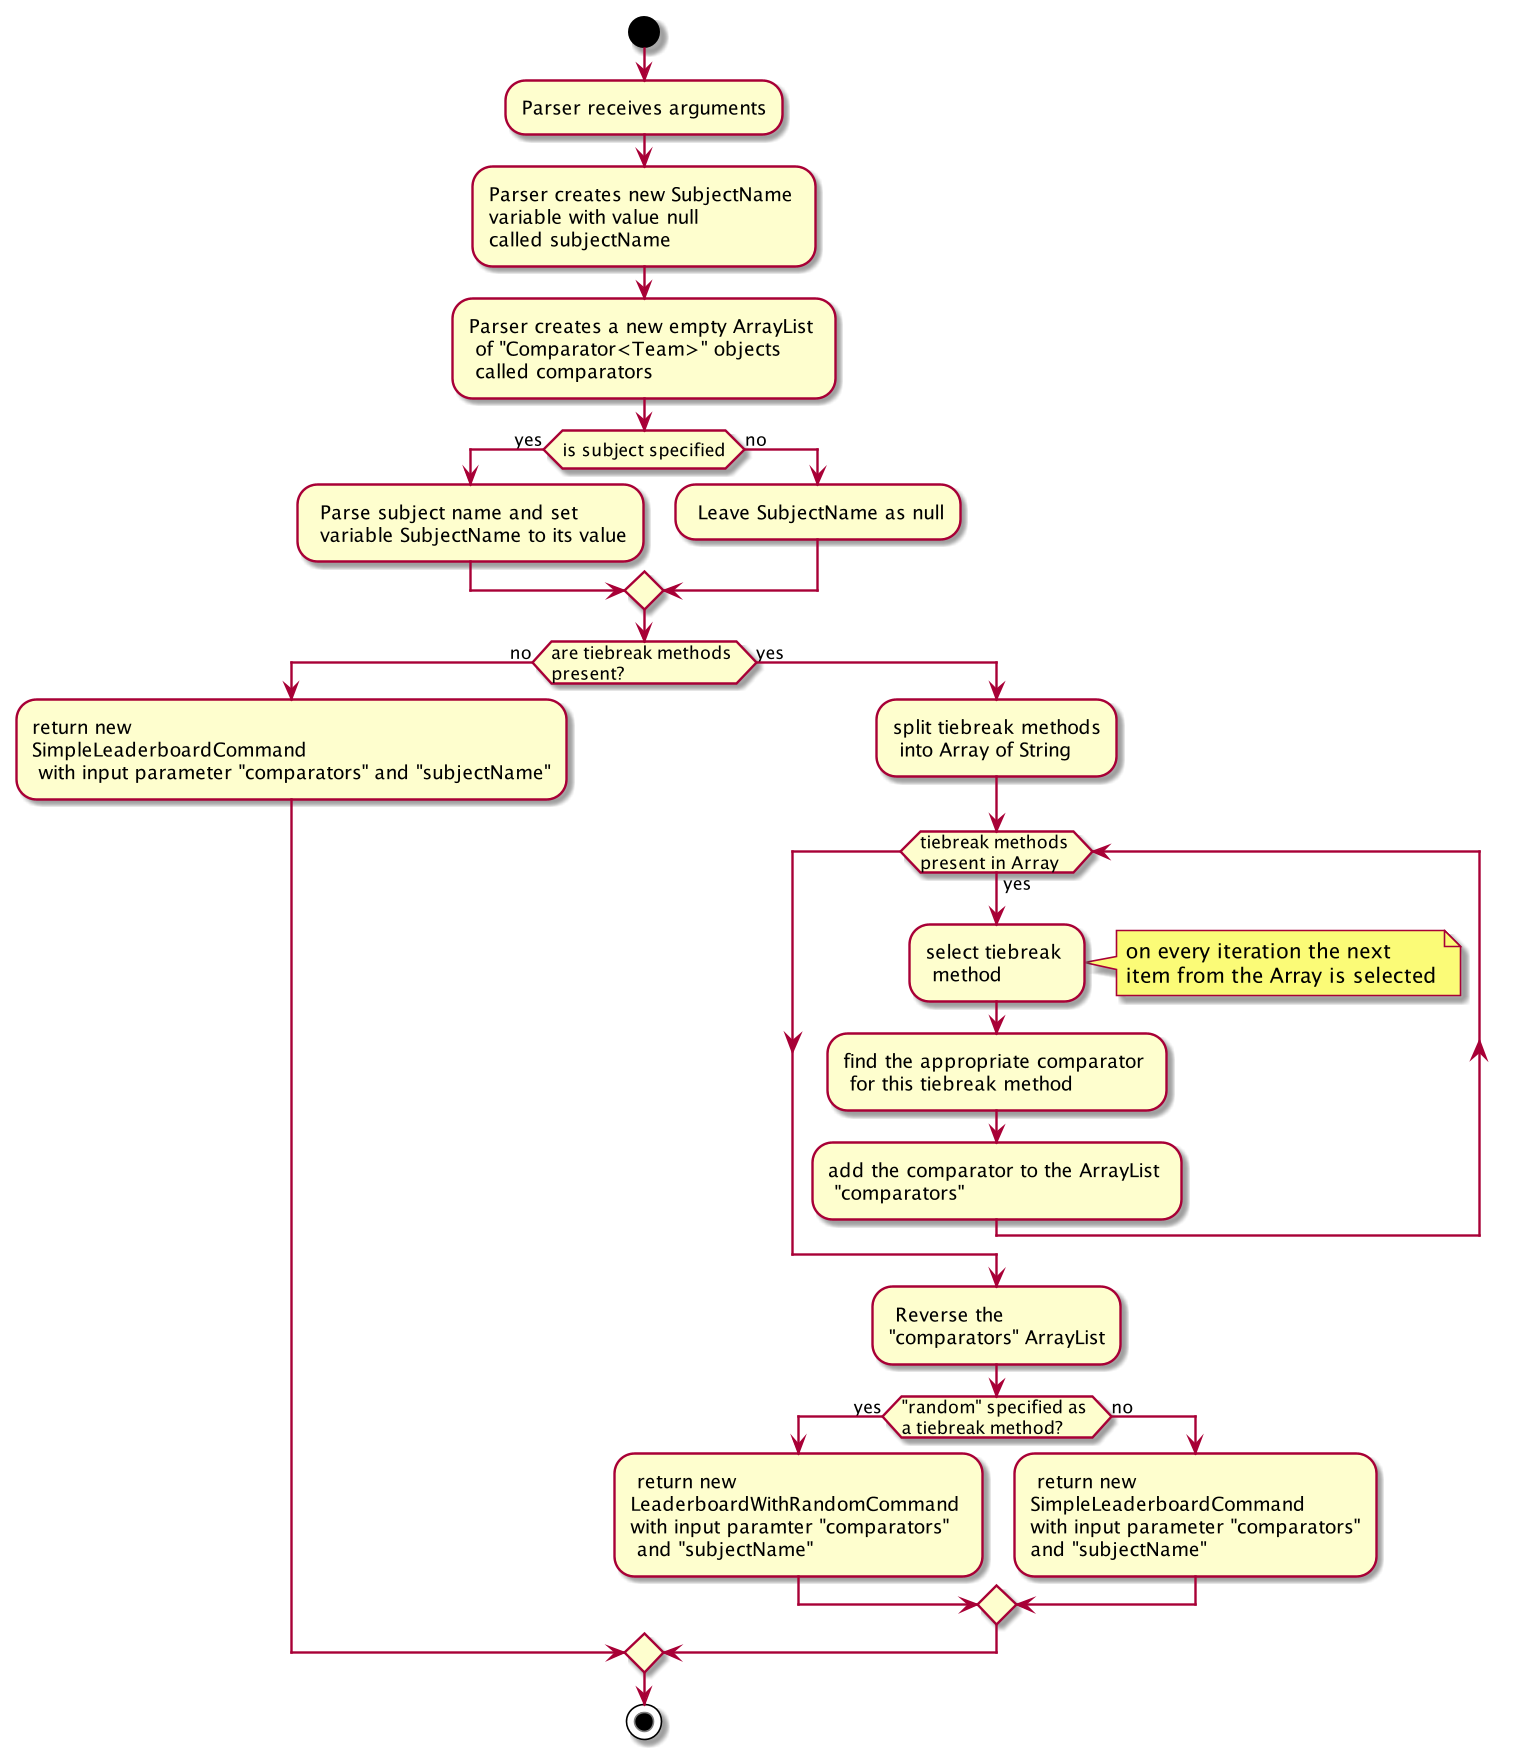
From the above there is one important aspect to note: the ArrayList of Comparator<Team> objects created in the second step. This is the ArrayList referred to in the previous sections which is tasked with containing and transferring the comparators which will be used to sort the teams in their appropriate order to form the leaderboard or top teams. This ArrayList is used as an input parameter for both leaderboard and getTop K command related classes, as explored in previous sections.
Additionally, before comparators can be passed as an argument to the commands, it is reversed. This is done intentionally so the comparators related to each tiebreak method are applied in an order such that they preserve the oder the user wants the tiebreak methods to be applied.
Secondly, if no subject is specified by the user, then the default value of the subjectName variable (of type SubjectName) is null. This signals to methods in Model (when the command is executed thereby calling Model 's methods) that no filtering of the sortedTeamList is required.
Note that the diagram above assumes there are no syntax errors made by the user when typing out the command. In case of any errors in the command, a ParseException would be thrown warning the user of such a situation. These have been excluded from the above diagram to prevent overcrowding and a deviation from the basic logic.
4.10.7. Design Considerations
Though this was a relatively straightforward subset of our leaderboard and getTop K command, there were still a few, small design considerations made.
Aspect: Signaling No Subject Filtering
-
Alternative 1: Use Java’s Optional class with the optional variable being empty.
-
Pros: Less prone to misuse which can cause exceptions.
-
Cons: Leads to unnecessary wrapping and unwrapping of the variable simply to check whether a value is present.
-
-
Alternative 2 (Current Choice): Use a variable of type
SubjectNameset to null.-
Pros: Easier to implement. No boxing and unboxing required.
-
Cons: Can lead to unexpected exceptions if not handled carefully.
-
-
Alternative 3: Use overloaded constructors for
LeaderboardCommandandGetTopTeamsCommand.-
Pros: Reduces the potential of mishandling null values which can lead to unwanted exceptions arising in the code.
-
Cons: Introduces extra logic in form of "if-else" statements to determine which constructors must be called. This would make the code slightly less readable and more complicated.
-
In the end "Alternative 2" was favoured over the other two alternatives. Although the misuse of null can lead to unwanted exceptions, it has been carefully used to ensure that at no point is null value used other than to check once whether the variable’s value is null or not. This careful implementation ensures that the variable is used selectively at only one place thereby making sure that no possibility `NullPointerException" occurs at any other part of the code. Moreover, it has been reinforced through thorough documentation of the constructors to guide future contributors. Although "Alternative 3" is a standard solution to null input parameters, in this case it would not serve its purpose too well as calling the overloaded constructor would require additional logic to check whether or not the subject is mentioned and then depending on this result which command needs to be created and returned. Java’s Optional class provides a good alternative, however it was not selected as it leads to needless wrapping and unwrapping of the variable, adding another layer of packaging and unpacking.
Aspect: Where to create comparators
-
Alternative 1: Create comparators when parsing each tiebreak method
-
Pros: Easier to implement as it does not require additional classes.
-
Cons: Can overcrowd a single method or class especially as more comparison methods are added. This is also a poor use of abstraction and would not respect Single Responsibility Principle.
-
-
Alternative 2 (Current Choice): Create a separate
Comparatorsclass where relevant comparators are created beforehand and can be invoke using static methods.-
Pros: Better use of abstraction and maintains Single Responsibility Principle as the parser class can focus on solely parsing the user commands.
-
In the end, "Alternative 2" was selected as it follows better software engineering practices by making better use of abstraction. Despite requiring slightly more code and classes, it would still be better than "Alternative 1" which breaks the Single Responsibility Principle as the parser class would have to be changed for changes in tiebreak methods in addition to changes in methods of parsing.
Aspect: How to separate tiebreak methods
-
Alternative 1: Each tiebreak method preceded by a new tiebreak prefix ("tb/")
-
Pros: Follows the paradigm followed by other commands.
-
Cons: Very tedious for the user to type and adds difficulty in parsing.
-
-
Alternative 2 (Current Choice): Each tiebreak method separated by a single whitespace
-
Pros: Easier to implement and more convenient for the user to type as well. Code-wise it is easy and quick to customize which character to separate methods on.
-
Cons: Introduces a slight variation as other commands don’t use whitespaces as separation methods which might confuse the user.
-
To better consider the user’s needs and convenience, "Alternative 2" was selected. So as to not confuse users, this implementation has been made abundantly clear in the User Guide as well. From a developer’s perspective, this implementation is also more customizable to better respond to changes in user’s preferences as the separation character can easily be changes.
4.11. Find Command
Currently, Alfred allows users to view specific entities by their ID using the view ENTITY ID.
However, it may not be convenient for users to remember the ID of specific users, especially since
ID objects are randomly generated.
To help Alfred become a viable alternative to Excel, Alfred also offers an improved find function
that has been inspired by the power of Excel Macros.
find offers a search by a single field and multiple fields. The list of fields that can be searched for
for each entity can be found in the
user guide, or by
simply typing in an incorrect find command in the application.
The find command also offers an option to do a negative search of the fields in the list. This can be
done via the EXCLUDE keyword. All the parameters that come after the keyword will undergo a negative
search. Figure 41 shows an example of this. find participant EXCLUDE n/uc will look for all participants
whose name that does not contain "uc".
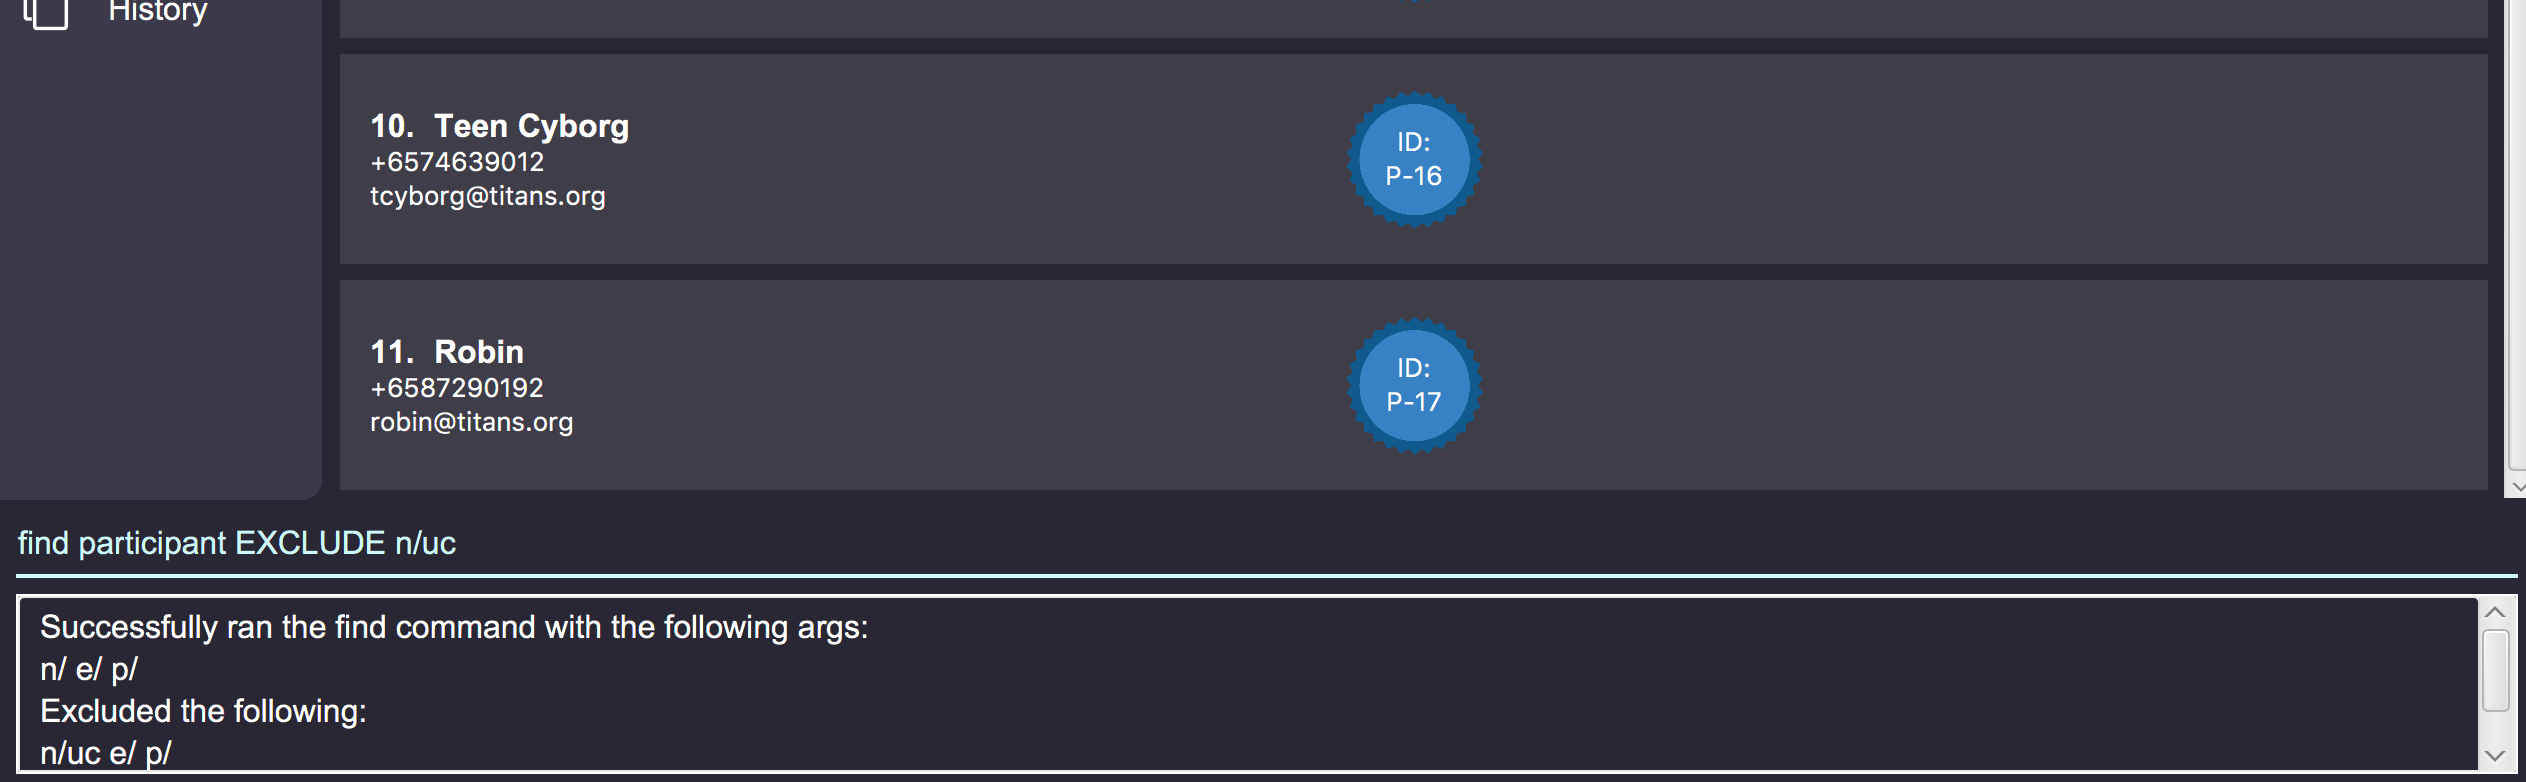
By default, Alfred does a search by intersection for the given entity. However, Alfred also allows
the user to do a search by union. This can be done by inserting an OR keyword before all the parameters.
Further examples on the usage of find can be found in the
user guide
.
4.11.1. Find Command Implementation Overview
The following sequence diagram shows the sequence of method calls used to display the filtered list
on the application, from Logic to ModelManager upon the execution of a FindParticipantCommand.
An analogous sequence diagram also applies for the Team and Mentor objects as well.

The left half of the diagram covers creation of the FindParticipantCommand while the right half
details the interaction with the Model. There are 5 main steps in the execution of the command.
-
FindCommandAllocatorallocates the correct parser for the find command based on the entity name provided. If the entity name is incorrect, then an error will be thrown and execution will terminate. This step is not represented in the sequence diagram to make it neater. -
The
FindParticipantCommandParserwill then parse the String provided to it. If the string provided is invalid and does not follow the specified format, an error will be thrown. Likewise, if the find command is called and no parameters are provided, an error will also be thrown. During the parsing, the parser splits the input string given into two separate strings, one for normal parameters and the other for parameters that will undergo negated search. Two separateArgumentMultimapobjects are generated using the two strings. TheseArgumentMultimapobjects are the same as the ones found in AddressBook3 and thus behave in a similar manner and have the same constraints. -
If there are no errors, the
FindParticipantCommandParserthen creates aFindParticipantCommandwhich in turn generates the predicate it would use to filter the relevantEntityListby. These predicates are stored as static variables in a centralPredicatesfile.FindParticipantCommandselects the predicates based on which fields are provided in the original input string. -
With these predicates, it then calls the
findParticipantmethod on the model with the generated predicate. -
A list of
Participantobjects is then returned, and is also printed onto the console for the user’s reference. Then, atFindParticipantCommand, aCommandResultis returned after the smooth execution of thisfindoperation.
The find command does not mutate the list in any way. It only changes the Entity objects displayed using
the generated predicate.
|
4.11.2. Design Considerations
The following are some design considerations for the find Command Feature
Aspect: Format of the input string
-
Alternative 1: Use a SQL style query string
-
Pros: SQL syntax is universally used to communicate with databases and is clean
-
Cons: Users may not be familiar with SQL
-
-
Alternative 2: Use the current format of
n/NAME e/EMAIL …(current)-
Pros: Maintains consistency within the application
-
Cons: It is not as clear as SQL style syntax
-
Alternative 1 would take the form
of find where name="John" and phone like "123" and not email="gmail.com". This would also have the added
benefit of better on-boarding SQL users. However,
while SQL-style syntax is relatively clean and understandable, we decided not to implement this
for the following reasons.
The first reason was that SQL queries are meant to be used for large databases with thousands of columns,
hence, the structure of the query must be clean to reduce the number of bugs made in the query. On the
other hand, each Entity in Alfred only has a small number of fields (less than 6) and thus the current
query format would still be understandable. Secondly, as mentioned above, users may not be familiar with SQL.
Hence, Alternative 2 was chosen as it would be more user friendly for users to the existing command format instead of memorizing a new format. Furthermore, implementing a new format would take more time as the new query format would have to be written and tested thoroughly, thus negatively impacting development velocity.
Aspect: Storing of the predicates
-
Alternative 1: Store the predicates in a central file (current)
-
Pros: Makes the predicates accessible to the whole application hence reducing code duplication
-
Cons: A large conditional statement would be needed in each Command class.
-
-
Alternative 2: Store the Predicates within each
FindCommandclass-
Pros: Each predicate is only used by one class, so this would have resulted in a better separation of concerns
-
Cons: A large conditional statement or hash map would still be needed to decide which predicates to use
-
Ultimately, we decided to use Alternative 1. Although most of the predicates are only used once, they are all unmodifiable functions that return a predicate in the form of a closure. Thus, the risks associated with unrestricted access and modification of an object are greatly reduced. Furthermore, predicates are also used in other parts of the codebase. Hence, it is a good idea to consolidate them in a single location. Thus, if another class in the codebase needed to implement another predicate, all it had to do would be to check this central file to see if a similar one was already written, as opposed to trawling though the entire codebase.
The large conditional statement was also not a major issue. This is because although it is large, the code within was understandable and this would have facilitated its extension, as compared to prematurely refactoring out into smaller submodules.
4.12. Logging
We are using java.util.logging package for logging. The LogsCenter class is used to manage the logging levels and logging destinations.
-
The logging level can be controlled using the
logLevelsetting in the configuration file (See Section 4.13, “Configuration”) -
The
Loggerfor a class can be obtained usingLogsCenter.getLogger(Class)which will log messages according to the specified logging level -
Currently log messages are output through:
Consoleand to a.logfile.
Logging Levels
-
SEVERE: Critical problem detected which may possibly cause the termination of the application -
WARNING: Can continue, but with caution -
INFO: Information showing the noteworthy actions by the App -
FINE: Details that is not usually noteworthy but may be useful in debugging e.g. print the actual list instead of just its size
4.13. Configuration
Certain properties of the application can be controlled (e.g user prefs file location, logging level) through the configuration file (default: config.json).
5. Documentation
Refer to the guide here.
6. Testing
Refer to the guide here.
7. Dev Ops
Refer to the guide here.
Appendix A: Product Scope
Target user profile:
-
Human Resource Admin In-Charge of School of Computing 'Hackathon' Event
-
has a need to manage a significant number of contacts
-
has a need to register participants in bulk
-
has a need to classify contacts into Mentor, Participants and Teams
-
has a need to keep track of which member is in which Team
-
has a need to keep track of the seating positions of each Team
-
has a need to keep track of Mentor assignments to Teams
-
has a need to keep track of the competition winners and prizes won
-
has a need to search for specific Mentor, Team or Participant at times
-
prefer desktop apps over other types
-
can type fast
-
prefers typing over mouse input
-
is reasonably comfortable using CLI apps
Value proposition:
-
manages different entities faster than a typical mouse/GUI driven app
-
keeps track of the relationship between Participant, Team and Mentor, such that it can be referenced at times
-
stores a significant number of entities in an organised, readable manner
Appendix B: User Stories
Priorities: High (must have) - * * *, Medium (nice to have) - * *, Low (unlikely to have) - *
| Priority | As a … | I want to … | So that I can… |
|---|---|---|---|
|
new user |
see usage instructions |
refer to instructions when I forget how to use the App |
|
Admin In-Charge |
find a Entity by name |
locate details of Entity without having to go through the entire list |
|
Admin In-Charge |
delete an Entity by name |
remove entries I no longer need |
|
Admin In-Charge |
add an Entity by name and contact information |
update the list of Entities |
|
Admin In-Charge |
updated an Entity by name and contact information |
update the specific entries |
|
Admin In-Charge |
register individuals en-masse(with provided registration information) |
avoid tedious manual registration |
|
Admin In-Charge |
keep track of winning teams and the prizes won |
ensure that the prize-giving ceremony runs smoothly |
|
Admin In-Charge |
keep track of winning teams and the prizes won |
ensure that the prize-giving ceremony runs smoothly |
|
Admin In-Charge |
make sure that I will be notified on any wrong commands that I commandType |
make sure that I do not accidentally clutter up my list of entries |
|
Admin In-Charge |
have a readable and organised User Interface |
understand the output of my commands |
|
Admin In-Charge |
keep track of participants who signed up late or after the event has filled up into a waitlist |
manage them in case available space turns up during the Event |
|
Admin In-Charge |
manually match Teams to Mentor |
know which Mentor is in charge of a team |
|
Admin In-Charge |
keep track of where each Team or Mentor is seating |
usher them to their places during the actual event |
|
Admin In-Charge |
know my sponsor’s needs and arrival time |
adequately cater to their needs and allocate manpower accordingly |
|
Admin In-Charge |
keep track of inventory of swag |
make sure they are adequately catered to all participants |
|
Admin In-Charge |
keep track of amount of food or catering |
make sure they are adequately catered to all participants |
|
Admin In-Charge |
automatically match Teams to Mentor by their expertise and project commandType of the Team |
do not need to perform the matching manually |
|
Admin In-Charge |
schedule meetings between Teams and Mentors |
lets Mentors know when to consult each Team in an organised manner |
{More to be added}
Appendix C: Use Cases
(For all use cases below, the System is the HackathonManager and the Actor is the user, unless specified otherwise)
C.1. Use case: Delete an Entity Type (Participant, Mentor, Team)
MSS
-
User requests a list of an entity commandType
-
HackathonManager shows a list of that entity commandType
-
User requests to delete a specific entity in the list by name
-
HackathonManager deletes the person
Use case ends.
Extensions
-
2a. The list is empty.
Use case ends.
-
3a. The given name is invalid.
-
3a1. HackathonManager shows an error message.
Use case resumes at step 2.
-
C.2. Use case: Find an Entity of a specific Entity Type (Participant, Mentor, Team)
MSS
-
User requests a find an Entity of a specific Entity Type.
-
HackathonManager indicates success and shows the details of the Entity.
Use case ends.
Extensions
-
1a. The Entity is not found in the list of Entities.
-
1a1. HackathonManager shows an error message.
Use case ends.
-
C.3. Use case: Create an Entity of a specific Entity Type(Participant, Mentor, Team)
MSS
-
User requests to create an Entity by specifying the Entity Type and contact information.
-
HackathonManager indicates success and shows the details of the Entity.
Use case ends.
C.4. Use case: Update an Entity of a specific Entity Type (Participant, Mentor, Team)
MSS
-
User requests a list of an entity commandType
-
HackathonManager shows a list of that entity commandType
-
User requests to update a specific entity in the list by name or index
-
HackathonManager updates the entity
Use case ends.
Extensions
-
1a. The name is not found it the list of Entities.
-
1a1. HackathonManager shows an error message.
-
1a2. User enters new name.
Steps 1a1-1a2 are repeated until the index or name is found in the list of Entities.
Use case resumes from step 4.
-
-
1b. The index is not found it the list of Entities.
-
1b1. HackathonManager shows an error message.
-
1b2. User enters new index.
Steps 1b1 - 1b2 are repeated until the index is found in the list of Entities.
Use case resumes from step 4.
-
C.5. Use case: Import external data through a CSV file
MSS
-
User writes a CSV file with Entity data.
-
User requests to import the CSV file located at user specified path into the HackathonManager.
-
HackathonManager finds and retrieves the CSV file.
-
HackathonManager adds each Entity in the CSV field.
-
HackathonManager displays original updated list of Entities.
Use case ends.
Extensions
-
2a. User does not specify the path to the CSV file.
-
2a1. HackathonManager asks the user to specify the file path.
-
2a2. User specifies the file path.
Use case resumes from step 3.
-
-
2b. User also requests that the HackathonManager create an error file.
Use case resumes from step 3.
-
3a. HackathonManager cannot find the file or the path contains illegal characters (note that illegal path characters may vary from OS to OS).
-
3a1. HackathonManager informs user of failure of execution.
Use case ends.
-
-
4a. User specified CSV file contains invalid formatting
-
4a1. HackathonManager imports the valid lines only.
-
4a2. HackathonManager informs the user which lines were invalid and why.
Use case resumes from step 5 if user did not request for an error file.
-
4a3. HackathonManager creates a CSV file with the invalid lines at user specified path.
Use case resumes from step 5.
-
C.6. Use case: Export data to an external CSV file.
MSS
-
User requests that the HackathonManager export all of its data to an external CSV file at specified path.
-
HackathonManager exports its data to the file at specified path.
-
HackathonManager indicates success.
Use case ends.
Extensions
-
1a. The user specifies which Entity Type data the HackathonManager should export.
-
1a1. HackathonManager exports all of the data of the specified Entity Type to the file at specified path.
Use case resumes from step 3.
-
-
1b. The user does not specify the path of the external file.
-
1b1. The HackathonManager exports its data to the default file path.
Use case resumes from step 3.
-
-
2a. The user specified path contains nonexistent directories and/or file.
-
2a1. HackathonManager creates user specified directories and/or file.
-
2a2. HackathonManager exports its data to the file at specified path.
Use case resumes from step 3.
-
-
2b. The user specified path contains illegal characters (Note that illegal path characters may vary from OS to OS).
-
2b1. HackathonManager notifies user of the failure of execution.
Use case ends.
-
C.7. Use case: View the Leaderboard
MSS
-
User requests to see the Hackathon Leaderboard (that is the teams sorted in descending order of their points).
-
HackathonManager sorts the teams in descending order of their points.
-
HackathonManager displays the leaderboard.
Use case ends.
Extensions
-
2a. There are no teams currently registered
-
2a1. HackathonManager informs user that there are no teams to show leaderboard.
-
2a2. Use case ends.
-
C.8. Use case: View the Leaderboard with Tiebreaks
MSS
-
User requests to see the leaderboard and specifies tiebreak methods to break any ties.
-
HackathonManager sorts the team in descending order of their points.
-
HackathonManager breaks any ties between teams depending on the methods specified by the user.
-
HackathonManager displays the leaderboard.
Use case ends.
Extensions
-
2a. There are no teams currently registered
-
2a1. HackathonManager displays an error informing the user that there are no teams to show leaderboard.
Use case ends.
-
-
3a. No tiebreak methods specified by the user.
-
3a1. Use case resumes at step 4.
-
-
3b. Invalid tiebreak method inputted by user
-
3b1. Hackathon manager displays an error informing the user that the particular tiebreak method does not exist or is not supported.
-
3b2. User inputs the command again specifying tiebreak methods again.
-
3b3. Steps 3b1-3b2 are repeated until all tiebreak methods specified are correct.
Use case resumes from step 3.
-
C.9. Use case: Find the top scoring K Teams
MSS
-
User requests to see the Top K Teams in the Hackathon based on their score (highest score first), with K being the user input.
-
HackathonManager sorts the teams in descending order of their points and fetches the top K teams.
-
HackathonManager displays the top K teams with their respective scores.
Use case ends.
Extensions
-
1a. The user input K as a negative, zero, invalid integer or non-integer value.
-
1a1. HackathonManager shows an error message.
-
1a2. User re-enters command with new user input of value K. Steps 1a1-1a2 are repeated until K is a correct value.
Use case resumes from step 2.
-
-
2a. The user inputs K as a integer more than the available number of teams.
-
2a1. HackathonManager fetches all the teams in descending order of their score.
Use case resumes at step 3.
-
-
2b. There are no teams in the hackathon.
-
2b1. HackathonManager shows an error message informing him there are no teams in the hackathon.
Use case ends.
-
C.10. Use case: Find the top scoring K Teams with TieBreaks
MSS
-
User requests to see the Top K Teams in the Hackathon based on their score (highest score first), with K being the user input and specifies tie break methods to break any ties between teams with the same score.
-
HackathonManager sorts the teams in descending order of their points .
-
HackathonManager breaks any ties based on the methods specified by the user.
-
Hackathon manager fetches the top K teams.
-
HackathonManager displays the top K teams with their respective scores.
Use case ends.
Extensions
-
1a. The user input K as a negative, zero, invalid integer or non-integer value.
-
1a1. HackathonManager shows an error message.
-
1a2. User re-enters command with new user input of value K. Steps 1a1-1a2 are repeated until K is a correct value.
Use case resumes from step 2.
-
-
2a. There are no teams in the hackathon.
-
2a1. HackathonManager shows an error message informing him there are no teams in the hackathon.
Use case ends.
-
-
3a. No tiebreak methods specified by the user.
-
3a1. Use case resumes at step 4.
-
-
3b. Invalid tiebreak method inputted by user
-
3b1. Hackathon manager displays an error informing the user that the particular tiebreak method does not exist or is not supported.
-
3b2. User inputs the command again specifying tiebreak methods again.
-
3b3. Steps 3b1-3b2 are repeated until all tiebreak methods specified are correct.
Use case resumes from step 3.
-
-
4a. The user inputs K as a integer more than the available number of teams.
-
4a1. HackathonManager fetches all the teams in descending order of their score.
Use case resumes at step 5.
-
C.11. Use case: Find the ranking of all Teams
MSS
-
User requests for the top scorers of a specific category
-
HackathonManager shows the leaderboard of the category, with respective score of each team. Use case ends.
Extensions
-
1a. The category is not found.
-
1a1. HackathonManager shows an error message.
-
1a2. User enters category. Steps 1a1-1a2 are repeated until the category is found.
Use case resumes from step 2.
-
Appendix D: Non Functional Requirements
-
Should work on any mainstream OS as long as it has Java
11or above installed. -
A user with above average typing speed for regular English text (i.e. not code, not system admin commands) should be able to accomplish most of the tasks faster using commands than using the mouse.
-
The system should not seem sluggish if it contains less than 1500 entities.
-
Project is not intended for use on mobile and only should be used on desktop.
-
The application assumes that the user is comfortable with the concept of the command line.
-
The application is meant to run offline.
-
The application is largely a personnel/HR manager, and is not expected to do anything more than that (eg hackathon finances etc).
-
The application is to be used for a single hackathon only and not for multiple hackathons.
-
The application assumes that the hackathon is a short term affair (no longer than 4 days).
-
The application assumes that this is an English medium hackathon and that no non-English names are expected.
-
The GUI should display the result of commands in an intuitive, organized manner that is readable by the laymen(as part of the organization/ affordability of the application).
Appendix E: Glossary
- Mainstream OS
-
Windows, Linux, Unix, OS-X
- Private contact detail
-
A contact detail that is not meant to be shared with others
- Logging
-
Logging uses file(s) containing information about the activity of a computer program for the developers to consult and monitor.
- Entity
-
Entities are the main objects Alfred stores. The Entities are Participant, Mentor and Team as described below.
- Participant
-
It represents a participant taking part in the hackathon
- Mentor
-
It represents a mentor available for teams to choose
- Team
-
Team is the base unit of this project. It contains references to an associated list of participants and an optional mentor.
Appendix F: Product Survey
Google Sheets
Author: Google
Pros:
-
This is extremely versatile as Google Sheets come with a list of extremely helpful macros that could help in the storage of participants.
-
The display and UI of Google Sheets is extremely intuitive and will come as second nature to anyone using the web.
-
Convenient and accessible by multiple HR personnel simultaneously.
Cons:
-
Google Sheets has no concept of objects and thus it cannot accurately depict the relationships between our different entities.
-
As above, it is hard to look for relationships between our entities, such as Team/Participant associations.
-
Google Sheets may be useful for storing information, but it does not support command line arguments.
-
Google Sheets is also unable to perform input validation as it lacks the logic to do so.
Appendix G: Instructions for Manual Testing
Given below are instructions to test the app manually.
| These instructions only provide a starting point for testers to work on; testers are expected to do more exploratory testing. |
G.1. Launch and Shutdown
-
Initial launch
-
Download the jar file and copy into an empty folder
-
Double-click the jar file
Expected: Shows the GUI with a set of sample contacts. The window size may not be optimum.
Note: If you are a OS X user, you might need to run this from your command line instead.
-
-
Saving window preferences
-
Resize the window to an optimum size. Move the window to a different location. Close the window.
-
Re-launch the app by double-clicking the jar file.
Expected: The most recent window size and location is retained.
-
{ more test cases … }
G.2. Deleting a Participant
-
Deleting a Participant while all participants are listed
-
Prerequisites: List all participants using the
list participantscommand. Multiple participants in the list. -
Test case:
delete participant P-1
Expected: Participant with id P-1. Details of the deleted contact shown in the status message. Timestamp in the status bar is updated. -
Test case:
delete participant P-101212323
Expected: No participant is deleted. Error details shown in the status message. Status bar remains the same. -
Other incorrect delete commands to try:
delete,delete x(where x is larger than the list size) {give more}
Expected: Similar to previous.
-
G.3. Saving data
-
Dealing with missing/corrupted data files
-
Prerequisites: Create a JSON with corrupted data, or any data at all
-
Test case: Start the application. Logger should kindly inform you that the storage files are corrupted and hence it defaults to using empty lists.
-